Why I Chose a Tented Split Mechanical Keyboard
Keyboards
Summary
- I chose a split keyboard because it improves ergonomics by spreading my wrists a shoulder width apart.
- The tenting aspect of this keyboard enhances comfort by changing the angle that my wrists sit at.
- The Dygma Raise offers 8 thumb keys for custom macros that I had no idea how much I’d use.
The world of mechanical keyboards is so expansive that it’s sometimes hard to choose which keyboard to use. I landed on a tented, split mechanical keyboard (with eight thumb keys), which is a pretty bold move. Here’s why I chose the Dygma Raise to run my desk setup.
Split Keyboards Are Great for Ergonomics
When I first came across my brother-in-law’s original Dygma Raise (the company is now on the Raise 2), I was a little taken aback. It was so strange. I wasn’t sure what to make of it. And, typing on it was abysmal at first. However, when he let me borrow one of his (he had two at the time), I was hooked.
It took me a few days to get used to typing with a split keyboard, but once I had the software configured properly and took the time to re-map where keys were in my head and with my muscles, it was over. I was sold on the idea of a split keyboard.
It was wild how immediate the differences were for me. Instead of having my fingers crunched together in the middle of my body, my wrists were resting at shoulder width apart. It felt… good? It was honestly something I wasn’t expecting.
I had been a full-time journalist for years at that point. I had gone through many keyboards, but all had been mechanical. I didn’t realize that there was another world out there that would allow you to type better. Ergonomic keyboards exist, sure, and I’ve even had a few in my time. But, nothing matched this split keyboard.
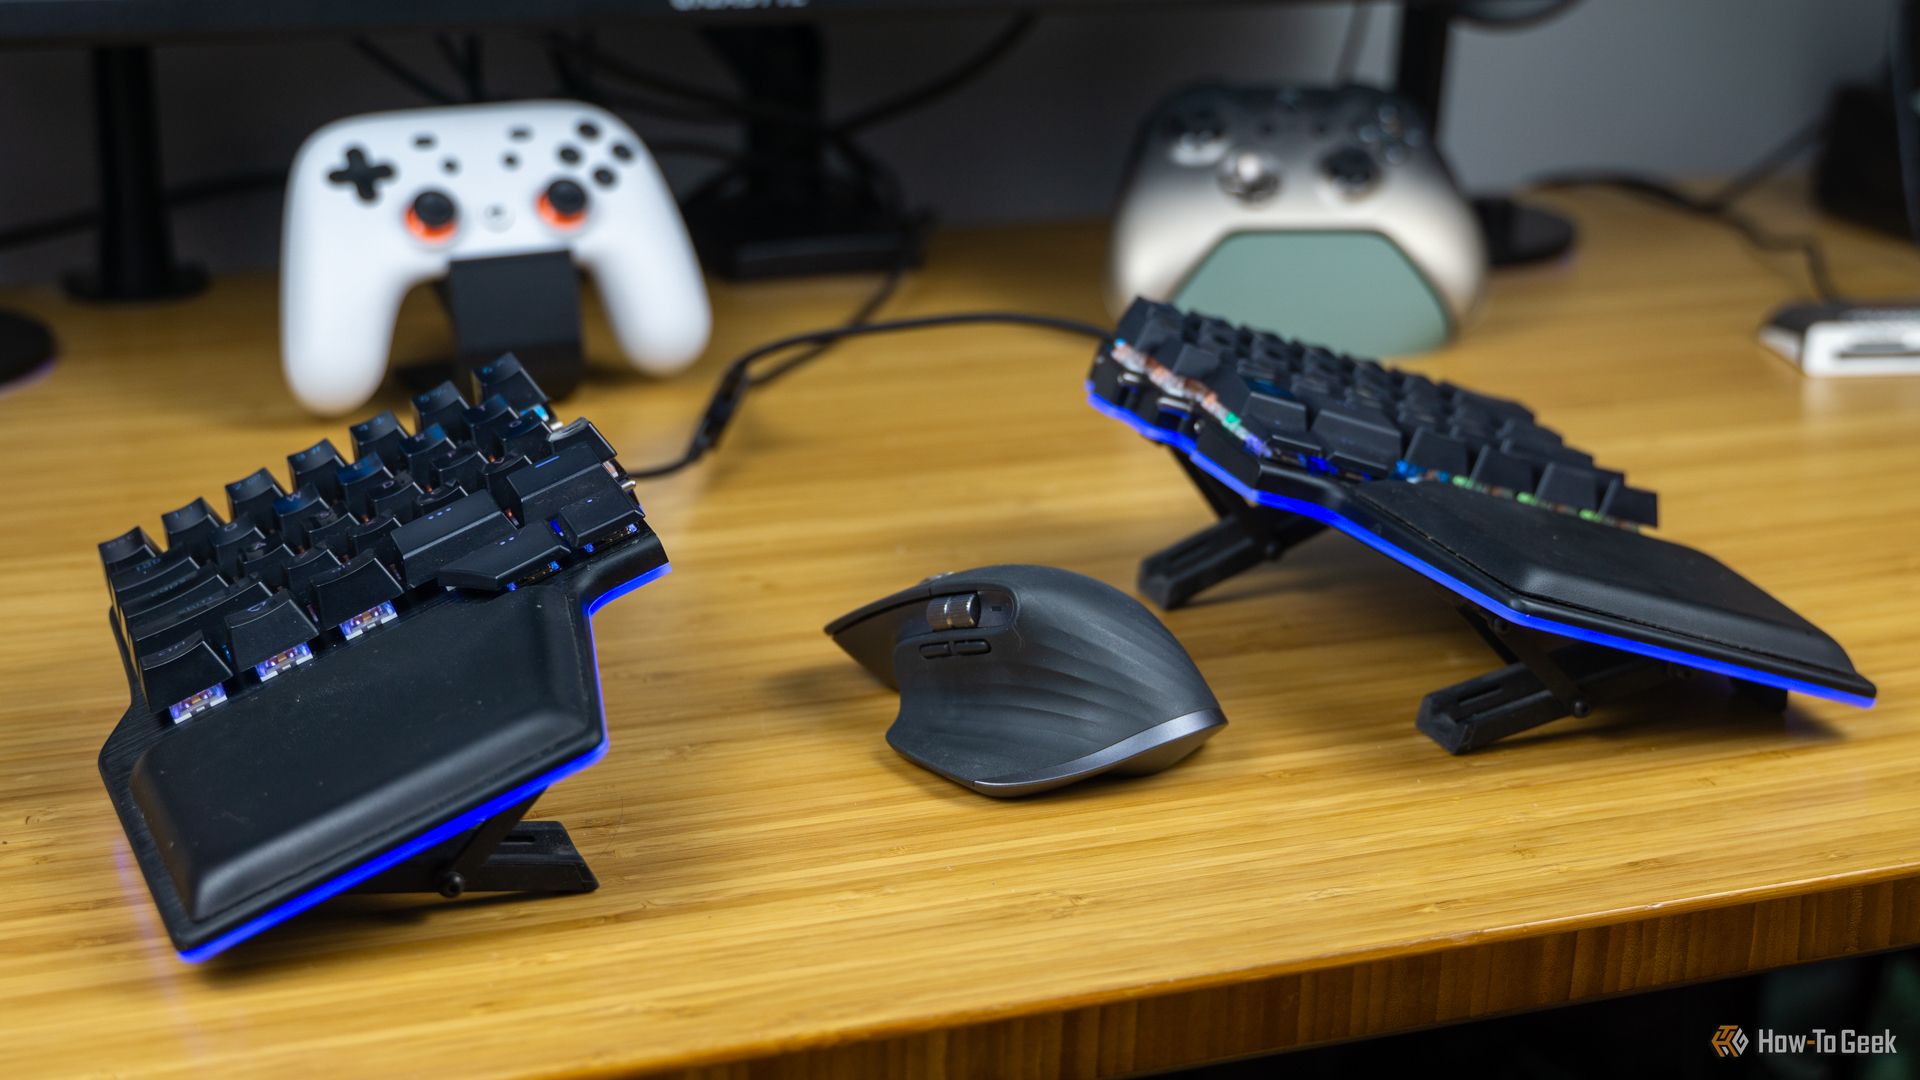
Not only did splitting the keyboard allow me to have my wrists spread apart at a more comfortable distance, but it also allowed me to park my mouse between the keyboard halves. Before you call me crazy, try it sometime (if you have a split keyboard). The ergonomics of having your mouse between the keyboard halves is so much better than having to reach over and use the mouse in a normal position.
All of this combined to completely overhaul the ergonomics at my desk, and that’s just the start of why I chose a split keyboard.
Tenting Makes Helps Ergonomically as Well
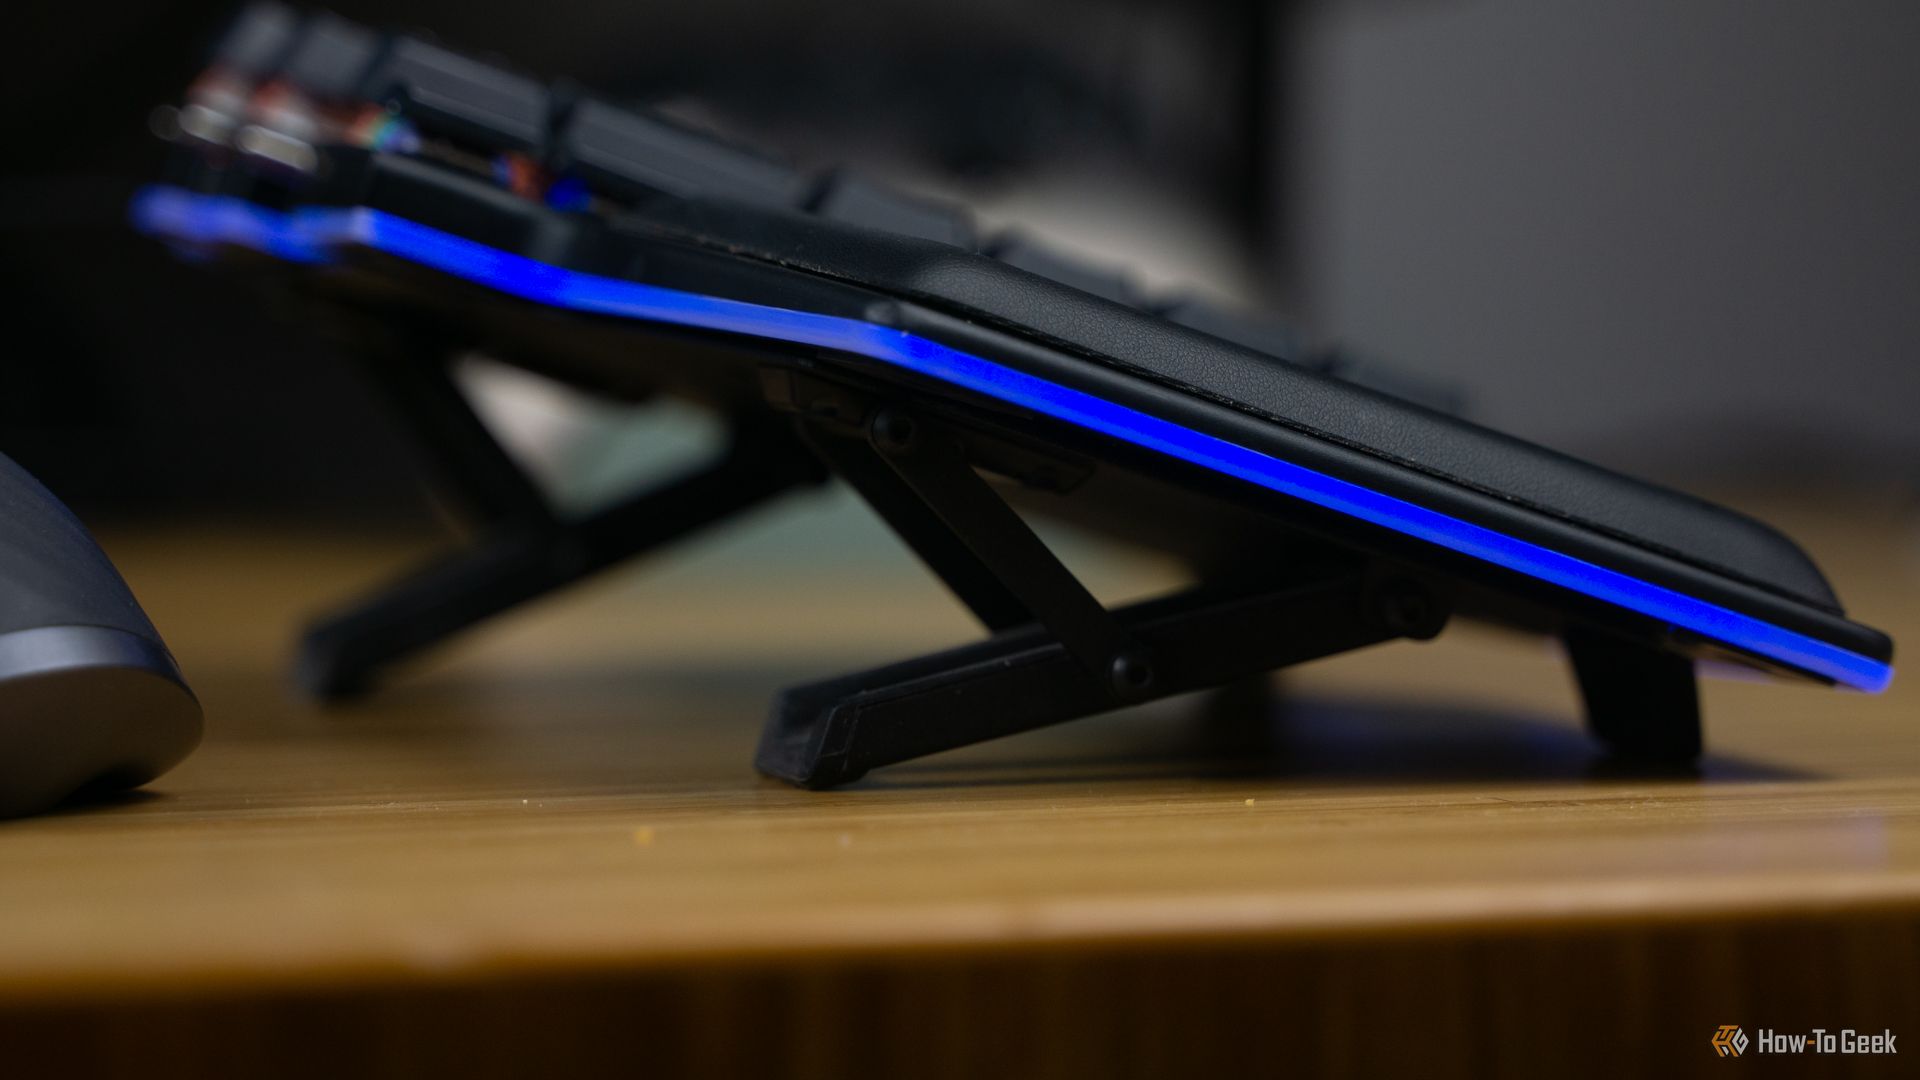
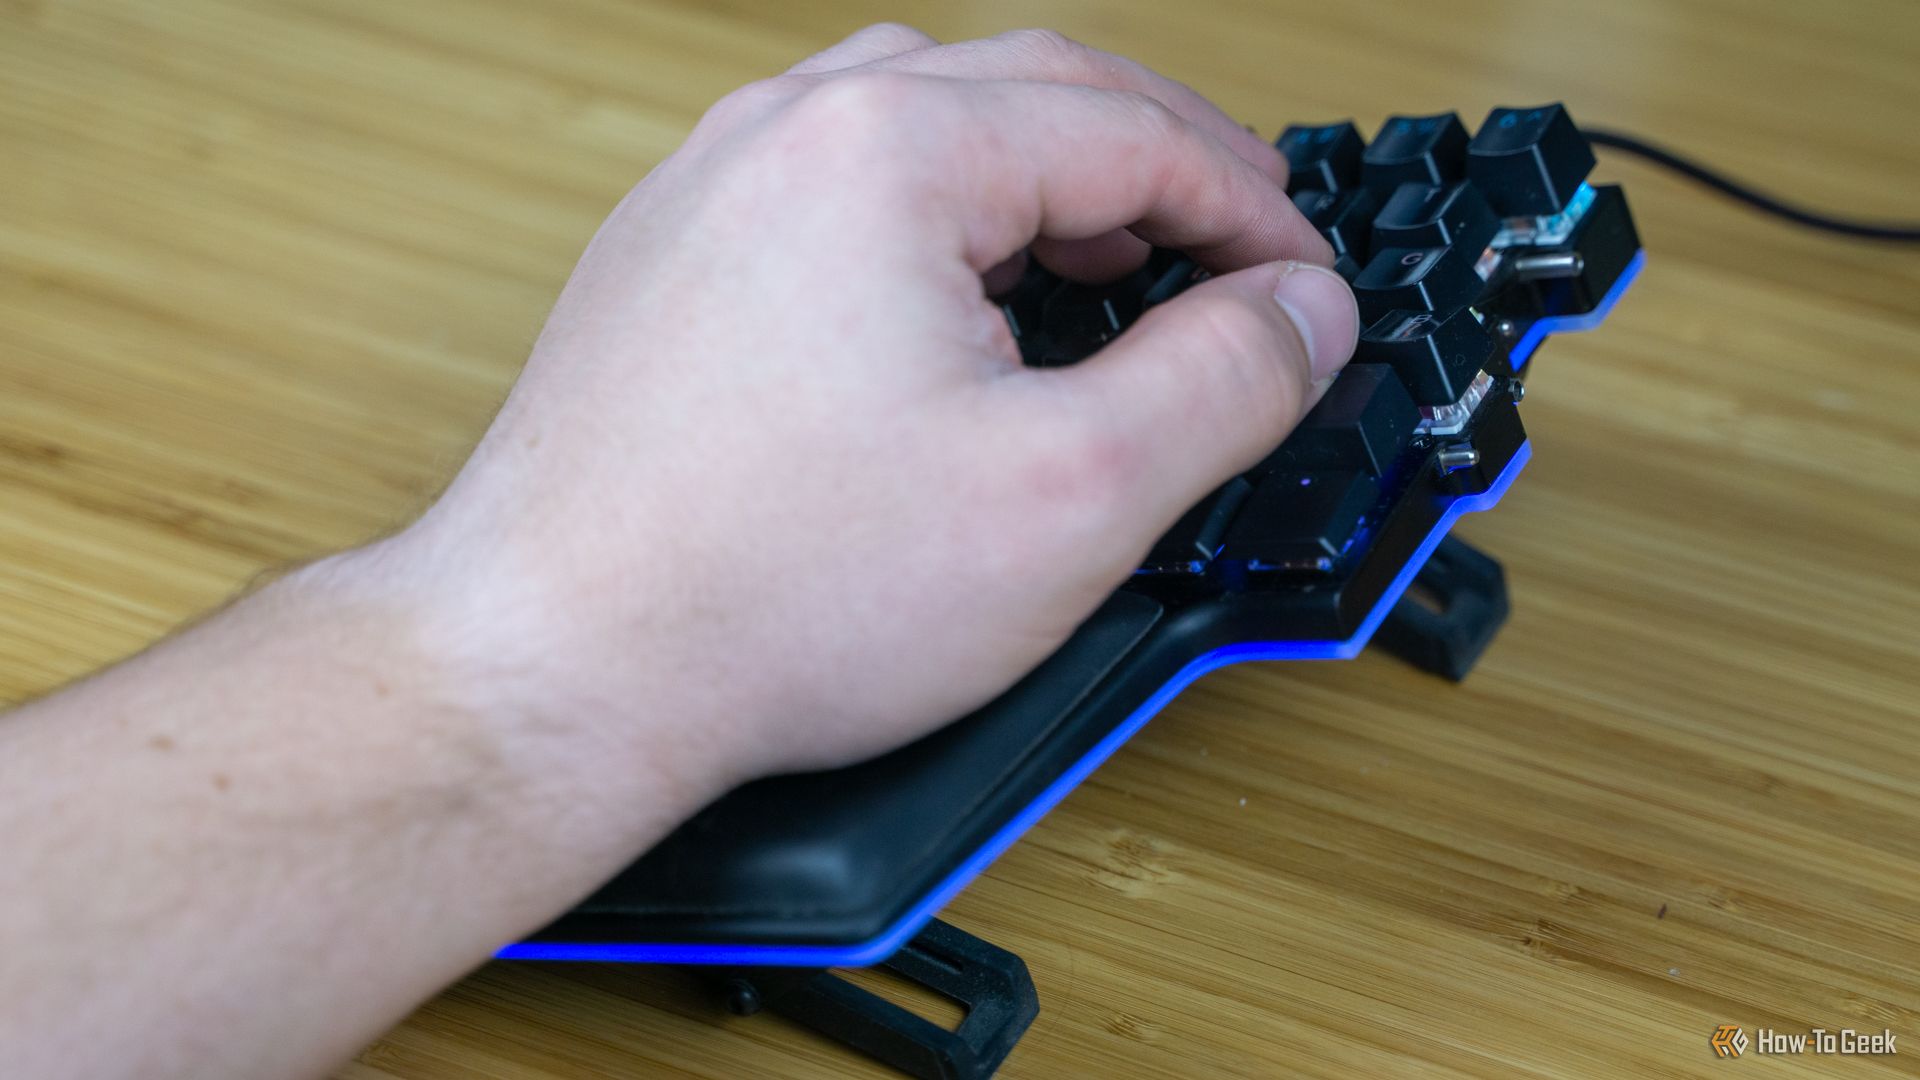
Splitting my keyboard was already weird enough. But, then Dygma introduced its tenting kit. For those unfamiliar, tenting your keyboard means raising it up at an angle to the desk. In a sense, most external keyboards support some form of tenting with the little feet on the back that kick the keyboard up at a slight angle.
However, Dygma’s tenting kit doesn’t raise the back of the keyboard. No, instead it tents the entire half of the keyboard at a pretty steep angle — left to right (or right to left). Yep, tenting is weird, but so ergonomic.
Going from a flat keyboard to a tented split keyboard completely changed the game for me. When others come to type, they have no idea how, but I can still bang out 80-110 WPM when typing if I’m in the zone on it. That took time to re-learn, for sure, but it’s a skill I love that I’ve mastered.
Now, back to the topic at hand: ergonomics. Tenting a keyboard means that, not only are your wrists a shoulder’s width apart, but they’re also at a much more natural angle. The reason that so many ergonomic keyboards, like the Logitech ERGO K860, are raised in the middle is that it benefits a better wrist posture.
So, when I went from typing on a flat, standard keyboard to a split, tented keyboard, my wrists thanked me over and over. It actually didn’t hurt to type for hours on end anymore. My wrists weren’t tired at the end of the day. In fact, my arms didn’t even hurt after typing.
I’m writing this article from a Starbucks coffee shop, which means I don’t have my original Dygma Raise with me (sadly), and my arms and wrists are already starting to tire. Meanwhile, at home, I can go for hours on end without so much as even noticing I’m typing, because it feels so much more natural with the keyboard both split and tented.
I Didn’t Know I Needed Eight Thumb Keys
While the Dygma Raise conquered ergonomics with a split design that tents, that’s not where the benefits stop. That’s only part of the equation.
The typical keyboard has one spacebar. You might think, “Duh, that’s all you need.” But, if you look at the oil stains on your spacebar (we all have them), you’ll likely find that you only hit the spacebar in one specific spot, not over the entire thing.
Because of this, why should the spacebar be one key that’s extremely wide? Dygma solved this by turning the spacebar into four separate keys, and then putting four more keys below that. This allows you to program the spacebar to be exactly where you need it and use the other sections to perform other tasks.
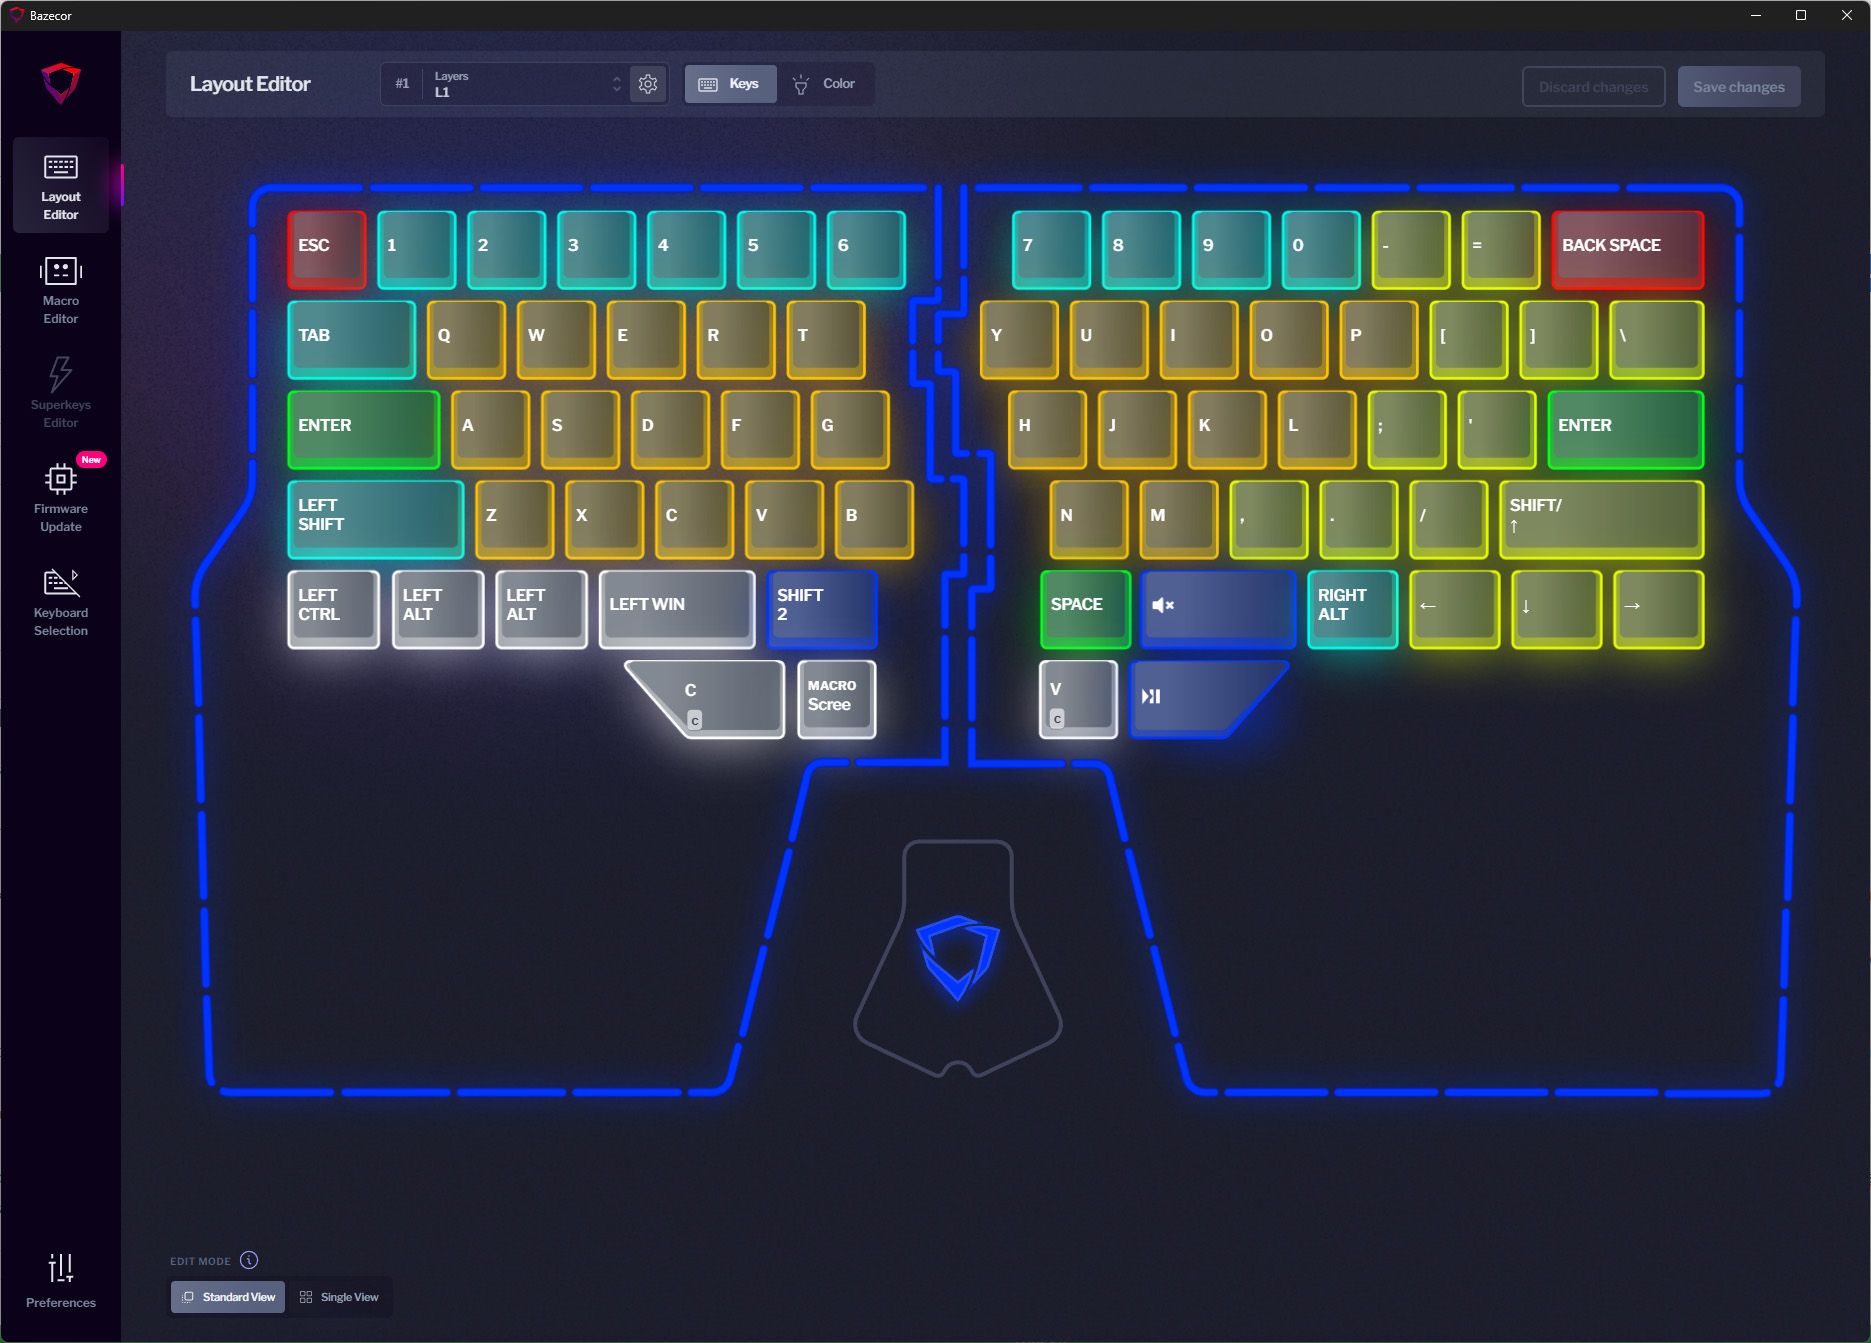
“What other tasks”, you might ask? Well, for me, my spacebar is on the left-most section of the right keyboard half. That’s where I hit space the most, and that’s where I’ve programmed it to be. The button to the right of that? That’s mute/unmute for my computer. The right-most section of the left half? That’s a layer shift that drops me to a secondary layer where every key on the keyboard changes function. Next to that is my Windows key.
On the bottom row, I have things programmed differently, as well. The left-most key on the left half is copy. While copy is a simple Ctrl+C, it requires moving your hand in a fairly unergonomic way. Clicking a single button with your thumb, however, allows you to be far more ergonomic.
To the right of that, I have a quick shortcut to take a screenshot. Windows 11 has streamlined screenshotting for sure, with the Windows+S keyboard shortcut. But, similar to copy, that can be unergonomic to hit. So, I made it a single keystroke with my thumb.
On the right half of the keyboard, I have the left-most key set to paste (which is also on my second layer if I want to use my left hand to both copy and paste). Lastly, the far right thumb key is play/pause. This puts play/pause right under mute, giving me my two most accessed media controls within the reach of my right thumb.
All of this is only made possible because of the eight thumb keys of the Dygma Raise. While I could accomplish this with macro keys off to the left side of my keyboard, or with a Stream Deck, that would require me to move my hands a lot. Having eight thumb keys means that I never even have to move my hands from the normal typing position to accomplish these tasks.
Dygma’s Software Is Where the Raise / 2 Really Shines
The Dygma software, also known as Bazecor, is really where the company’s keyboards shine. I couldn’t program the four thumb keys like I did without the software. However, the thumb keys aren’t where the software ends.
I mentioned that I have a second layer. Would it surprise you if I told you that I actually have five layers that I actively use? Let me explain.
Layer one is the main layer that I type on 99% of the time. It has the thumb keys programmed exactly how I mentioned above, and it’s got a standard keyboard layout with the number row as a normal number row. However, since the Dygma Raise is technically a 60% keyboard, there are no arrow keys. Not to fret, I simply reprogrammed a few unused keys to be arrow (or dual-purpose) keys.
Using Bazecor, I reprogrammed the right Ctrl, Function, and Windows key, alongside the right Shift to be my left, down, right, and up arrow keys. However, because of Bazecor’s advanced functionality, my Shift key is dual-purpose. A simple tap and release acts as the up arrow key, while holding the key turns it back into the shift key.
Oh, and the caps lock key on the left keyboard half? Since I never use caps lock, it’s enter. This change alone is something I think all keyboard users should make (unless you love typing with caps lock on.)
Now, layer two allows me to have all kinds of added functionality. For instance, the caps lock key turns from enter on the primary layer to space on the second layer. The E key becomes paste, which means I can use my left thumb to copy something and then quickly switch to layer two and paste. The R key is a custom-built macro that lets me export for web in Photoshop with a single keystroke.
My bottom two thumb keys on the left side of the keyboard turn into volume up and down, while the S, D, and F keys become seek backward, pause, and seek forward, in that order. This brings media control to both my right and left hand depending on what I’m doing.
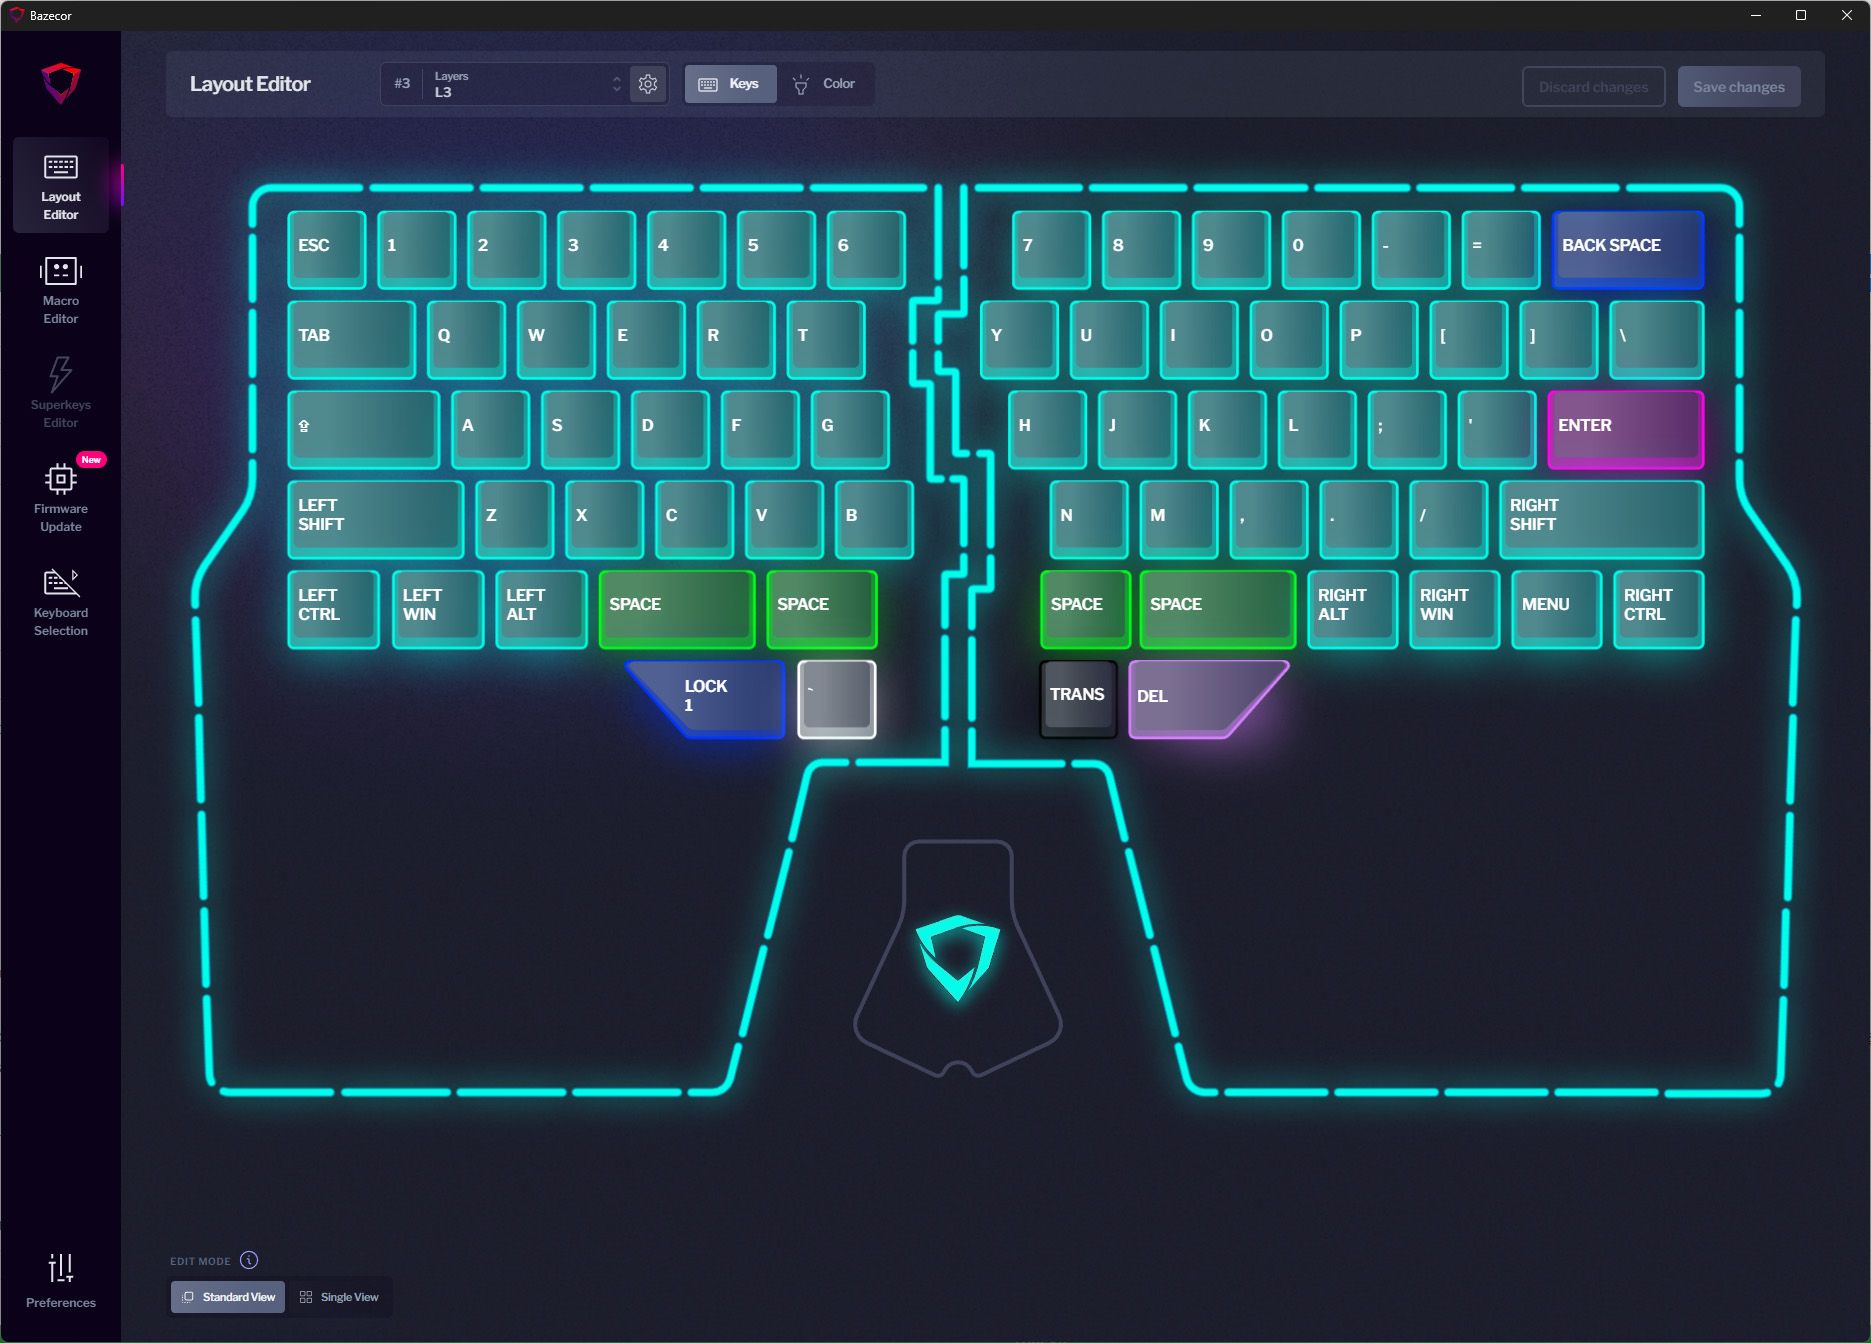
That’s only scratching the surface of layer two. However, layer three is very boring. It’s just a normal keyboard layout with the two right spacebar buttons acting actually as spacebar. Why? Well, when I’m gaming, I only use the left half of the keyboard, and most modern games have some form of jump in them, which requires spacebar. When I’m gaming, I don’t need access to advanced functionality like layer two provides, and I can live without my copy and screenshot commands. Also, layer three also gives me access to the caps lock key, should I need it.
Layers four and five are the same as layers one and two, except for macOS. I sometimes run my desk from my M1 Max MacBook Pro, and for those times, I need everything reprogrammed. On macOS, keyboard shortcuts are vastly different. So, while on Windows I would hit Ctrl+C to copy, on macOS I need to hit Cmd+C. If I didn’t change the command, I would be hitting the equivalent of Control+C, and that wouldn’t do me any good, as that doesn’t do anything on macOS.
Bazecore is such a well thought out software that it alone could be reason enough to buy the keyboard. Forget splitting the keyboard, forget tenting the keyboard: Bazecor is the best keyboard customization software I’ve ever used, bar none.
Hot-Swappable Keys Give the Ability to Customize Every Aspect of This Keyboard
As a final nail in the coffin for choosing the Dygma Raise, as if the above functionality wasn’t enough, it’s fully hot-swappable. Each key on the entire keyboard can be changed for any other switch you want.
This means that I can change from the Kailh Speed Copper switches currently in my Raise to Cherry MX Blue, or Gateron White. You name it, if it’s the standard MX-style switch, it’ll go in 62 of the available main keys. For the bottom four thumb keys, you’ll need Kailh low-profile switches.
Dygma already offers the keyboard with a wide range of switch options, but you could really get them from anywhere, including Temu. The fact that the Dygma Raise offers me the ability to change out switches at any time I want is really what sealed the deal.
While I haven’t changed from my Kailh Speed Copper’s yet, my incoming Dygma Raise 2 keyboard will have Kailh Silent Brown switches with Cherry MX Blue’s for backup, if I want to go from silent typing to loud and clacky.

Dygma Raise 2
This split keyboard has optional tenting that allows for maximum ergonomics and productivity.
$369 at Dygma
At the end of the day, the Dygma Raise became my go-to keyboard because it offered me the ability to be far more ergonomic in how the keyboard sits, how it’s programmed to work, and the option to swap things if my tastes in keyboard switches ever change.
Want to learn more about the ergonomic benefits of putting your mouse in the middle of your keyboard? I go into great detail as to why I do it. And, I’ve also outlined some great ways you can use keyboard macros outside what I’ve mentioned in this article.


