Movies Without Drama: Easily Use Linux USB Drives with Plex
Linux & macOS Terminal
Quick Links
-
The Plex Media Server and Libraries
-
Installing Plex
-
Creating the Mount Point
-
Mounting the USB
-
Use the USB Libraries in Plex
-
A Word About Jellyfin
-
Showtime!
Key Takeaways
- For Plex to be able to access media on external USB drives, you need to create a dedicated mount point.
- Use chown to give the ‘plex’ user ownership of the mount point.
- Add a line to the /etc/fstab file to mount your USB drive on the mount point.
Plex is simple to install and use, and it performs marvelously. One thing that drives new users crazy though, is trying to access media on external USB drives. Here’s the easy way.
The Plex Media Server and Libraries
The well-known Plex media server organizes your media in libraries. These are collections of different media types, such as movies, TV shows, photographs, and so on. You add directories containing your media to your libraries. The directories can be on local hard drives, external mounted USB drives, or some other network-accessible location. These directories are called sources.
On Linux, USB drives must be mounted before they can be accessed. That’s fine, we can use standard Linux techniques to do this. But plex has a further requirement.
Plex creates a Linux user called plex. This user must have access to the media. Time and again I’ve heard how this stumbling block drives people to give up. After floundering in stormy seas of permissions and file and directory ownership, they abandon ship.
The reality is, it’s easier to accomplish than you might think.
Installing Plex
The installation of Plex plays a major part in whether you succeed. I recommend you use the official Plex install files. Snaps, Flatpaks, and the versions in distribution repositories didn’t work for me. Your mileage may vary but, very often, the plex user wasn’t created. Without the plex user, you’re bound to fail.
The only exception was the Manjaro and Arch version in the Arch User Repository, or AUR. That worked perfectly. You’ll need an AUR helper tool like yay to use the AUR.
Once you have yay, you can use this command:
yay -S plex-media-serverFor Ubuntu and Fedora, you’ll get the best results using the official RPM and DEB files. On Fedora, this command retrieves the latest RPM at the time of writing.
wget https://downloads.plex.tv/plex-media-server-new/1.41.0.8994-f2c27da23/redhat/plexmediaserver-1.41.0.8994-f2c27da23.x86_64.rpm
sudo dnf install plexmediaserver-1.41.0.8994-f2c27da23.x86_64.rpm -y
On Ubuntu, you need to issue a sequence of commands. It might look a lot, but it’s just a case of cut and paste. If you’ve just installed Ubuntu, make sure you update and upgrade first, with:
sudo apt update
sudo apt upgrade
You might already have cURL installed, but I’ve included the command in case you don’t. Don’t skip the update command before you perform the final apt install command.
sudo apt install apt-transport-https
sudo apt install curl
curl https://downloads.plex.tv/plex-keys/PlexSign.key | gpg --dearmor | sudo tee /usr/share/keyrings/plex-archive-keyring.gpg >/dev/null
echo deb [signed-by=/usr/share/keyrings/plex-archive-keyring.gpg] https://downloads.plex.tv/repo/deb public main | sudo tee /etc/apt/sources.list.d/plexmediaserver.list
sudo apt update
sudo apt install plexmediaserver
OK, that’s Plex installed. On all distributions, we have to enable and start the plexmediaserver daemon:
sudo systemctl enable plexmediaserver
sudo systemctl start plexmediaserver
Creating the Mount Point
We need to create a mount point that’s owned by the plex user. I named my mount point ‘plex-usb’, and it’s in the root directory. Don’t create it in your home directory.
sudo mkdir /plex-usb
sudo chown plex:plex /plex-usb
ls -ld /plex-usb/
The chown command changes the user and group ownership of the directory to ‘plex.’ We use ls to confirm those changes.
Mounting the USB
My USB drive was named Silver when it was formatted. It shows up with that name when I plug it in. It holds two directories called Movies and Shows.
We need to find its Universally Unique Identifier, or UUID. We’ll pipe the blkid command into grep and look for /dev/sd devices. These are identified as sda for the first drive, sdb for the second, and so on.
sudo blkid | grep /dev/sdIn my case, the USB drive is /dev/sdb. We need to take note of the UUID and the Type. The UUID of my drive is ‘b7ea748e-2df0-450e-922b-bf9d81e534c3’ and its Type is ‘ext4.’
If you have difficulty spotting your drive, remove it, then run the blkid command, as above. Open another terminal window, insert your USB drive, and run the blkid command again. You can then look for differences between the two sets of output.
We need to edit the /etc/fstab file to mount our USB drive on the /plex-usb mount point whenever the Plex computer boots.
Use your favorite editor, and open the /etc/fstab file.
sudo gedit /etc/fstabAdd this line at the bottom of your fstab file. Use the UUID and Type from your own drive, of course, and the name and path of your own mount point.
/dev/disk/by-uuid/b7ea748e-2df0-450e-922b-bf9d81e534c3 /plex-usb ext4 defaults 0 0You can separate the fields with spaces or tabs.
Save your changes and reboot your computer. When you log in, you should be able to navigate to your mount point and see your media.
Counterintuitively, ls now reports the mount point belongs to user dave-mckay.
ls -ld /plex-usb/
ls -l /plex-usb/
This is because the root of the USB drive has been overlaid on the mount point. But, beneath the surface, the underlying mount point is actually owned by the plex user, which we verified earlier. This “dual ownership” is how the plex user can access the USB drive.
Use the USB Libraries in Plex
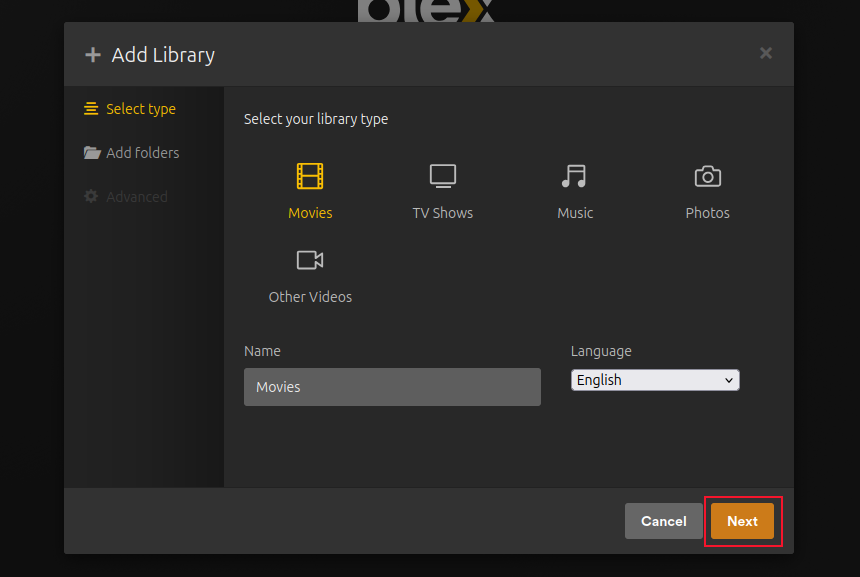
In your web browser, navigate to localhost:32400/web and go through the usual Plex start-up screens. When you get to the Server Setup, Organize Your Media page, click the “Add Library” button.
We’re going to add a source of movies, so click the Movies button.
You can edit the name, and choose a language.
I’m happy with the defaults, so I clicked the Next button. On the next page, click the “Browse For Media Folder” button.
On the Add Folder page, click / for the root directory.
Scroll through the list of directories on the right, until you see your mount point.
Click it when you see it.
Scroll back up, and you’ll see the directories on your mounted USB drive. Click the Movies directory.
You’ll see the contents of the directory. Click the Add button.
You’ll get a chance to review your choices. I’m adding a directory called /plex-usb/Movies to this library, which is correct. Click the Add Library button.
The new library is listed as a configured source.
To add the TV Shows, we follow the same procedure. Click Add Library > TV Shows > Next > Browse For Media Folder > root directory ‘/’ > plex-usb, Shows > Add, Add Library.
Now we’ve got two libraries listed. Click Next.
Click Done.
Your media will be scanned, identified, and added to the Plex database, and found under the name of your Plex server.
A Word About Jellyfin
Jellyfin functions similarly to Plex. To add external USB drives to Jellyfin, use the same overall process.
Install Jellyfin, and create the mount point, say /jellyfin-usb.
sudo mkdir /jellyfin-usbMake the jellyfin user the owner of the mount point.
sudo chown jellyfin:jellyfin /jellyfin-usbAdd an entry to /etc/fstab to mount the USB drive to the mount point.
Showtime!
You’re all set to watch media stored on your external drive.
Remember to unmount your USB drive before removing it. The easiest way to use it on another computer and then reattach it to your Plex server, is to shutdown your Plex server, use your drive elsewhere, plug it back in, then boot up your Plex server.


