How to Use GarageBand to Record a Podcast
Audio
You can use Apple’s free GarageBand application for Mac to record and edit basic podcasts. Here’s how to get the most out of GarageBand in podcast production, and recommendations for other applications when you need a better tool.
GarageBand used to be a fantastic entry-level application for both music and podcast production. For example, the GarageBand 3 update bundled in the iLife ’06 package introduced advanced chapter editing and video call recording integration. However, many of those features were quietly removed over the years, in much the same way iMovie lost many helpful features. You can still use GarageBand for podcast editing, but it’s not the best option for most workflows.
This guide will focus on the Mac version of GarageBand, not the iPad version, even though they are similar in many ways. This guide also assumes you are making an audio podcast—video podcasts need a video editor like DaVinci Resolve or Final Cut Pro.
Get Started With Recording
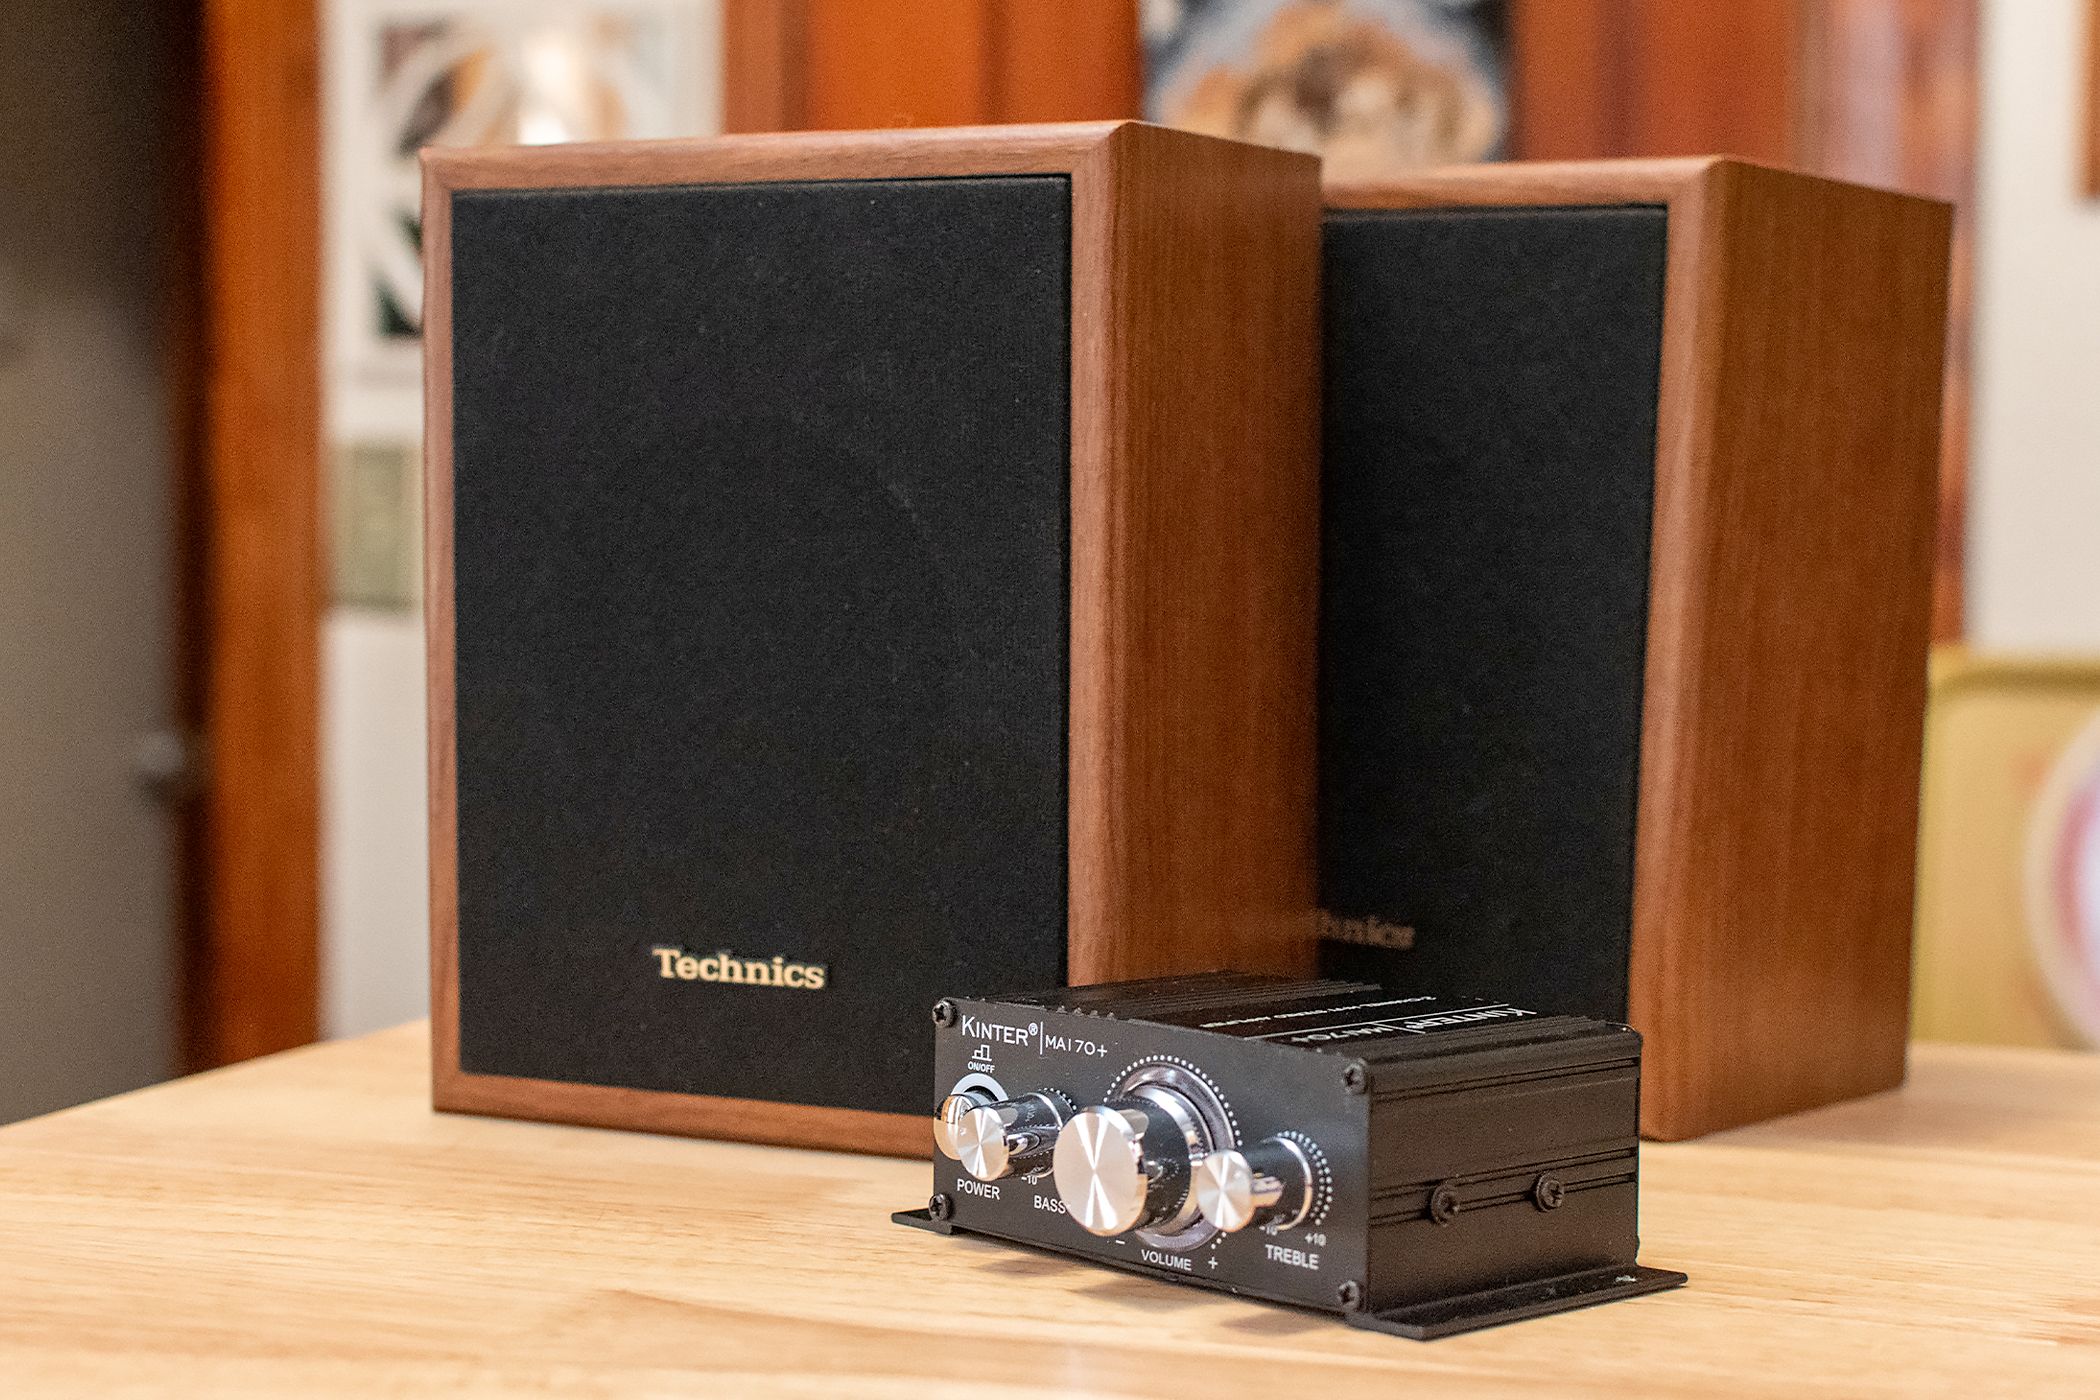
If you are completely new to creating and editing podcasts, you need to do some prep work. First, you should have a pair of headphones or earbuds, as well as a microphone. If you’re on a modern MacBook, the built-in microphone is surprisingly capable, or you can connect any USB microphone. If you have an iPhone, you can use the iPhone’s microphone with Mac apps through Continuity Camera mode.
You can use the ‘Voice Isolation’ microphone mode from the menu bar to remove some background noise, but this can also make your recording sound a bit more like a phone call with reduced quality. I personally have a Blue Yeti condenser microphone with a foam pop filter, though a dynamic microphone would probably be a better fit for my current recording space.
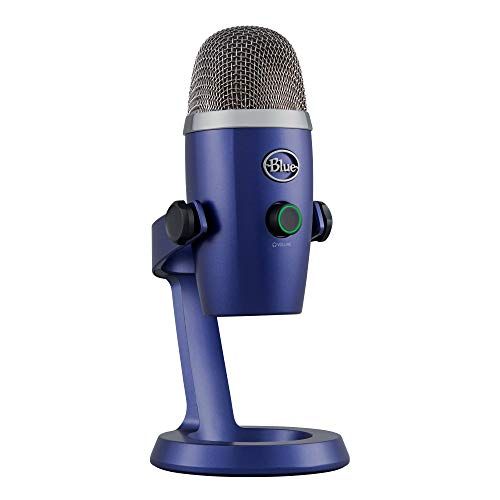
Logitech Blue Yeti Nano Premium USB Microphone
A compact version of one of the best USB mics around.
See at Amazon
See at bestbuy
See at Lenovo
You don’t need any specific headphones for recording podcasts, though noise isolation can be an issue with some types of earbuds and headphones. Many earbuds and open-back headphones allow sound to ‘bleed’ through, so if you’re recording with other people, their voice might come through your headphones and be audible in your recording. I usually stick with Apple’s wired 3.5mm earbuds or my Sony WH-1000XM5 headphones in wired mode, but again, most headphones are fine.
The most important step here is testing your equipment to see what the best setup is for you. You absolutely do not need to spend a few hundred bucks to start podcasting, and that alone would not guarantee a perfect recording setup. Once you have GarageBand ready, try recording in different spaces with all of your available audio options, and see which one you like the best.
Create a GarageBand Project
GarageBand might already be installed on your Mac, but if not, go download it from the Mac App Store. You can open it from your Applications folder, the Launchpad, or by searching for it with Spotlight.
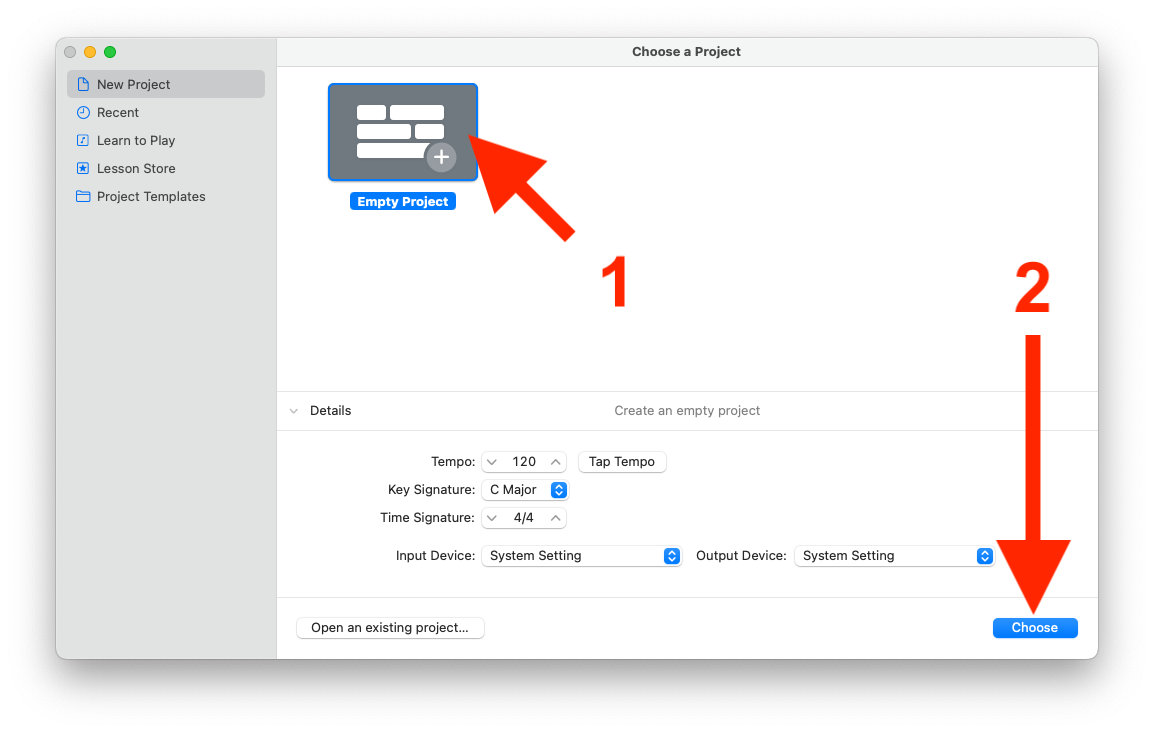
GarageBand will show the ‘Choose a Project’ window by default. Create a new project with the Empty Project template by clicking the Choose button.
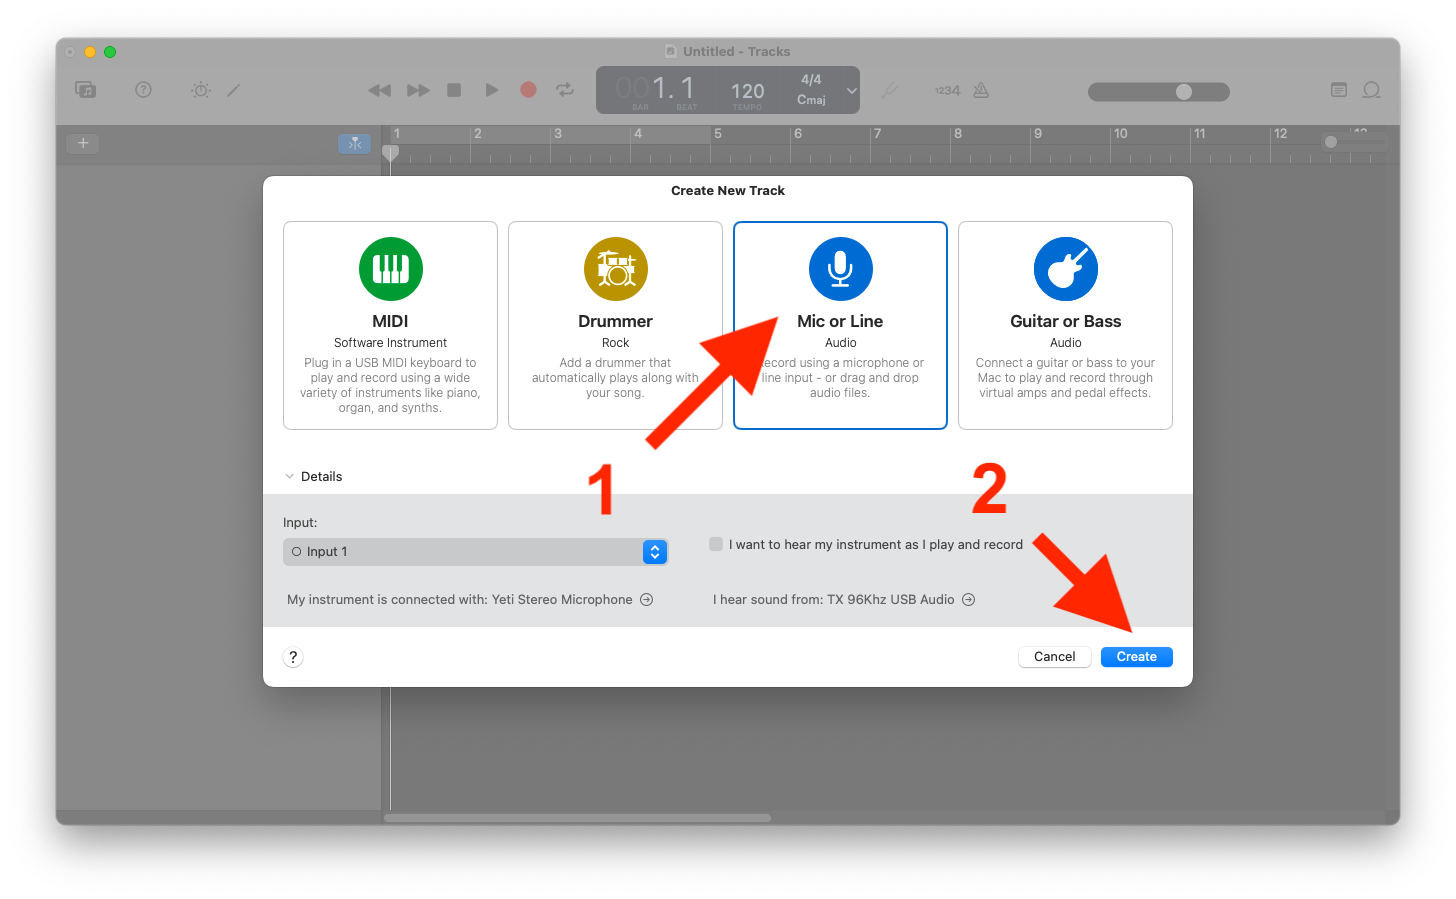
You will be asked to create a new track. Pick the microphone track option, then click the Create button.
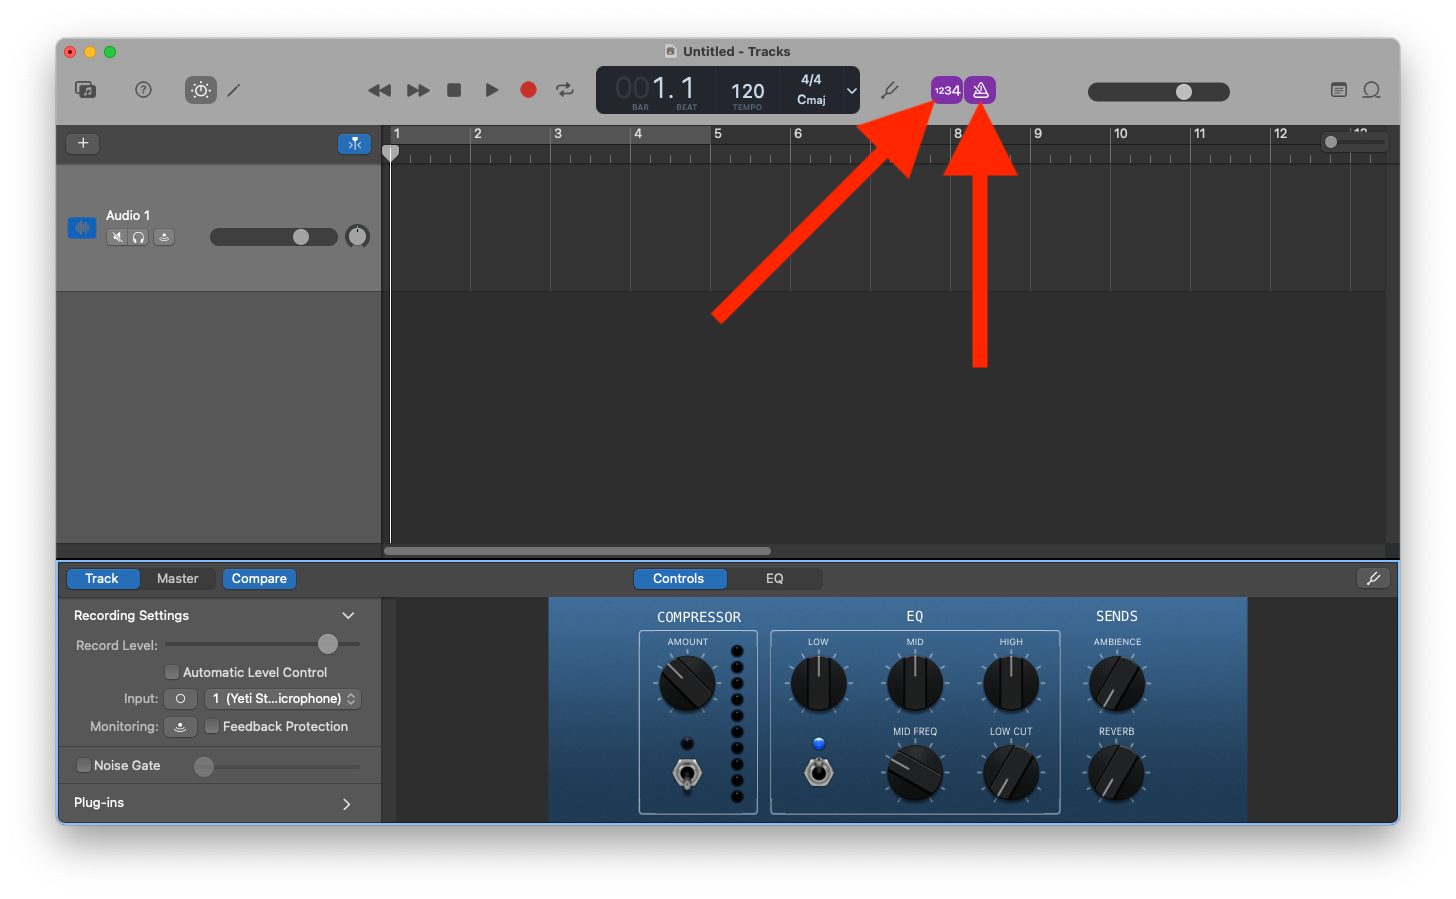
The first setting you should change is turning off the metronome and ‘Count in’ sounds. You can do that by clicking the buttons for them in the toolbar, which look like ‘1234’ and a metronome. Those are helpful features for music production with a consistent rhythm, but not so much for podcasts.
You now have a blank GarageBand project with one track for voice recordings. You can click the big red recording button in the toolbar, or press the R key on your keyboard, to start and stop the recording. If the recording is already in an audio file, drag it into your GarageBand window to add it to the project.
Once you have an audio clip, you can drag it around the timeline, or you can grab the edges to trim sections. The play, rewind, and fast forward buttons can be used for playback, and the skip back (‘Go to Beginning’) button will instantly jump to the start of the project.
How to Use Tracks and Smart Controls
The ‘Smart Controls’ panel at the bottom is where all your important settings are located, like the recording level (not the same as the volume), compressor, EQ, noise gate, and other options. If you don’t see it, press the ‘B’ key to toggle it, or select View > Show/Hide Smart Controls in the menu bar.
These controls are tied to each individual track, so you can change settings on one track without affecting the other. Remember to click the right track before you start changing settings.
You can create new tracks by double-clicking an empty area in the track list, or by selecting Track > New Track in the menu bar. If you’re just recording a solo podcast, or one using a shared recording of a group call, you’re probably only going to use one track for the voice audio. You could use more tracks for background music, sound effects, ad breaks, or other components.
Edit a Podcast
If you’re just recording a solo podcast, or a group podcast without individual recordings for each person, you’ll mostly be working on one track. As an example, I’ll use a recording of me talking to Copilot on my phone, with both my voice and my phone’s speaker coming through the same microphone.
GarageBand is a non-destructive audio editor, which means your changes to the compressor, gain, EQ, noise gate, and so on can be changed or reversed at any point. They don’t modify the audio files in your project. Some other editors, like Audacity, have features that are applied directly to audio clips and can’t be reversed after a certain point.
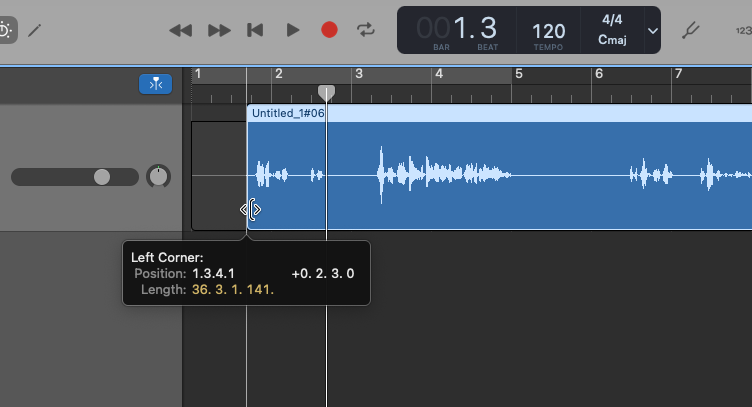
You can start by trimming the start and end of the recording to fit the content. Click and hold down on the bottom left corner of the clip, then drag it to the right to cut off the parts before the actual introduction. You can do the same action to the end of the clip by dragging the bottom right corner to the left. In my example, I removed the quiet parts before anyone started talking.
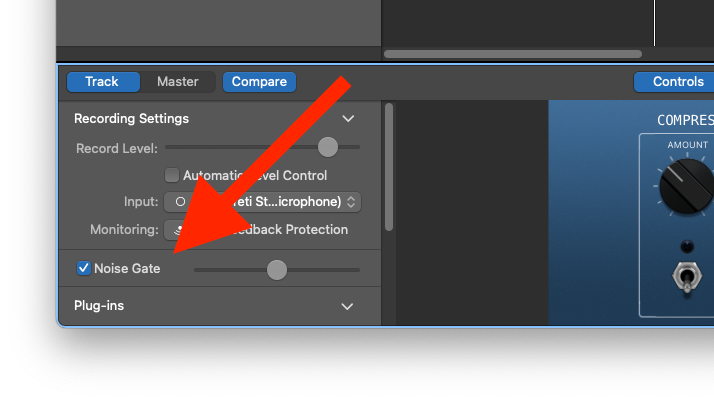
You might want to remove background noise next. GarageBand’s main option here is the Noise Gate, which mutes the track if the sound goes below a certain threshold. We want to set it high enough to remove fans, chair noises, and other sounds, but not high enough to cancel out people speaking quietly. Select your track, then in the Smart Controls panel at the bottom (press the B key if it’s hidden), click the Noise Gate checkbox.
With Noise Gate enabled, try playing your podcast and see if any background noise is still audible while no one is talking—you can adjust the settings while in playback mode. If there’s still some noise, turn it up until you can’t hear it anymore. If it’s starting to cut off someone’s voice, turn it down. The background noise might still be audible while people are talking, but the track should be silent when no one is talking.
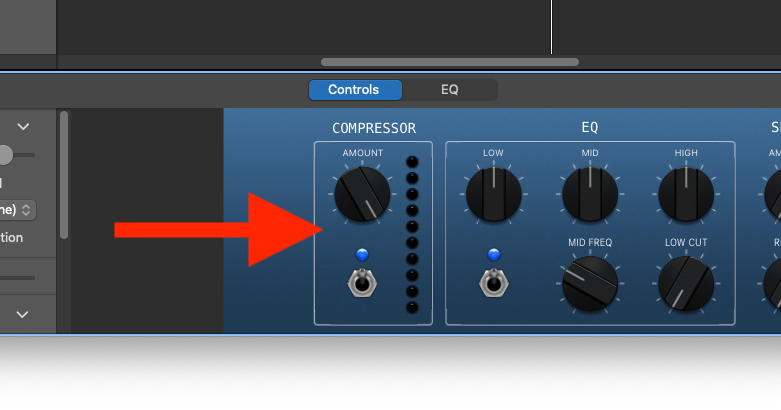
You’ll also want to try the Compressor tool. This limits the loudest and softest parts of the recording, so you (and whoever else is in the recording) will stay at a consistent volume while speaking. Click the Compressor switch in the Smart Controls panel, then adjust the dial as needed. If you want the most consistent volume possible, set it to the maximum level. If you’re recording a spooky podcast or something else that might need louder parts, a medium or low setting might work best.
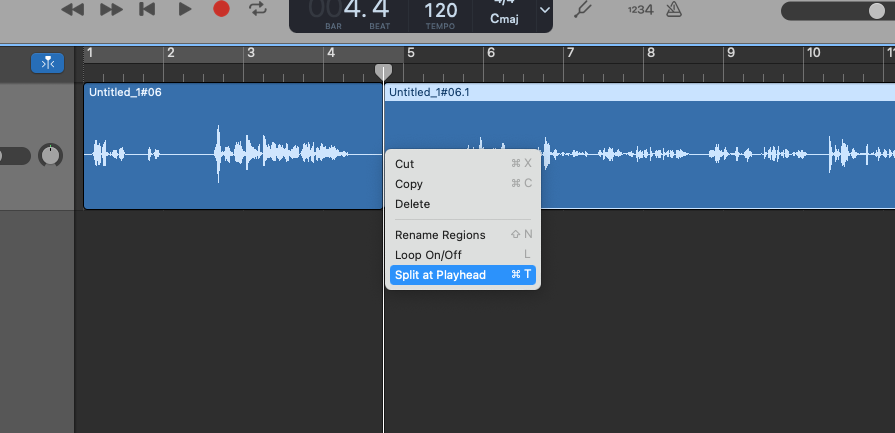
Now that the audio levels are improved, you can start trimming and moving around snippets. If there’s a section you want to remove—an extended quiet section, off-topic discussion, doorbell ringing, or anything else, do X. Drag the playhead to the section then use the Cmd+T keyboard shortcut to split the clip in half. You can also right-click and select the ‘Split at Playhead’ option.
Once the clip is split, you can drag the ends of the clips to remove the parts you don’t want. After that’s done, just drag the second clip to the end of the first clip. You can also select the section you don’t want and do Edit > Delete and Move to automatically remove the empty space.
You can also drag your mouse to select multiple clips at once, or do Edit > Select All (or Cmd+A) to select all the clips in your project. For example, if you decide to add a new introduction, you can do the select all action to move everything forward by a few seconds, then add your new intro to the start.
Saving and Exporting Your Podcast
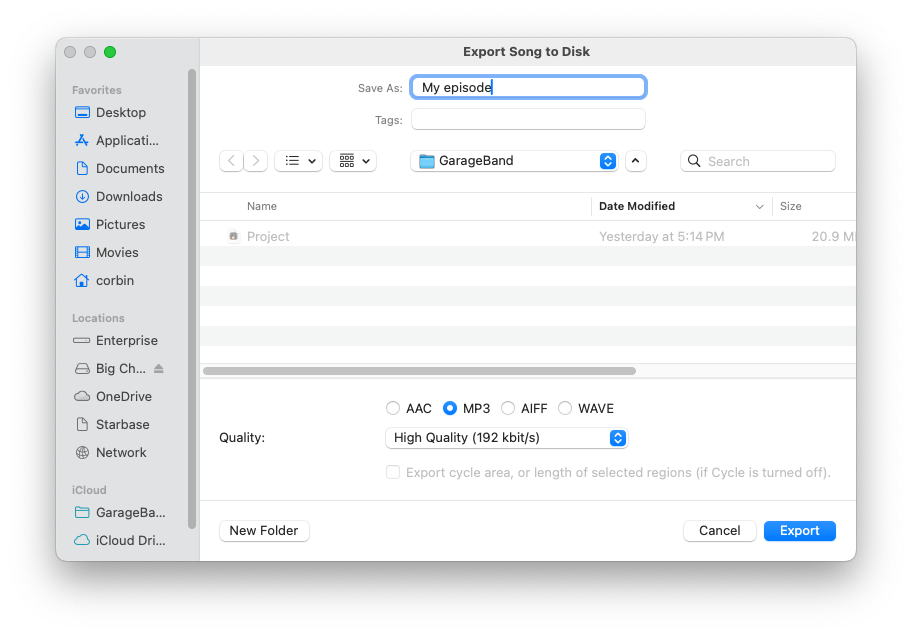
When you’re done editing your podcast, click Share > Export Song to Disk in the menu bar. This will open an export dialog, allowing you to select where the file is saved. Select MP3 as the file type.
The ideal quality setting depends on the type of podcast. If the episode is mostly just people talking, the 128 kbit/s option is probably a high enough quality. Some podcasts go even lower than that, but GarageBand’s next-lowest 64 kbit/s preset is pushing it. If your podcast has music or other elements that sound noticeably worse when compressed, try the 129 kbit/s option. You can always export again if the completed file doesn’t sound great.
Now that you have your file, it’s time to publish it on a podcast platform. Advice for which platform is best is beyond the scope of this guide, but Apple has some recommendations.
Go Beyond GarageBand
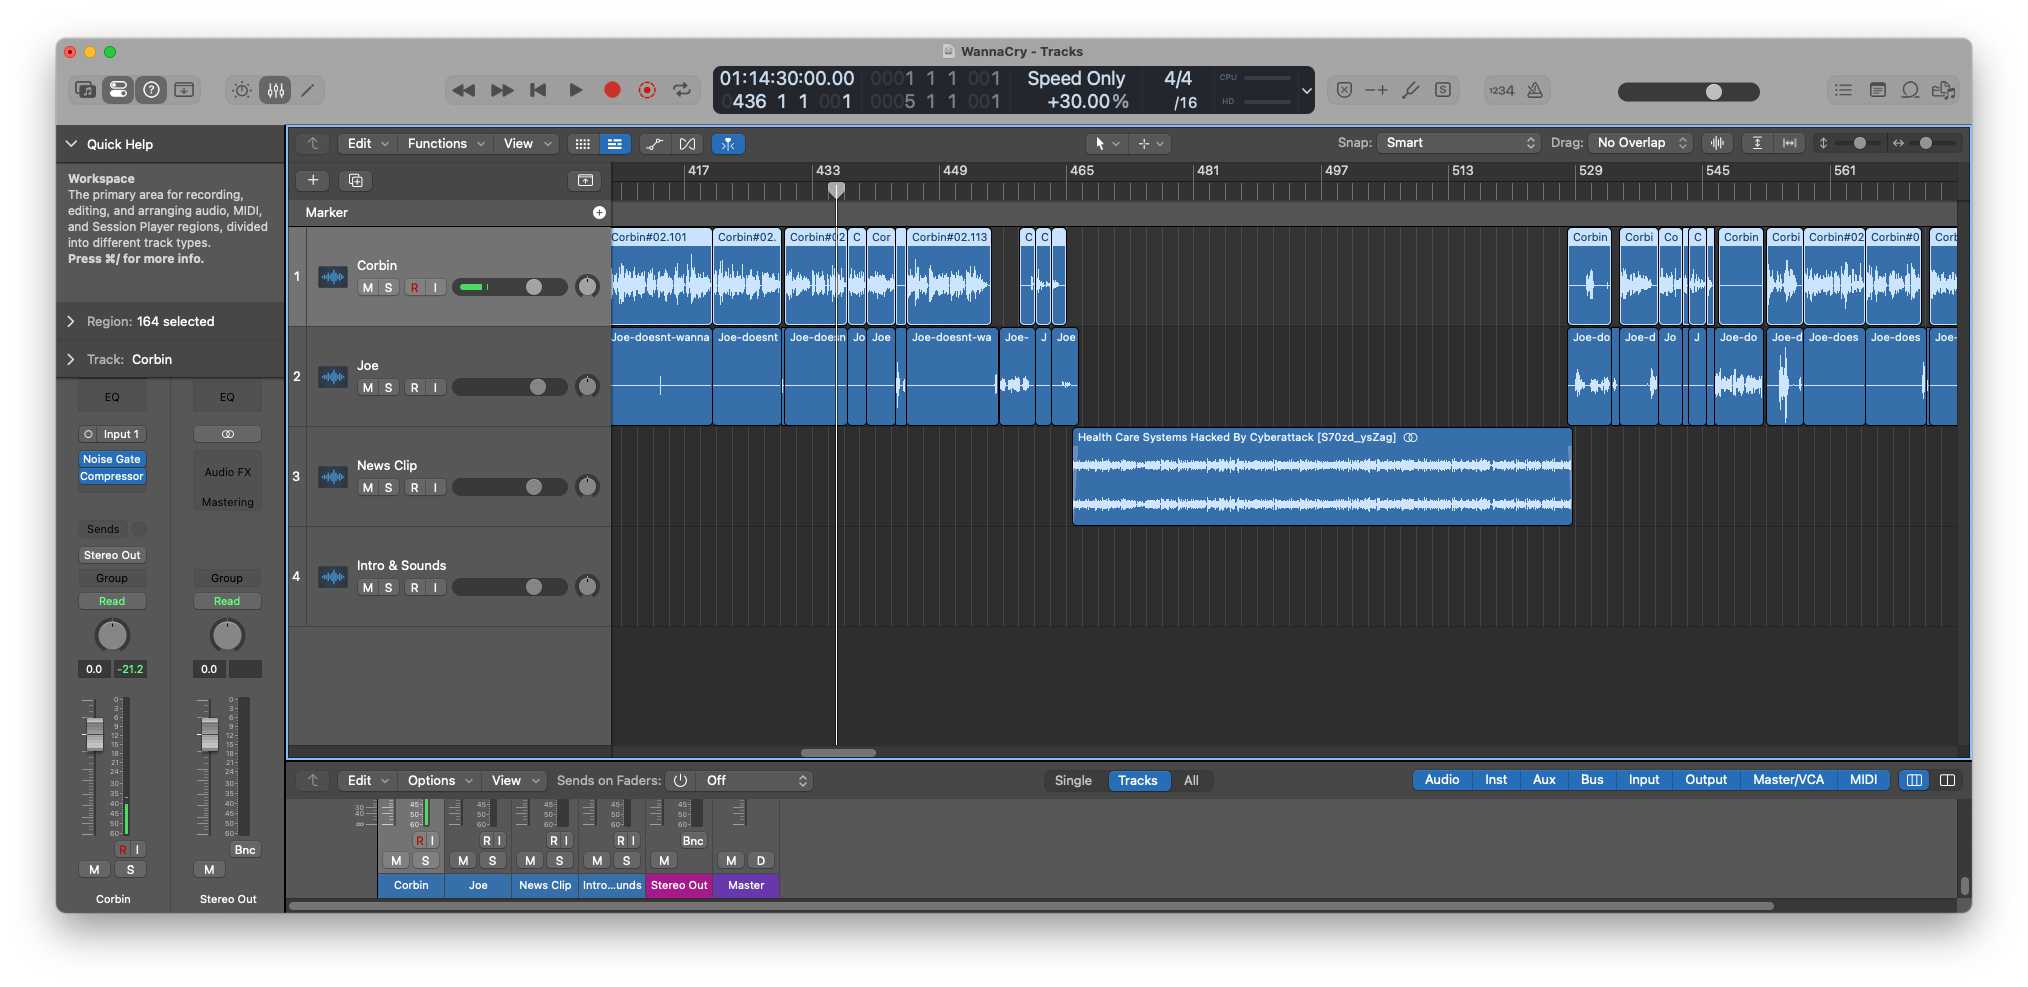
GarageBand is missing many features that are helpful for podcast production and editing, such as chapter marker support, multi-track section inserts and cuts, text and artwork metadata, and much more. The lack of support for multi-track ripple editing makes multi-track podcast editing almost impossible, especially with keeping all tracks synchronized. You’ll start to feel the need for a better editing tool after a while, if you haven’t already.
Audacity is one alternative to GarageBand, and its focus on being a recording and editing tool rather than being a digital audio workstation (DAW) makes it better suited to podcasts. Multi-track editing is much better than GarageBand, and its ‘Labels’ feature can be adapted to work as podcast chapter markers. Audacity is cross-platform and easy to use, but some features and plugins are ‘destructive’, meaning the changes can’t be reversed after the undo history runs out.
Apple’s preferred upgrade path from GarageBand is Logic Pro, which is a full-featured DAW that costs $200 on the Mac App Store. Logic Pro isn’t really built for podcast production either, but it does have much better support for multi-track editing than GarageBand, and it does have chapter marker support.
I’ve been editing new episodes of my Tech Tales podcast with Logic Pro for a while now, and before that, I was using Audacity. A video tutorial from Sam Loose helped me set up better keyboard shortcuts, and I made a custom script to automate exporting and chapter marker identification for popular podcast platforms.
There are many more audio editors you can try for podcast production, such as Reaper and Adobe Audition. I only have personal experience with GarageBand, Audacity, and Logic Pro, so I can’t offer much advice there. If you’re making a video podcast, try DaVinci Resolve.


