Android Marshmallow was recently released, and as we’ve grown to expect, a root method was quickly made available to devices running the brand new operating system. Legendary root developer Chainfire has stated that he’s working his way towards retiring from the scene, but he still had enough left in the tank to quickly publish an update to his popular SuperSU root method.
The process is a bit different this time around, which is a result of Google adding extra SELinux policies and expanding a new security feature called Verity. Nonetheless, you can still get superuser access and all of the cool tweaks that come along with it, so I’ll show you how to do it below.
Before You Begin
First and foremost, you should know that this root method is only intended for use on devices running Android 6.0 Marshmallow (specifically build MRA58K), and as a result of some changes that have been made, is only available for the Nexus 5, 6, 7 (2013), 9, and Player.
Secondly, you will need to have a custom recovery installed on your Nexus device to use this root method. You can use this guide to get TWRP recovery installed on your device, but it’s recommended that you install the latest version, which is linked below for all applicable devices:
- TWRP for Nexus 5
- TWRP for Nexus 6
- TWRP for 2013 Nexus 7 (Wi-Fi)
- TWRP for 2013 Nexus 7 (3G)
- TWRP for Nexus 9
Finally, if you’re using a Nexus 6 or Nexus 9, it’s highly probable that this method will wipe all of the data on your device. This is because a modified boot image (kernel) is required for rooting Android 6.0, which will disable the default encryption on these devices, rendering any existing data useless and forcing a full wipe. If you’ve already disabled forced encryption on your Nexus 6 or Nexus 9 and made sure to keep your device decrypted while updating, this won’t be an issue.
Step 1: Download Necessary Files
With the prerequisites out of the way, you’re ready to get started. First, you’ll need to download a custom kernel for your device, which is now a requirement for rooting Android 6.0, since changes have been made to the stock boot image (kernel) that would otherwise prevent rooting.
ElementalX is a rock-solid custom kernel that supports root on Android 6.0 and even gives you a few bonus tweaking options, so it’s what we’ll be using today. To begin, tap one of the following links to download the ElementalX kernel for your respective device:
- ElementalX for Nexus 5
- ElementalX for Nexus 6
- ElementalX for 2013 Nexus 7 (Wi-Fi)
- ElementalX for 2013 Nexus 7 (3G)
- ElementalX for Nexus 9 (Wi-Fi)
- ElementalX for Nexus 9 (LTE)
Beyond that, all devices can use the same SuperSU ZIP to get root access on Android 6.0. Tap the following link from your Nexus device to grab a copy of Chainfire’s root ZIP:
Step 2: Flash ElementalX to Enable Rooting
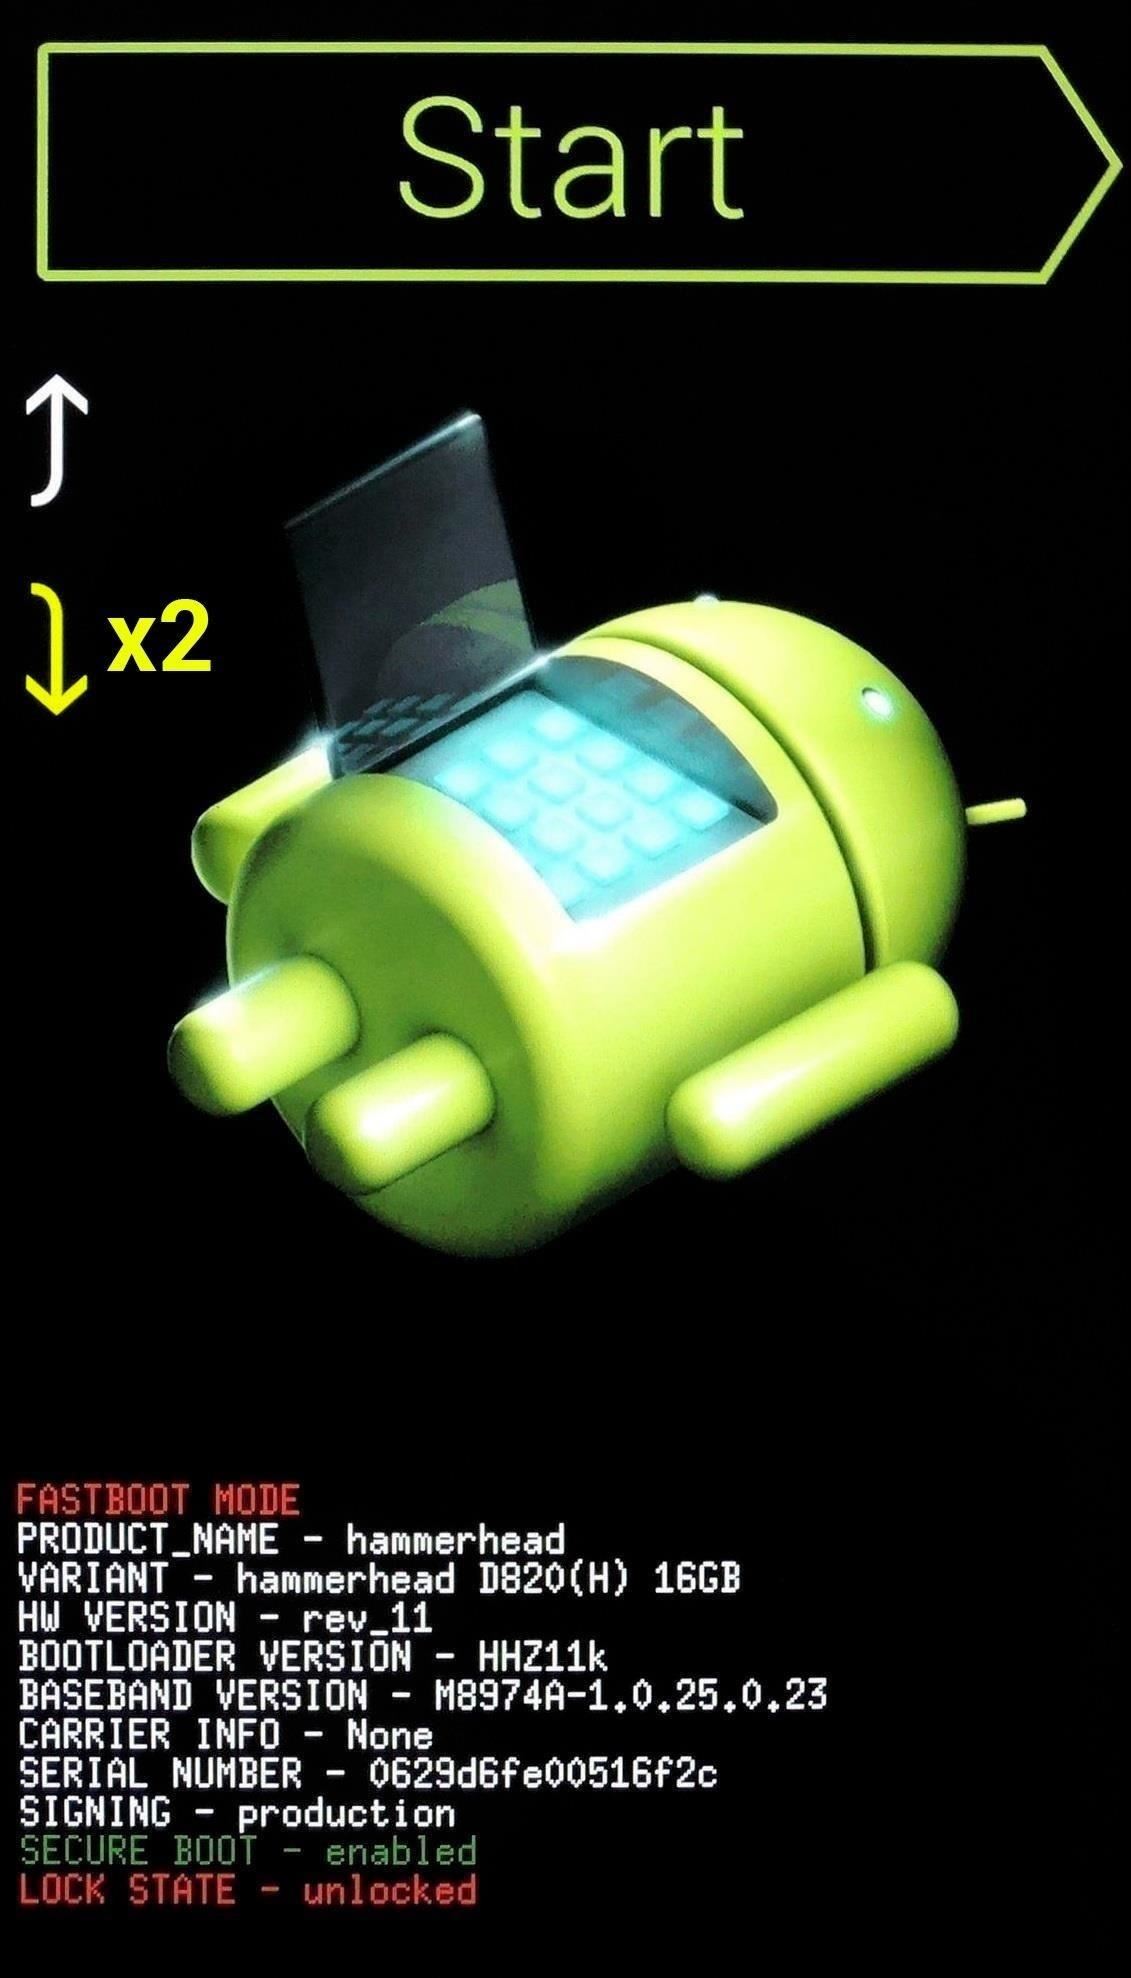
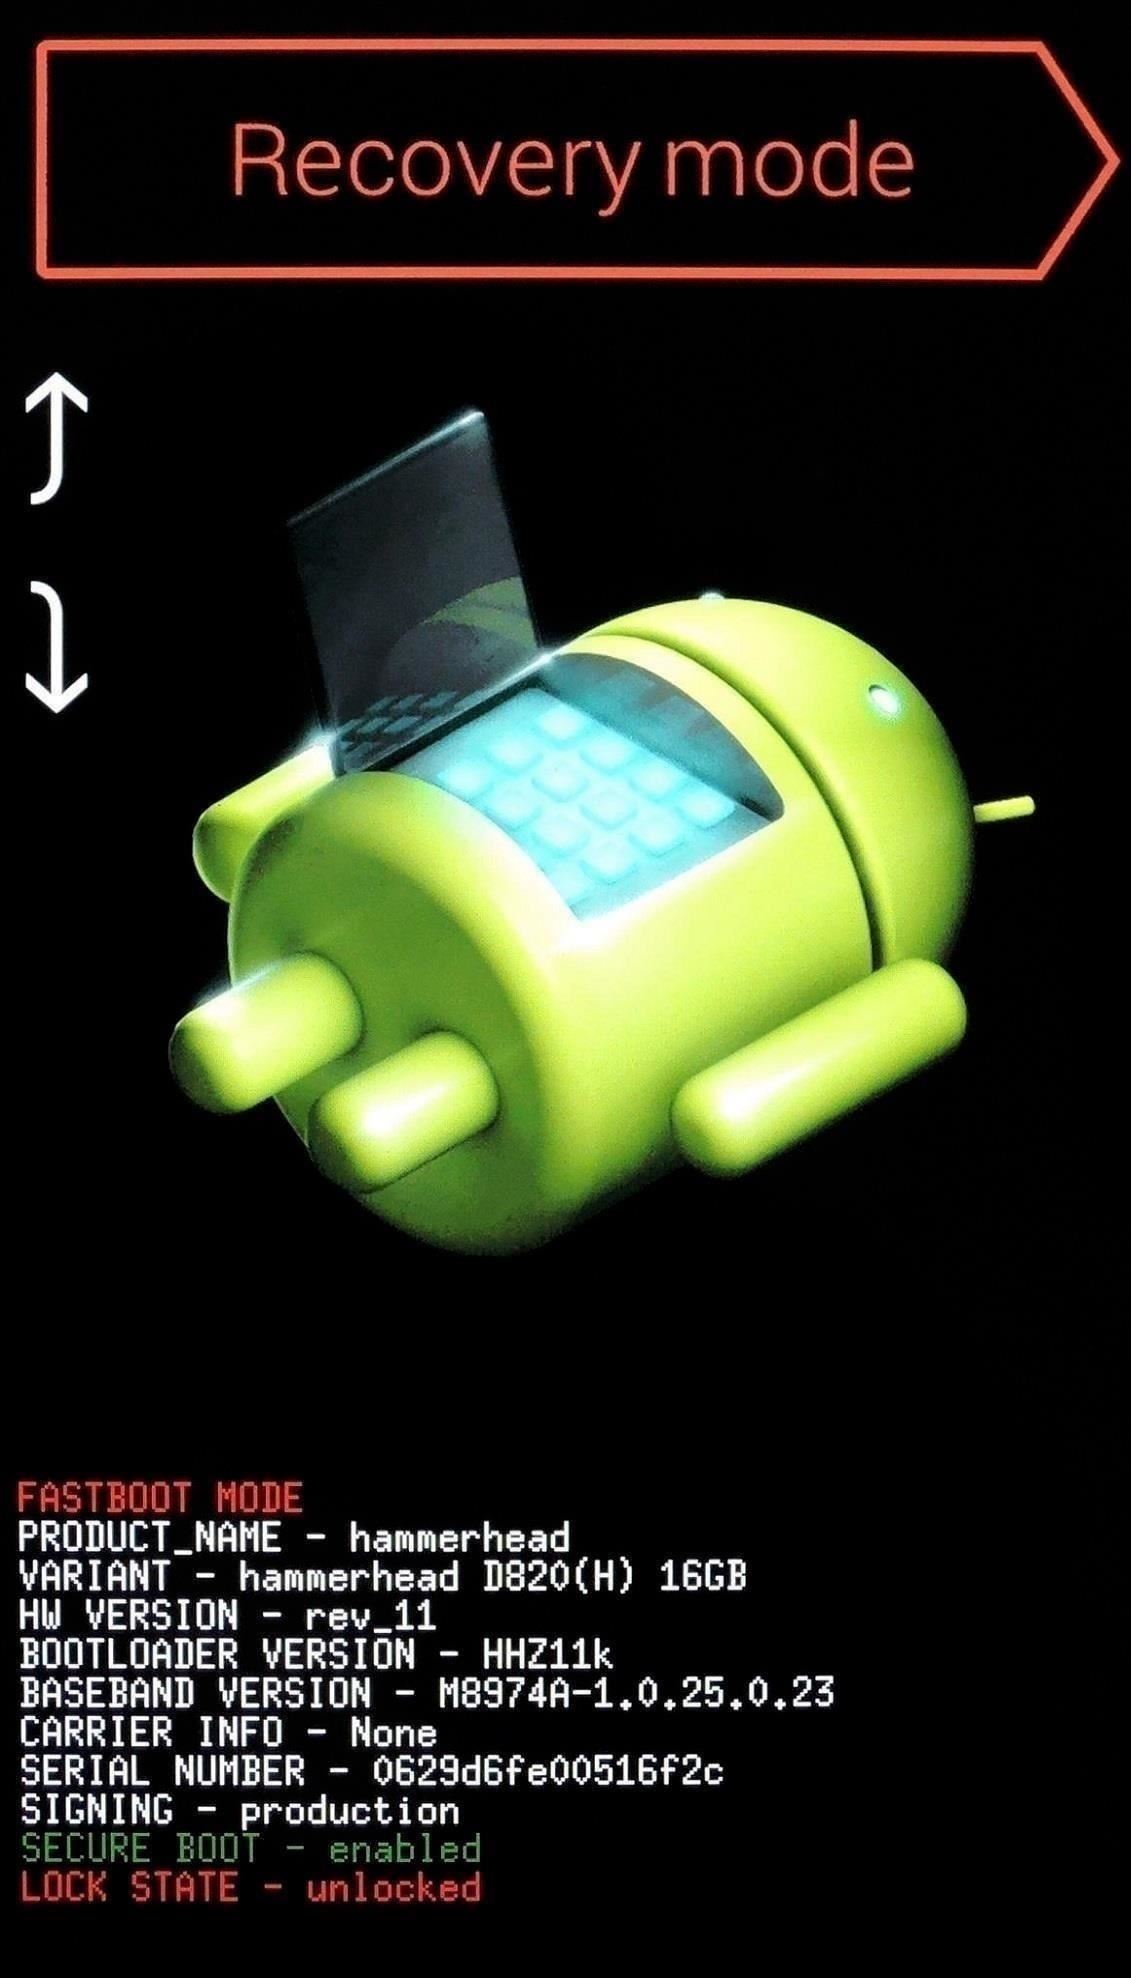
With the necessary files downloaded, go ahead and boot your device into custom recovery. To do that, start by powering your phone or tablet completely off. When the screen goes black, press and hold the volume down and power keys simultaneously to enter bootloader mode. From here, press the volume down button twice to highlight “Recovery mode,” then press the power button to select it.
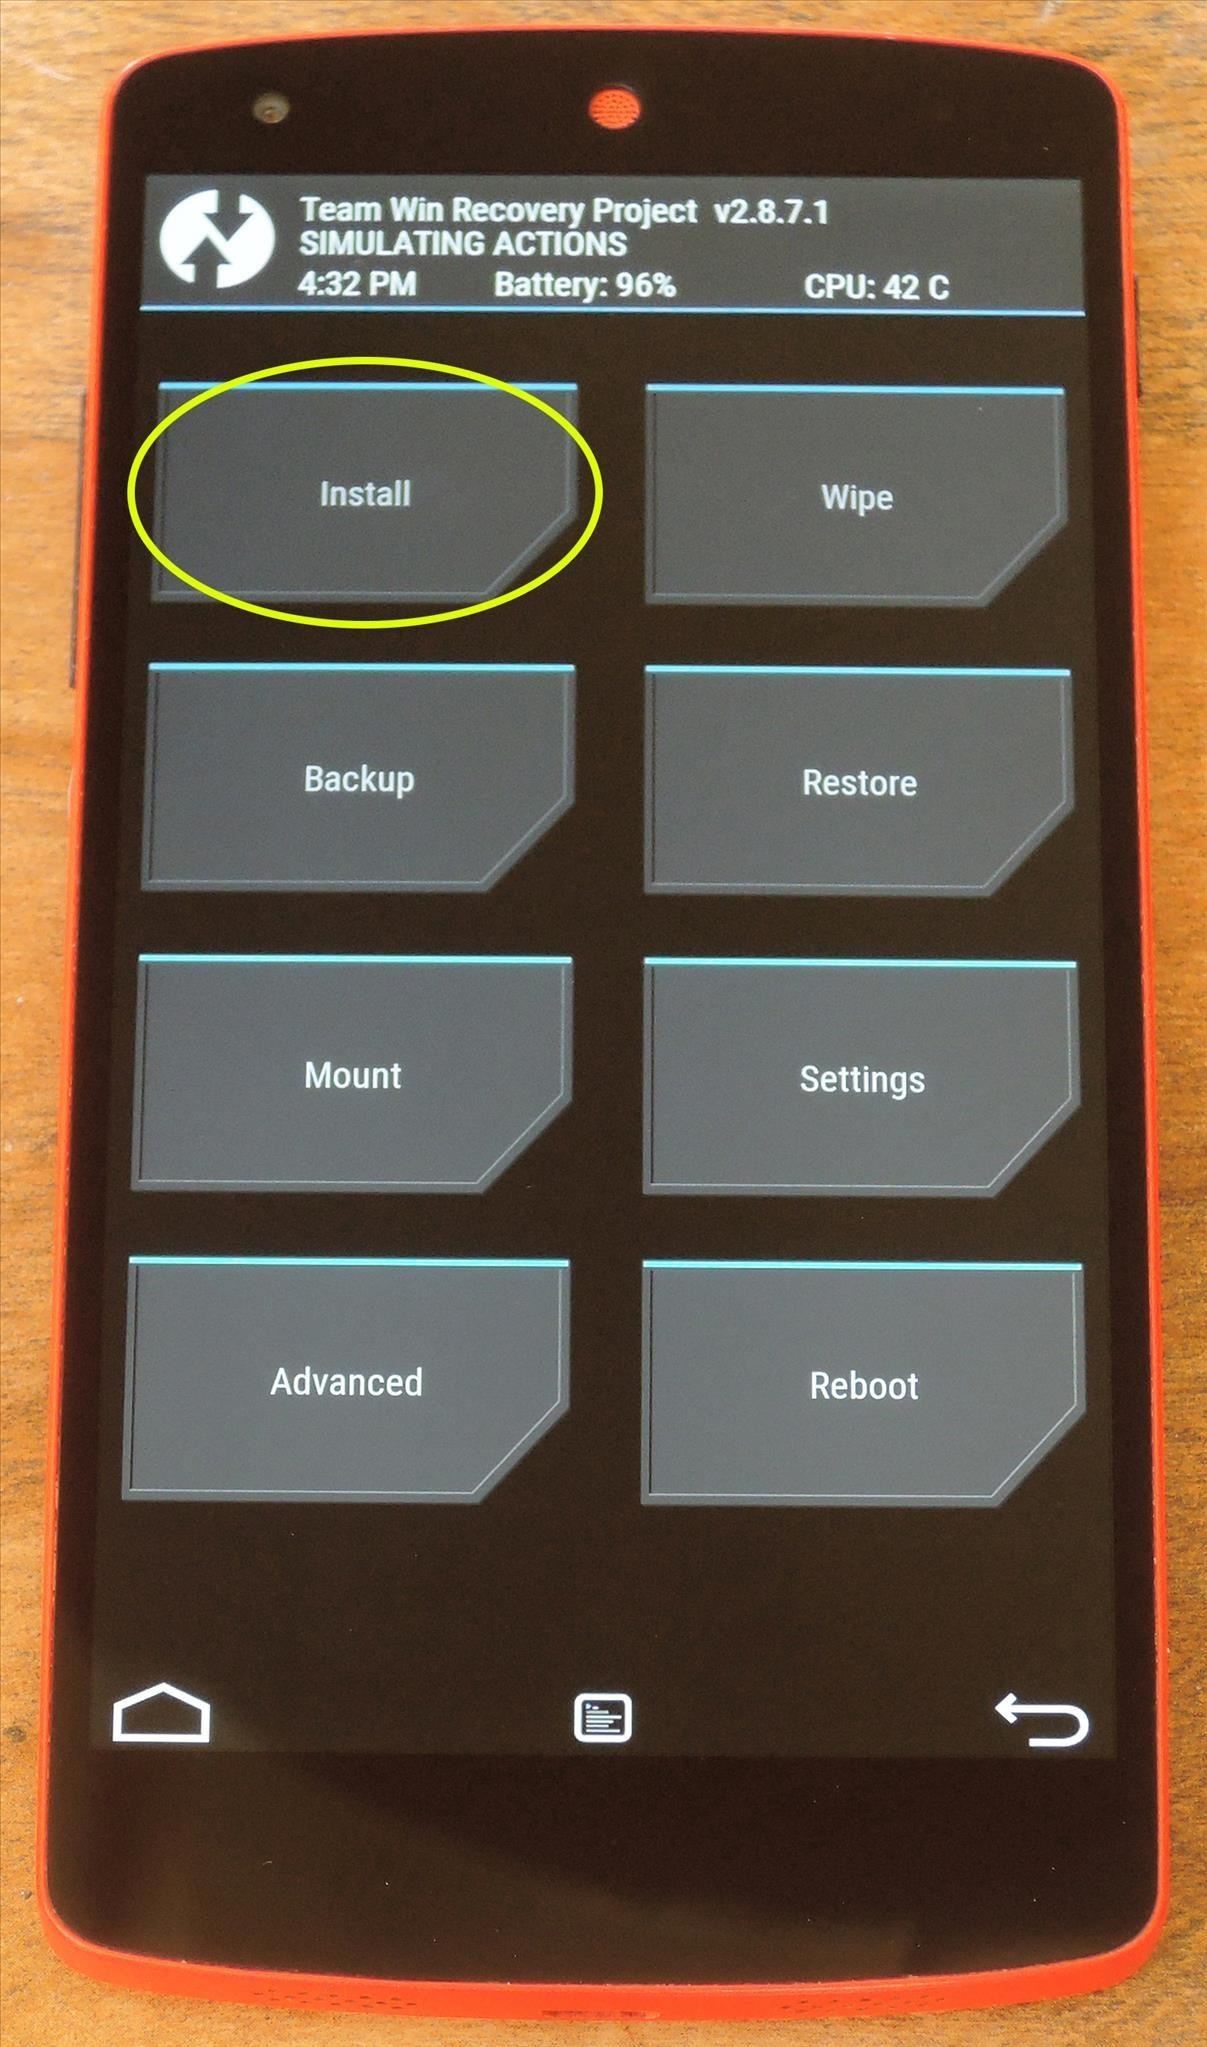
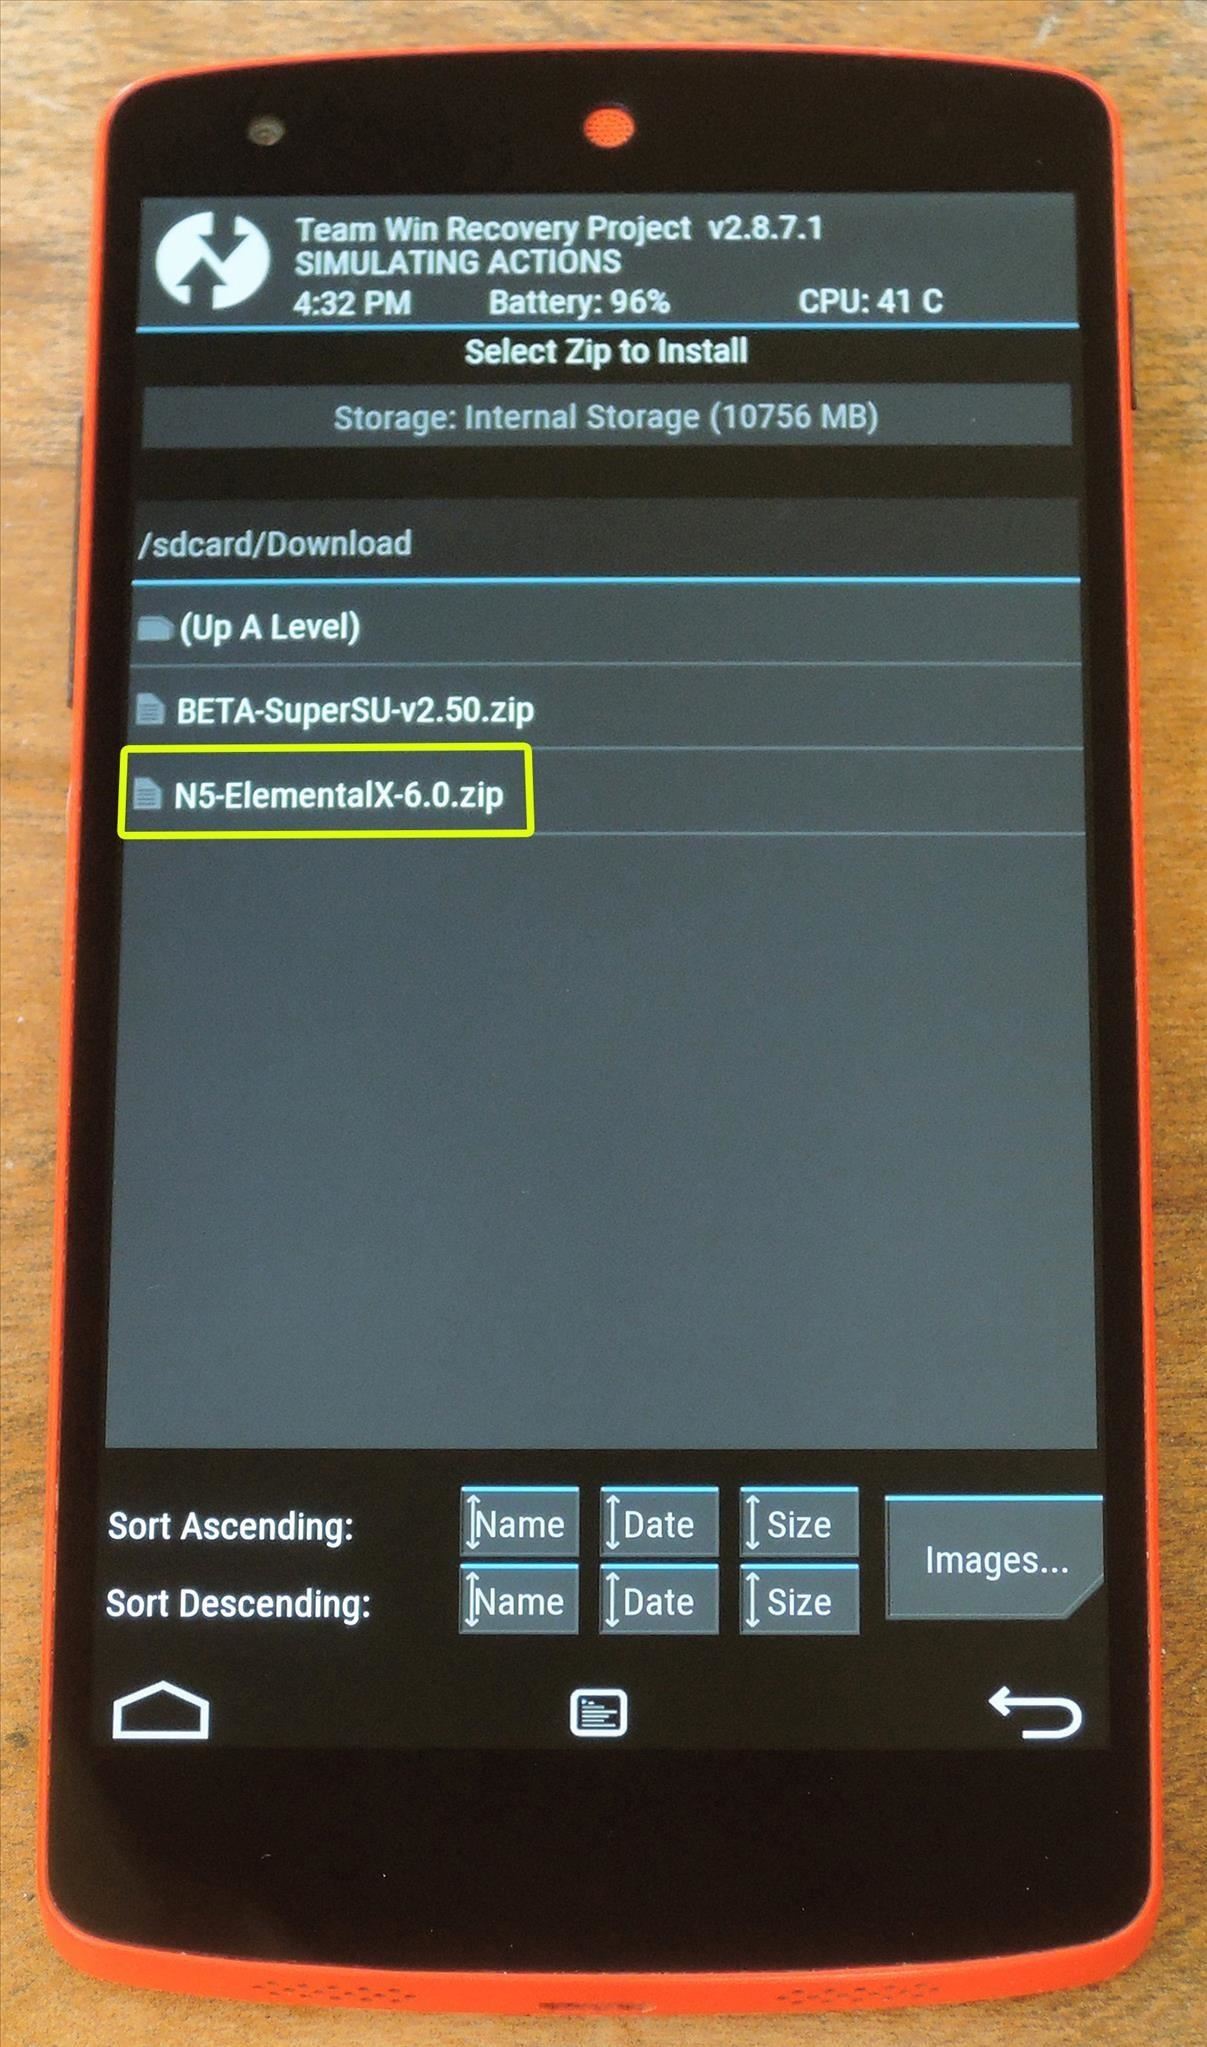
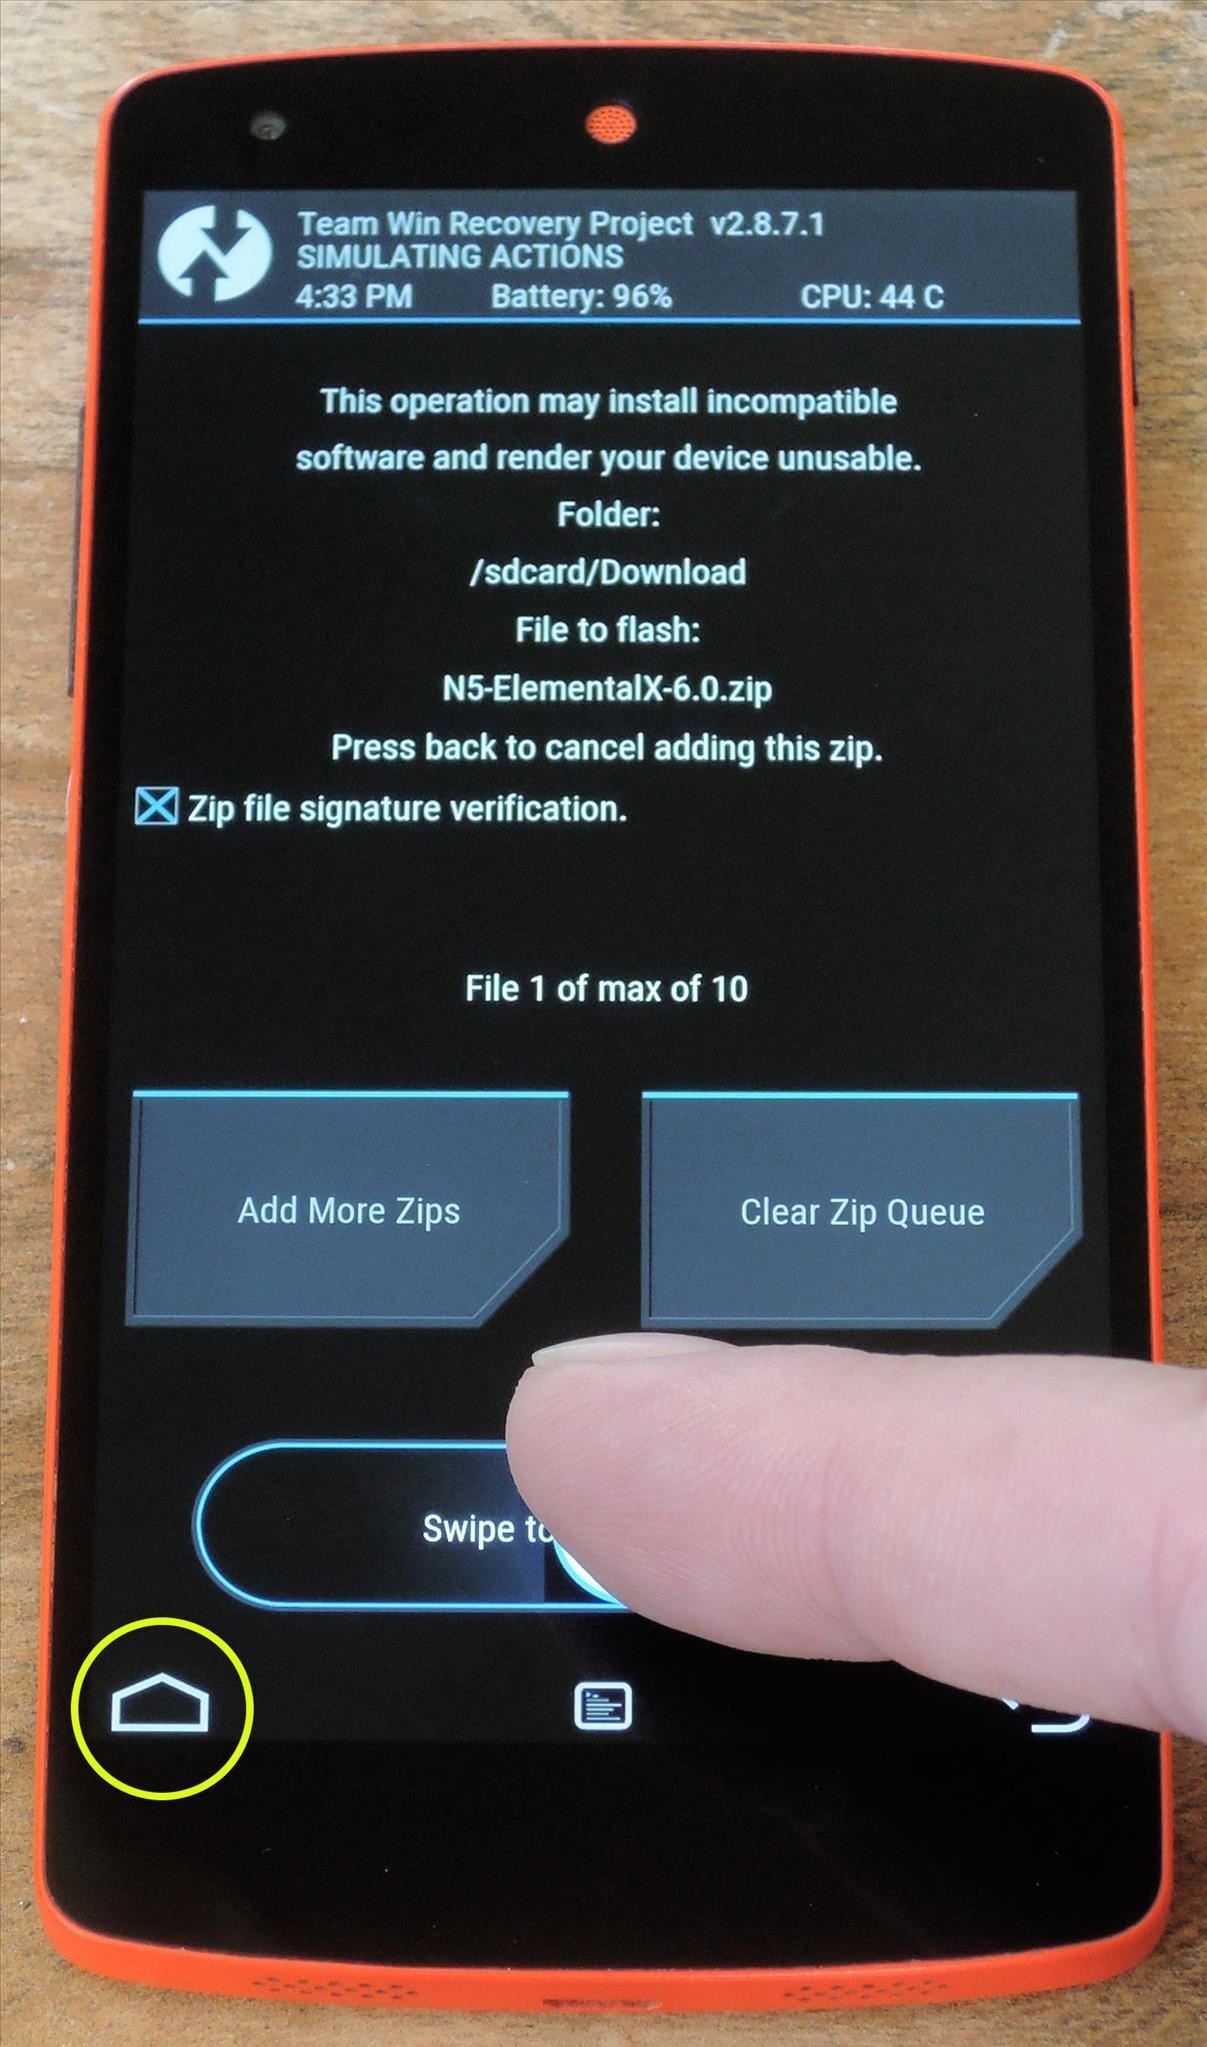
From TWRP’s main menu now, go ahead and press the “Install” button. Next, navigate to your device’s Download folder, then select the ElementalX kernel file that you downloaded in Step 1. From here, simply swipe the slider at the bottom of the screen to install the kernel, and when that’s finished, tap the home button in the bottom-left corner of the screen.
Step 3: Flash SuperSU to Get Root Access
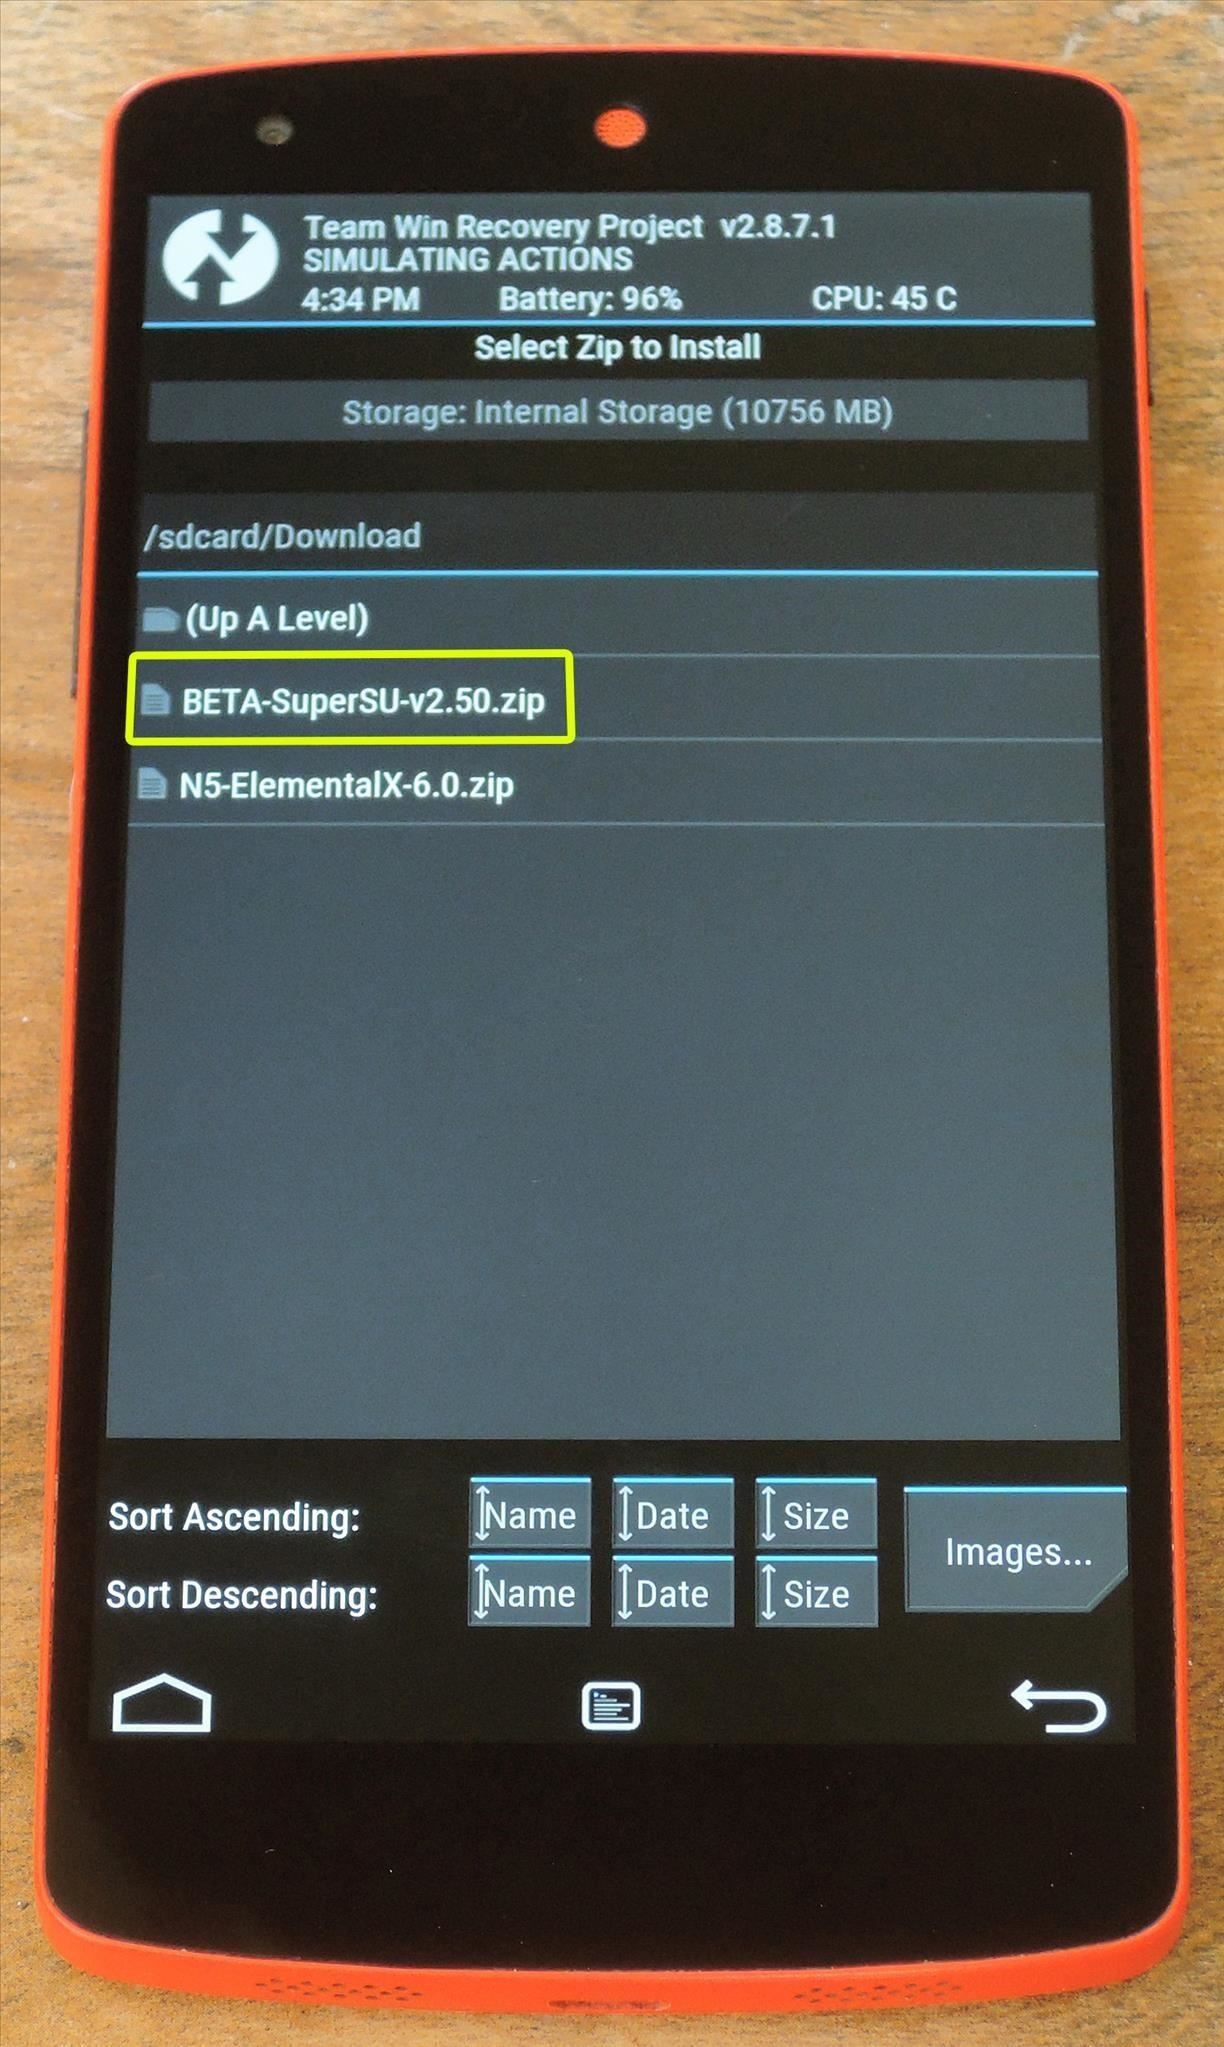
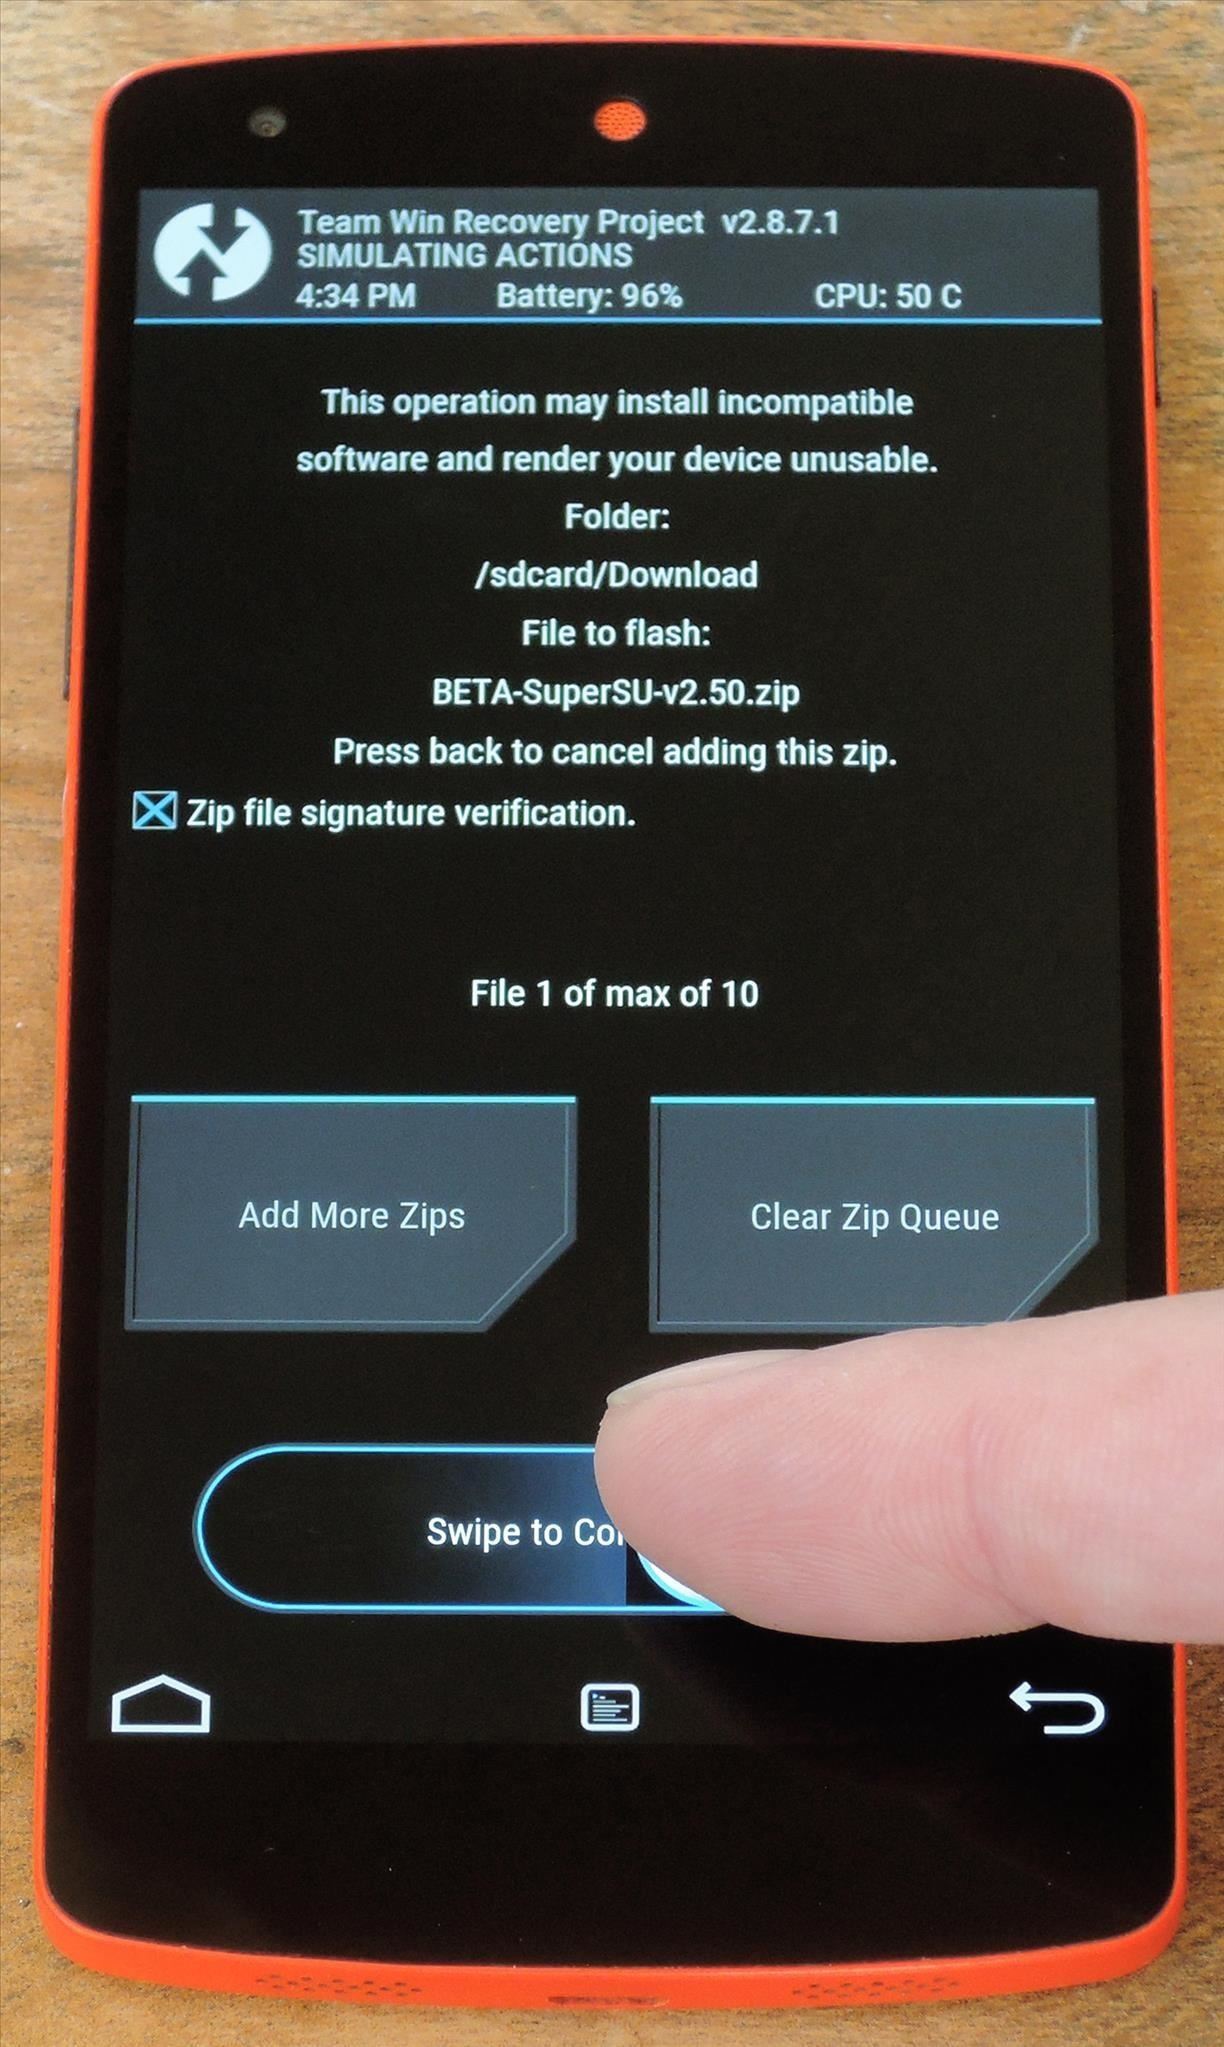
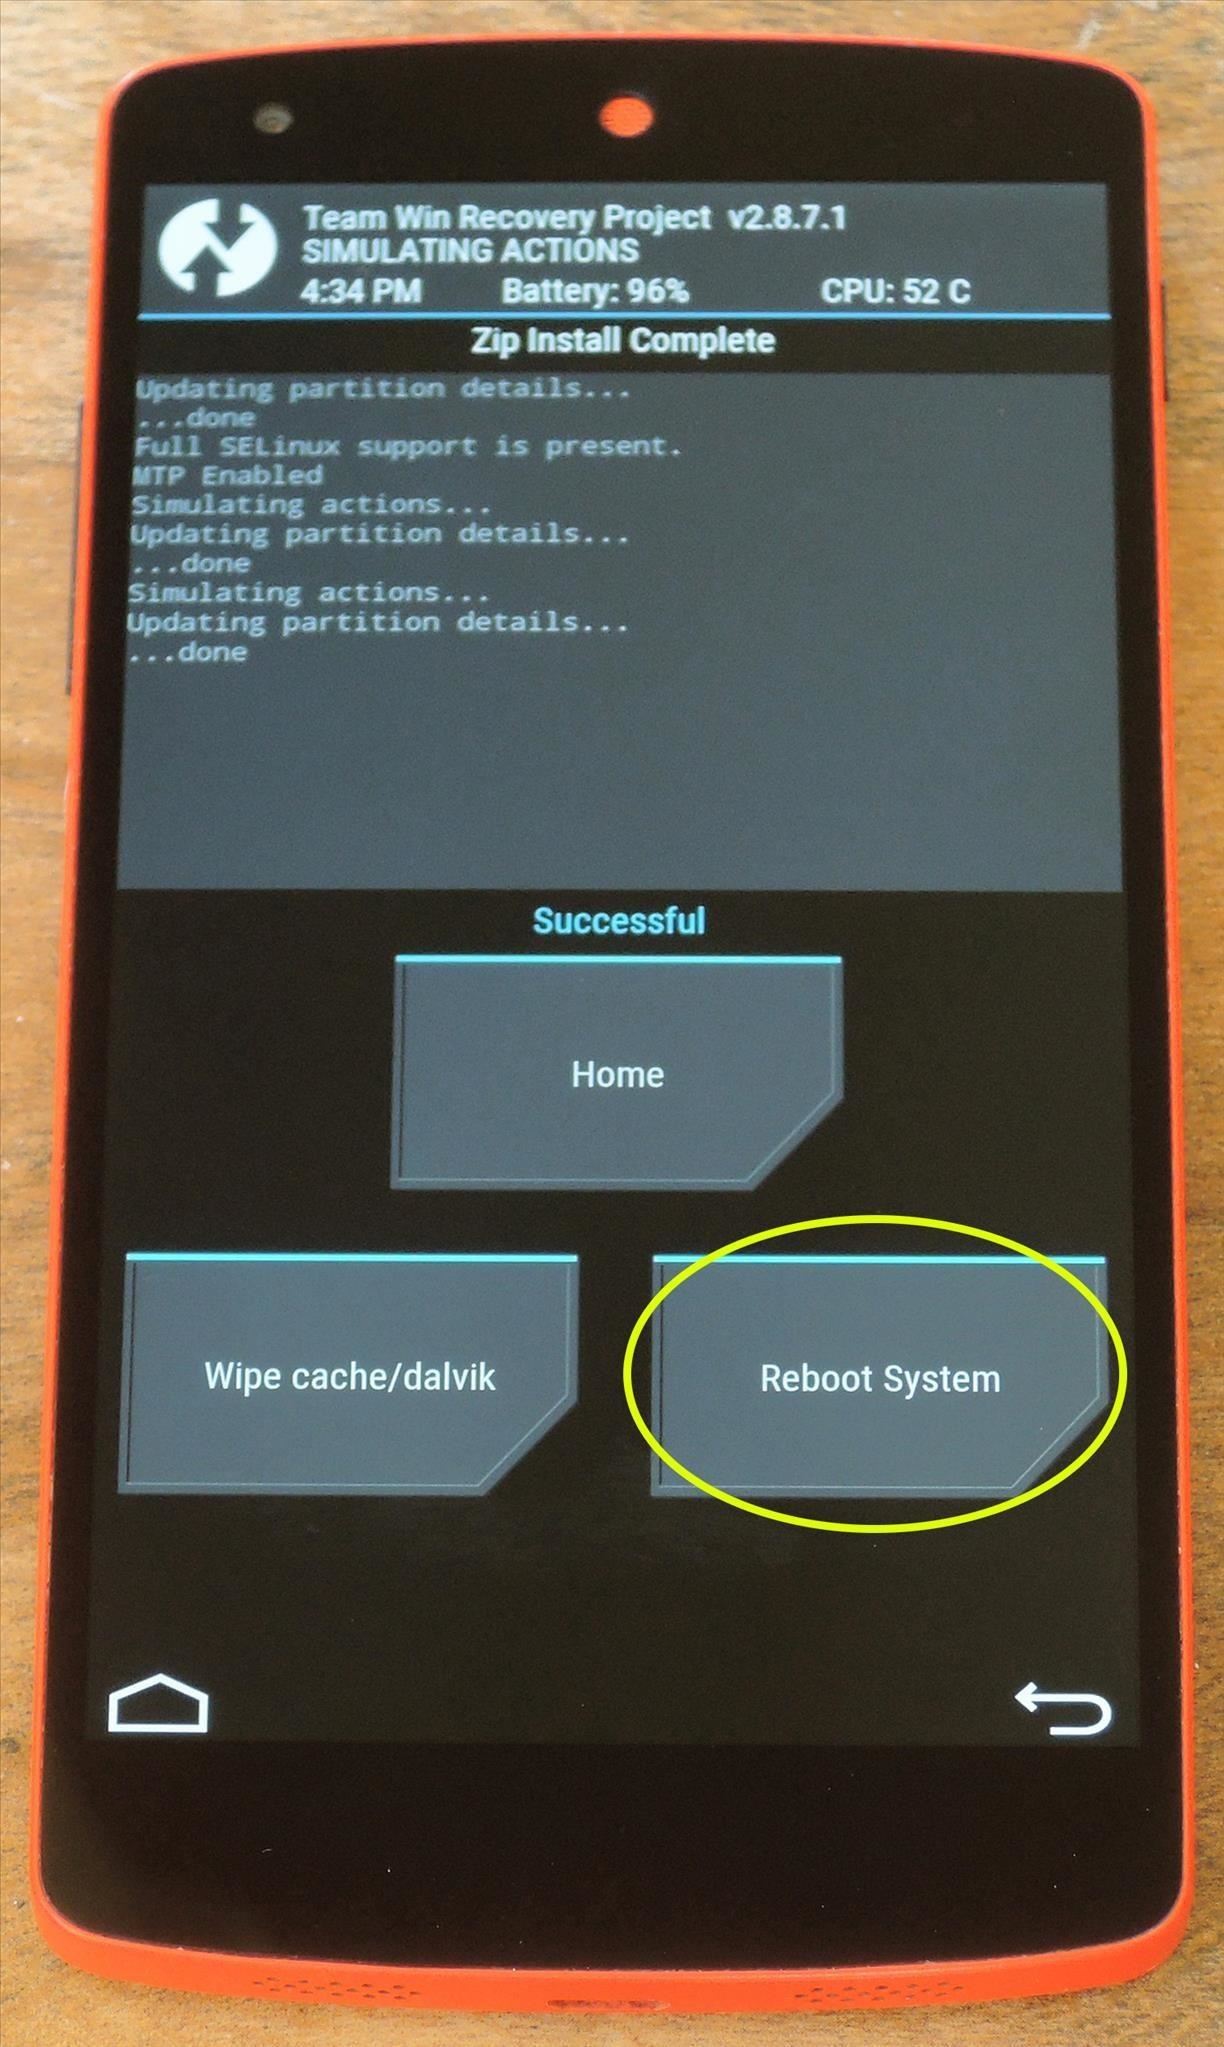
Now that you have a modified boot image/kernel, the rest of the rooting process will be exactly the same as it was with previous Android versions. To begin, tap the “Install” button from TWRP’s main menu and navigate to your Download folder again. From here, select the BETA-SuperSU-v2.50.zip file and swipe the slider at the bottom of the screen to install it. When that’s finished, tap the “Reboot System” button to wrap things up.
Step 4: Verify Root
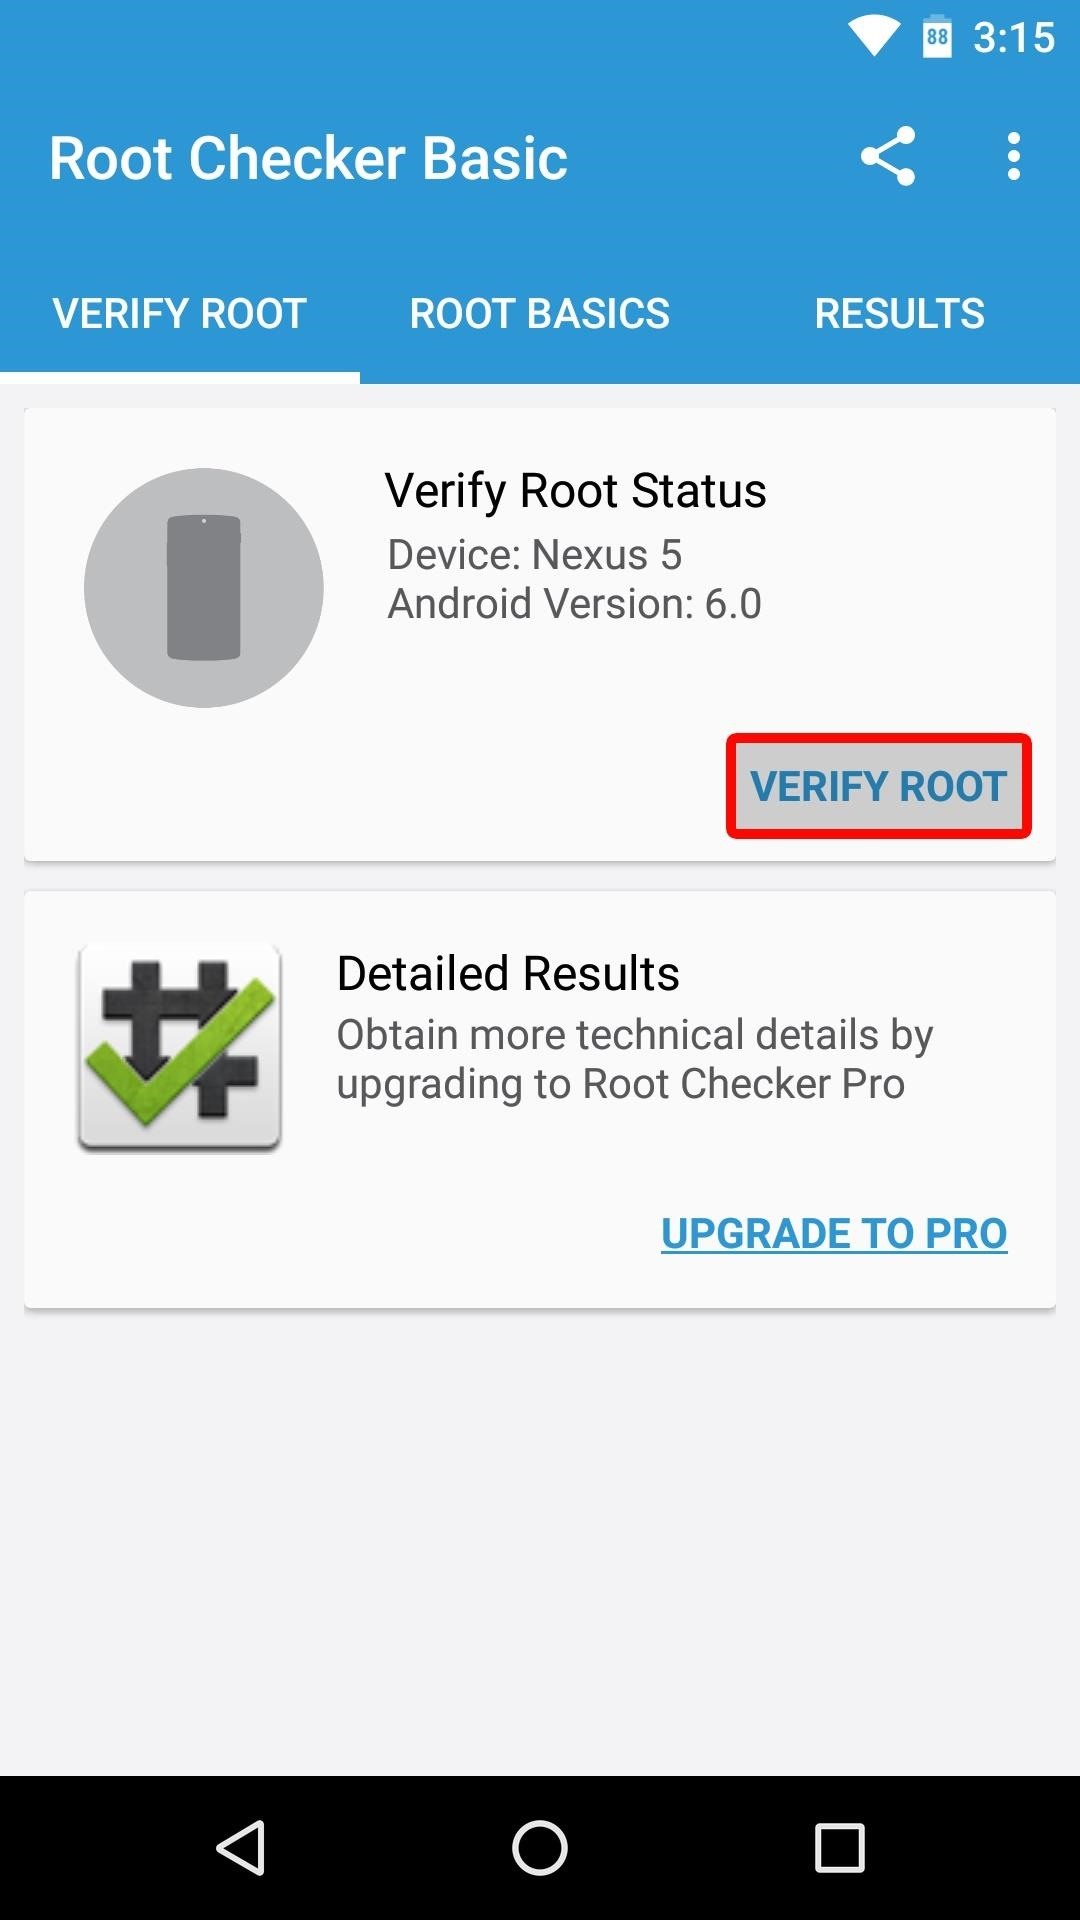
When you get back up, your device should be fully rooted. To verify this, download an app called Root Checker from developer joeykrim.

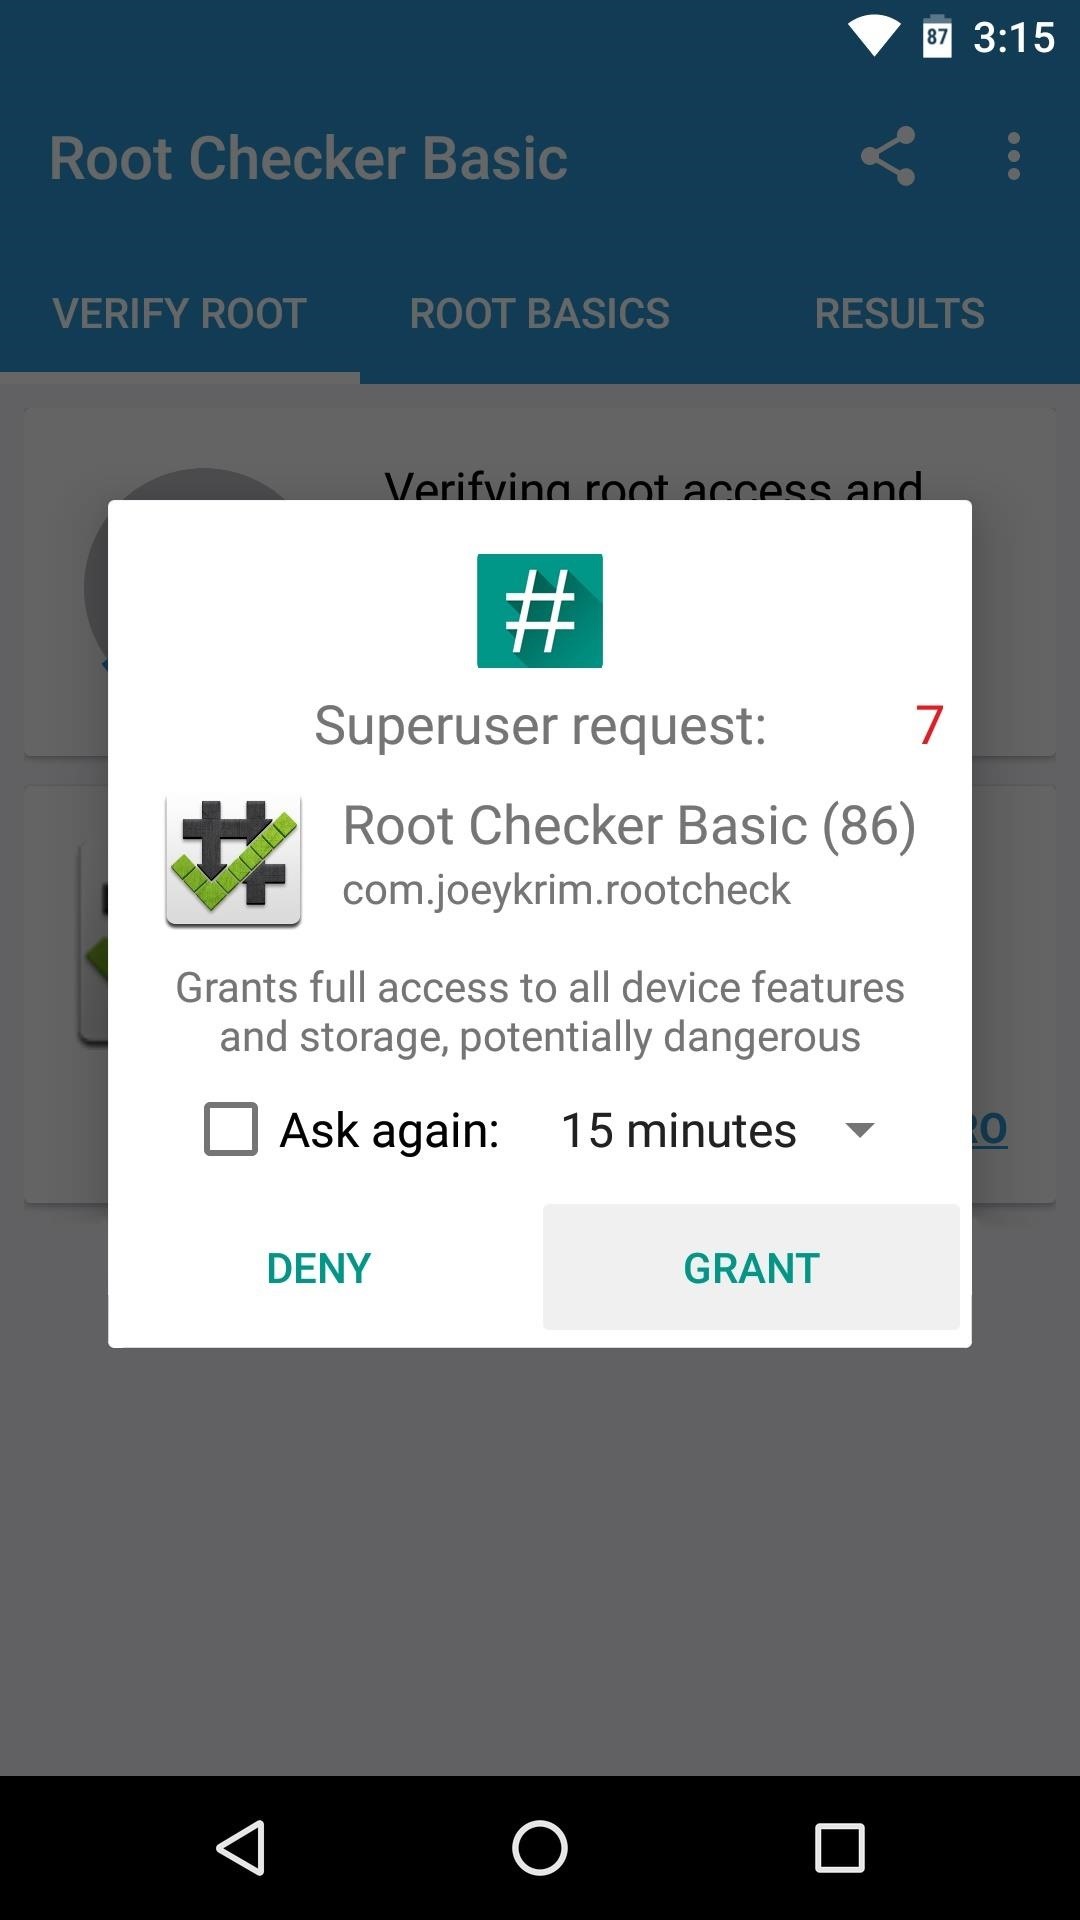
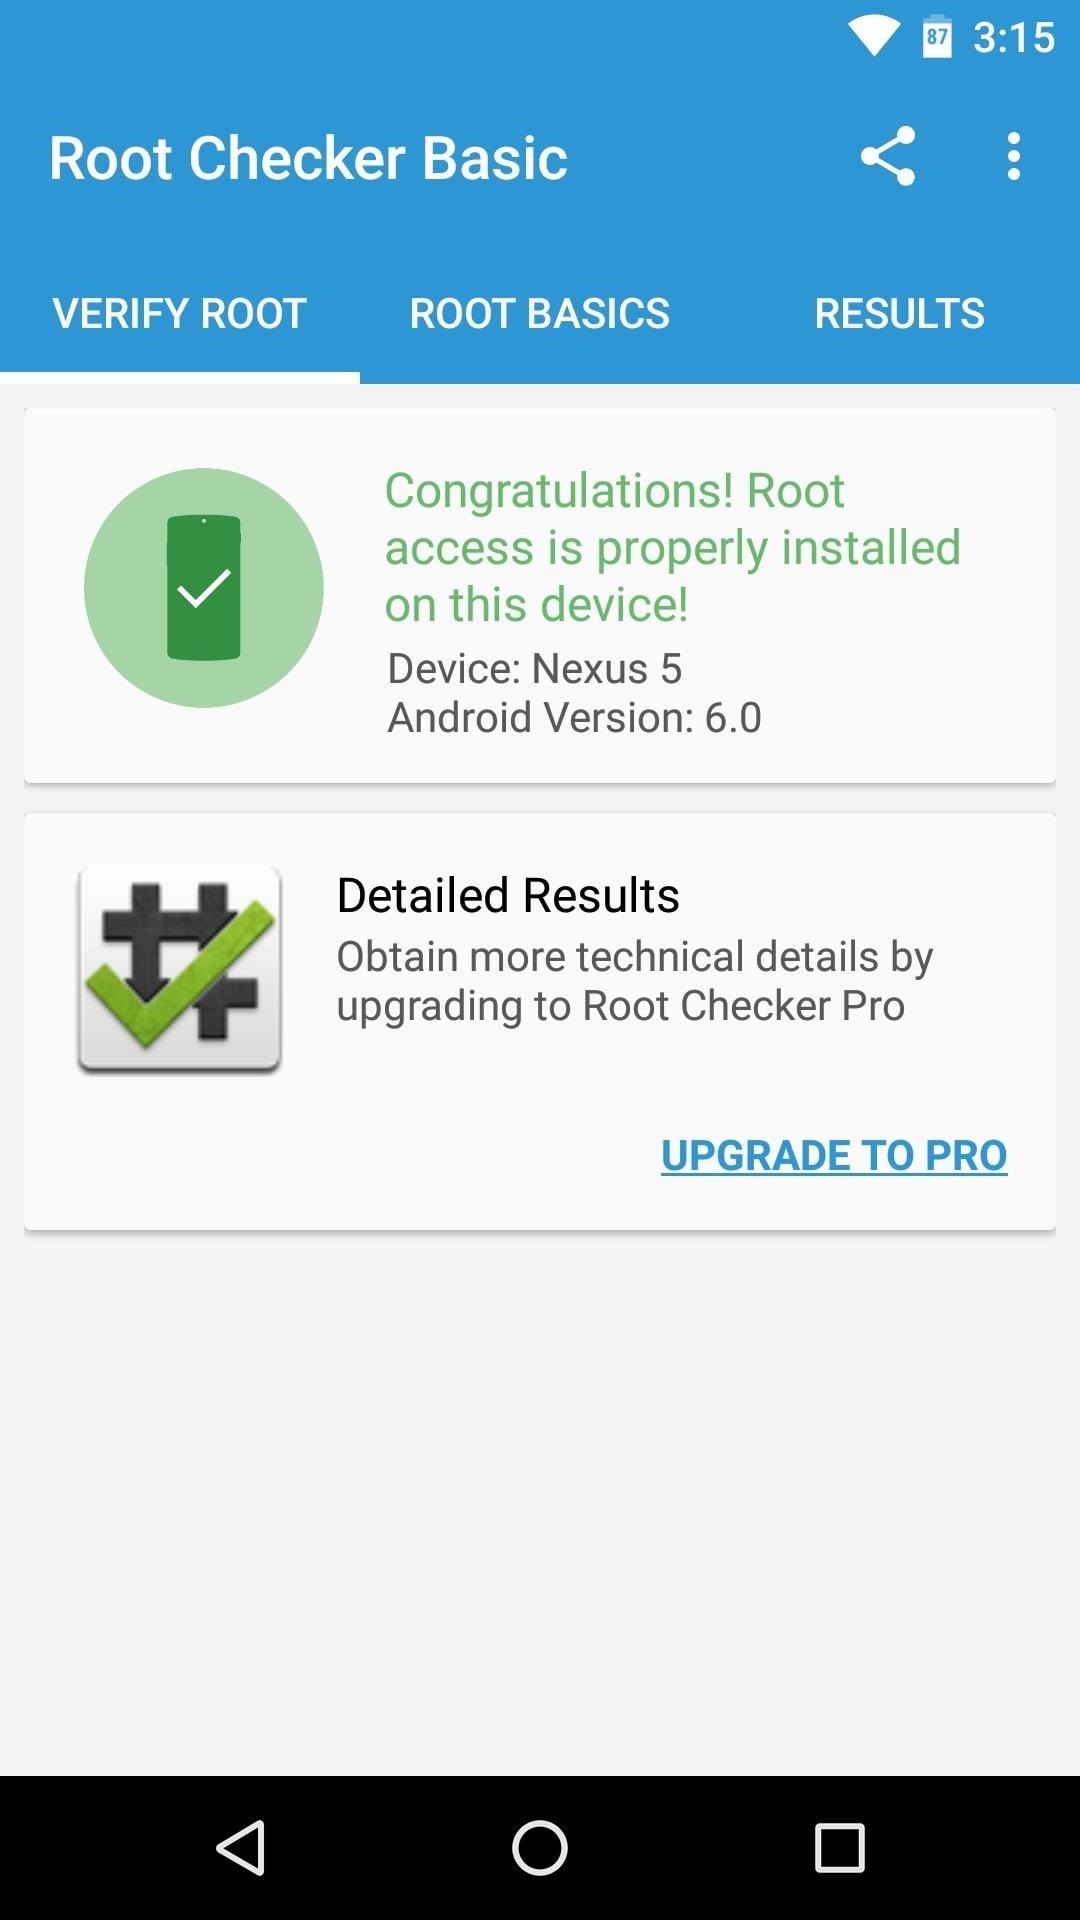
Once you’ve installed the app, simply open it up and tap “Verify Root.” From here, tap “Grant” when prompted to give the app superuser access, and if everything went off without a hitch, you should see a message saying “Congratulations! Root access is properly installed on this device!”
What are your thoughts on the changes in Marshmallow that require a modified boot image before you can root your device? Is this a sign of Google working towards making root impossible, or is it as innocuous as their stated intent of making Android more secure? Tell us what you think in the comment section below, or drop us a line on Android Hacks’ Facebook or Twitter, or Gadget Hacks’ Facebook, Google+, or Twitter.
Just updated your iPhone? You’ll find new emoji, enhanced security, podcast transcripts, Apple Cash virtual numbers, and other useful features. There are even new additions hidden within Safari. Find out what’s new and changed on your iPhone with the iOS 17.4 update.
“Hey there, just a heads-up: We’re part of the Amazon affiliate program, so when you buy through links on our site, we may earn a small commission. But don’t worry, it doesn’t cost you anything extra and helps us keep the lights on. Thanks for your support!”


