How to (Officially) Install Windows on a Steam Deck OLED
Video Games
Quick Links
-
Before You Begin
-
Prepare Your SD Card
-
Copy Windows Drivers to Your SD Card
-
Giving SteamOS the Boot
-
Reverting to SteamOS
-
Alternatively: Installing Windows Directly (Not Recommended)
Key Takeaways
- Thanks to a set of fresh drivers from Valve, Windows 11 will run smoothly on your Steam Deck OLED.
- Using a bootable microSD card for a fresh Windows installation on Steam Deck OLED allows you to keep your data and makes it easy to switch back to SteamOS.
- Make sure that your Steam Deck has the latest BIOS update or certain drivers will not properly work.
Valve’s SteamOS is streamlined and designed with the Steam Deck in mind, but it’s hard to ignore the unending array of Windows native applications and PC-exclusive games. Thanks to some recently-released drivers, you can now give in and install Windows 11 right on your Steam Deck Here’s how.
The following installation instructions are specifically for the Steam Deck OLED. If you are looking to change the operating system of the LCD model, a detailed step-by-step can be found
here
.
Before You Begin
The easiest way to install and run Windows on your Steam Deck OLED is by way of a bootable microSD card. You could wipe the drive and install Windows directly on your Steam Deck’s internal SSD but going for the “fresh start” approach effectively forces you to start from scratch. This complicates the ability to reinstall SteamOS at a later date.
Using an SD card for Windows gives you the freedom to change your mind and switch back to SteamOS to overcome performance issues that are impeding your game of choice. As with any major changes to an operating system, make sure to back up your files and games before proceeding.
To kick off the installation, enable the SteamOS Beta and update your BIOS to version 3.6.9 or later. To do this, press the “Steam” button then navigate to Settings > System > Beta Participation and select “Beta” from the System Update Channel list. You’ll be invited to restart your device, after which a new update will be ready for you. Install it and you’re good to go.
Once your hardware is up-to-date, you will need an ultra-high speed microSD card (UHS-I or faster) with a minimum storage capacity of 64GB. You’ll also need a computer running Windows on which to prepare the medium.
Prepare Your SD Card
The first step to creating a bootable microSD card is acquiring the Windows 11 ISO. On your PC, download the Windows 11 or Windows 10 installation media and ISO straight from Microsoft’s website. Both versions of Windows are supported on the Steam Deck, and the installation process is essentially identical.
Download and Open Rufus
Now that you have the ISO, you’ll use the free, open-source wonder Rufus to actually prepare your card. Visit the official Rufus website on your PC and download the latest version of the executable file. Once downloaded, open the executable to run Rufus.
Insert Your microSD Card
Insert your microSD card into your PC’s card reader. It should be recognized by your computer, but make sure to format it if prompted.
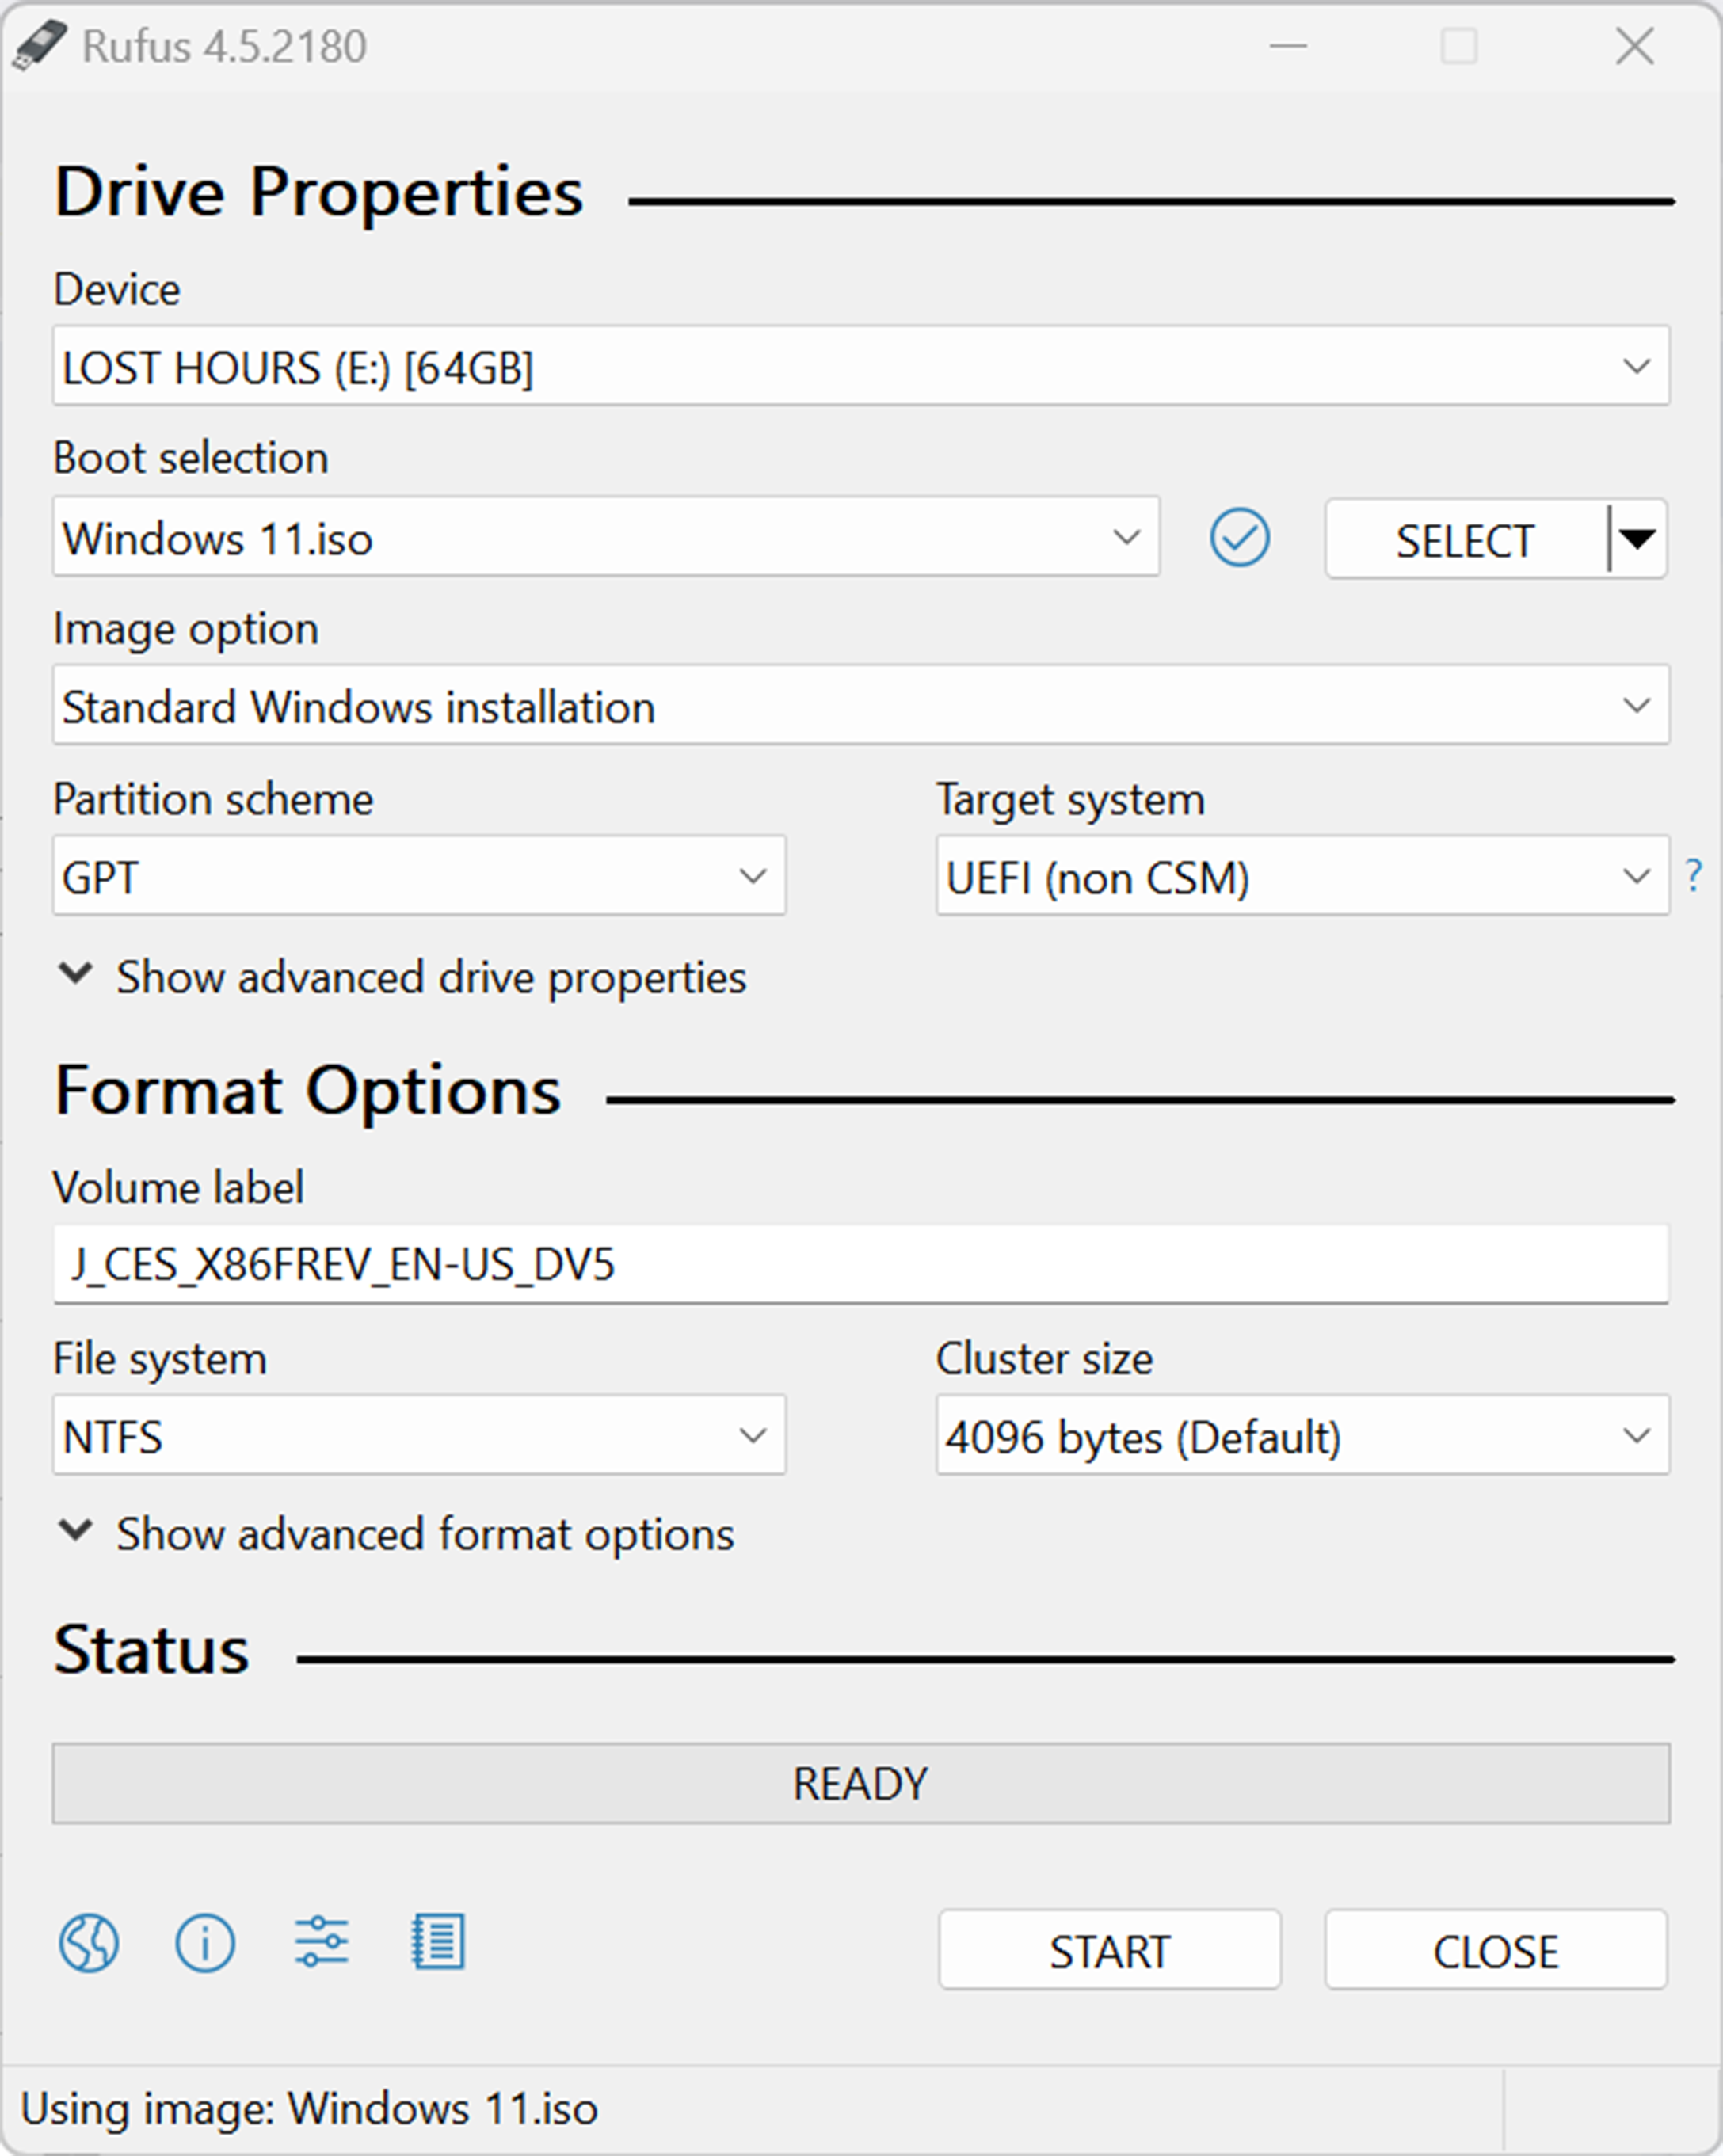
Launch Rufus, and you should see the application’s main window open. Rufus automatically detects connected USB devices or memory cards. In the “Device” drop-down, ensure your microSD card is selected as the target device. Be careful to select the correct device, as the process will format the selected card.
Boot Selection
In the “Boot Selection” section, click on the dropdown and select “Disk or ISO image (Please select)”. After this, click the “Select” button next to the menu and locate your downloaded Windows ISO file from your system. Once found, click “Open” to load the ISO file into Rufus.
Now select “Windows To Go” from the “Image Option” menu.
Partition Scheme and File System
Rufus will automatically set the “Partition Scheme” to GPT and “Target System” to UEFI (non-CSM), which is necessary for compatibility with modern systems like the Steam Deck. The “File System” should be left as NTFS (default for Windows installations).
Now is also the time to rename your microSD card by using the “Volume Label” field if you wish.
Windows User Experience Settings
Once you click the Start button, Rufus will prompt you with Windows User Experience settings. If you prefer to manually configure regional settings or use an online Microsoft account, you can leave the relevant options unchecked. However, for privacy and convenience, enabling these options is recommended.
Finalize Install
After confirming your settings, you will be met with a final warning message that all data on your microSD card will be deleted. You’ve already gone this far, click “OK” to proceed. Rufus will now install Windows on your microSD card.
Copy Windows Drivers to Your SD Card
With your new operating system resting calmly on your SD card, you’re ready to acquire the drivers needed to make software run smoothly on your Steam Deck. Valve’s Steam Deck: Windows Resources page has all the required files. Download the required drivers to your Windows 11 desktop and unzip the files.
Open up the root folder on your microSD and create a new folder. Now you can just select the folders containing the drivers and drag them into the folder you just generated for later use.
Giving SteamOS the Boot
Your freshly prepared boot disc is ready to bring the Windows 11 PC experience to your Steam Deck.
First, power off your Steam Deck completely. Now Insert the SD card into the Steam Deck’s microSD card slot. Hold the “Volume Down” button and press the “Power” button, then release both buttons once you hear a sound.
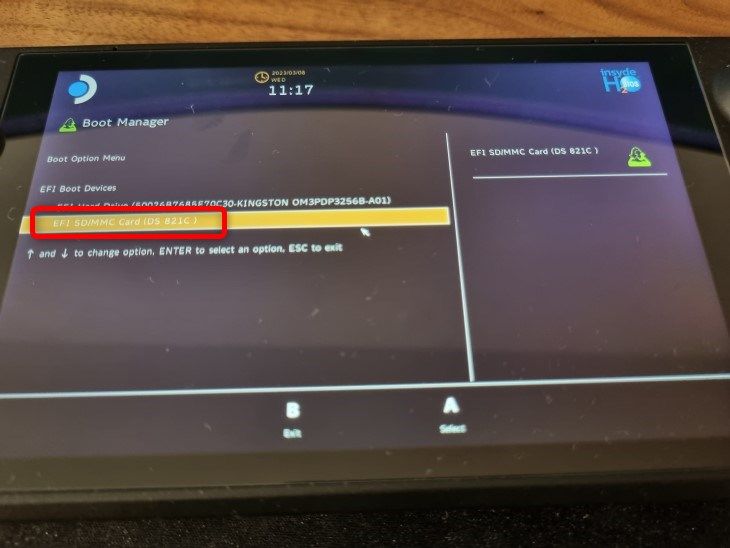
You’ll be taken to the boot selection menu. Select your SD card and press “A” to set up Windows.
Once inside Windows, you can return your screen to its rightful horizontal position. Right-click and head to Desktop > Display Settings > Scale & Layout > Display Orientation > Switch to Landscape to fix the screen layout.
With Windows installed and booting on your OLED Steam Deck, it’s time to set up those essential drivers we left snug in the root directory of your SD card. Navigate to the folder and proceed to install each driver.
Install the APU Driver
Find the “setup.exe” file in the folder for the APU driver and run it to install.
Install the SD Card Reader Driver
Go to the “BayHub_SD_STOR_install” folder and run the “setup.exe” executable.
Install the Wi-Fi Driver
Navigate to the Wi-Fi driver folder, right-click the “qcwlan64.inf “file, and choose “Install.”
Bluetooth Driver
For Bluetooth, right-click “qcbtuart.inf” in the Bluetooth driver folder and select “Install”. Keep in mind, if this doesn’t work, you may not have remembered to update the BIOS for your OLED Steam Deck.
Audio Drivers
You will need to install three different drivers for full audio functionality: “cs35l41.inf”, “NAU88L21.inf”, “amdi2scodec.inf”. For each driver, right-click, then select “Install.”
Once all drivers are installed, Windows will function on your OLED Steam like the desktop you dragged to your buddy’s basement to get in some matches of Counter Strike in 2001.
Reverting to SteamOS
Since you made the wise decision to install Windows 11 on a bootable SD, it’s a breeze to return to SteamOS if you so choose.
First, power off your Steam Deck completely. Hold the “Volume Down button and press the “Power” button. Release both buttons once you hear a sound. You’ll be taken to the boot selection menu.
Select your Steam Deck’s SSD and press “A” to boot back into the intended OS.
Alternatively: Installing Windows Directly (Not Recommended)
If you are still hellbent on nuking the Steam Deck’s SSD in order to go “full Windows” on your handheld, it’s a similar process with just a few tweaks. Grab a USB drive that can hold at least 32GB of data and connect it to your Windows PC. Download the ISO from Microsoft’s website in the same fashion as previously mentioned, run Rufus, and choose your memory stick of choice in the “Device” window.
You will still choose “Disk or ISO Image (Please select)” from the “Boot Selection” menu, click the “Select” button next to it, and open the Windows ISO file. Since you are installing the operating system directly onto the hard drive, select “Standard Windows Installation” from the “Image Option” drop-down.
When greeted by the “Windows User Experience” window, make sure the box next to “Remove requirement for “4GB+ RAM, Secure Boot, and TPM 2.0” is checked and proceed to finalize the installation.
Once you have finished setting up your USB, create a folder in the root and download the drivers, and you are ready for installation.
Power off your Steam Deck completely and insert your flash drive into the Steam Deck’s USB port. Hold the “Volume Down” button and press the “Power” button. Release both buttons once you hear a sound. You’ll be taken to the boot selection menu.
Select your USB drive and press “A” to start the Windows 11 installation process. Go through the setup and select “Custom: Install Windows Only” when prompted. When asked where to install Windows 11, delete all partitions and create a new one.
There’s no turning back now—this will delete all the information stored on your OLED Steam Deck. Choose the new partition as the installation location. You are good to go. Now fix the screen, install the drivers, and enjoy your odd-shaped Windows 11 laptop.
Windows on a Steam Deck is nice, but not essential. There are lots of options for playing games from the Epic Game Store on your Valve handheld that don’t involve a Windows installation.


