


Apple released the new Mac OS X 10.10 Yosemite in the Mac App Store for everyone to download and install for free on October 16th, 2014, but downloading a 5+ GB file for each of your computers will take some serious time. The best thing to do is download it once and create a bootable install USB drive from the file for all of your Macs.
- Don’t Miss: How to Create a Bootable Install Drive of 10.11 El Capitan
- Don’t Miss: How to Create a Bootable Install Drive of 10.9 Mavericks

Just make sure that once you have the installation app for Yosemite in your Applications folder, which will be named “Install OS X Yosemite,” that you don’t install it yet. (Previous versions of the app installer were named “Install OS X 10.10 Developer Preview” and “Install OS X Yosemite Beta.”)

Once you install Yosemite, the file will automatically erase itself, so it’s important to make a bootable drive first. If you want to install first and then make a bootable drive, make a copy of the installer app in another location so you can access it later. Worst case scenario is downloading the large file again from the Mac App Store, but then why make a bootable drive?
The Easiest Way: Use DiskMaker X
By far the easiest way to create a bootable drive is to use the DiskMaker X application, which automates the entire process in the next method. To start out, download the newest version of DiskMaker X from its website. Currently, that’s the Yosemite Beta version. (Update: the public Yosemite version is out now, and you can download it from here, here, or here.)
Once download, open it up and select “Yosemite Beta” or “Yosemite 10.10” (depending on the version you’re using) to start the process.

You’ll be warned about it being a beta software, but once you get passed that, make sure to select “Use this copy” to use the installer app it found in your Applications folder. If you have more than one installer like I do, you’ll want to make sure to do it manually.

Next, select what type of drive you have. I’m using a 16 GB drive, but I still chose the “An 8 GB USB thumb drive” option. Afterward, select your drive from the list.

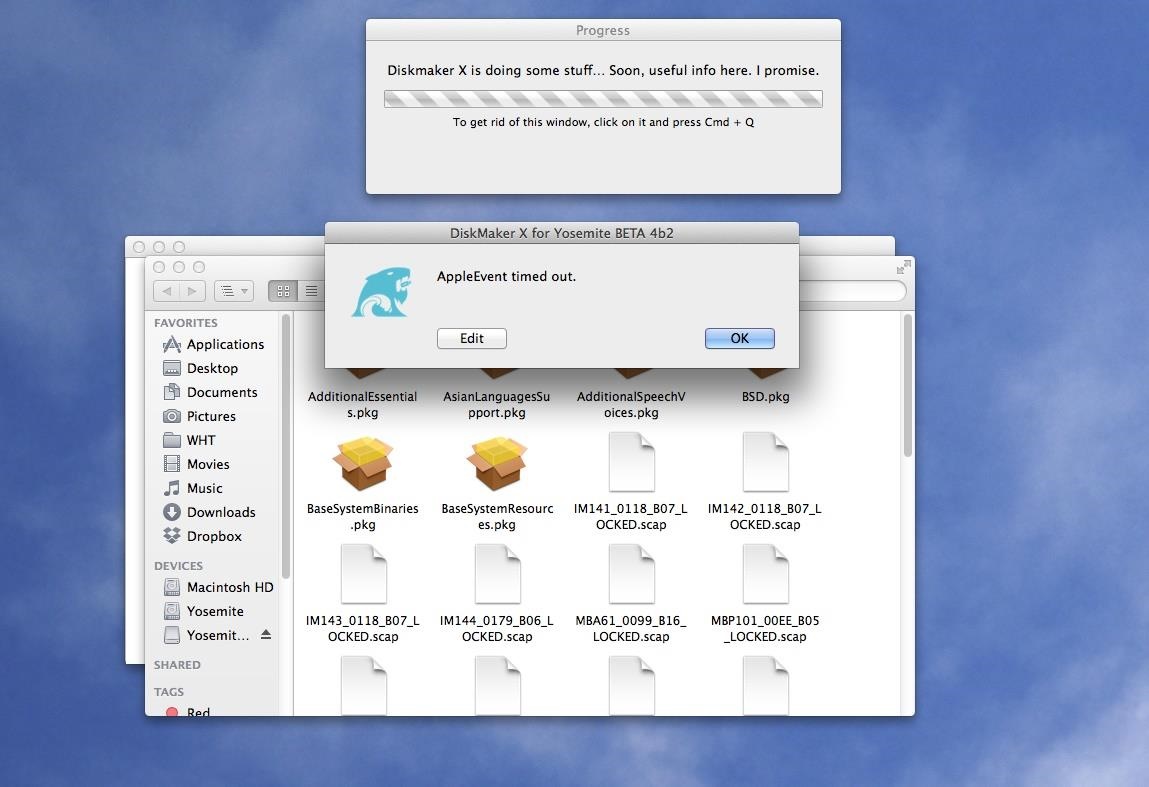
Then just follow the rest of the prompts to start the disk-making process. It could take anywhere from 15 minutes to to 45 minutes to finish, depending on your USB flash drive. If it’s more toward the latter, you might get a “AppleEvent timed out” error, but it should still work, according to the developer (it worked for me).
The Less Easy Way: Format & Use Terminal
If you’re more comfortable with Terminal commands, this is the method for you. Just make sure your USB drive is already formatted correctly before proceeding. To see how to correctly format your USB drive, please see Step #1 below in the “The Hardest Way” section.
With your USB drive ready to go, open up Terminal and type (or copy/paste) the following command.
- sudo /Applications/Install OS X Yosemite.app/Contents/Resources/createinstallmedia –volume /Volumes/Yosemite –applicationpath /Applications/Install OS X Yosemite.app –nointeraction
Note that you should replace the “Yosemite” in “Volumes/Yosemite” with whatever you named your USB drive.
This should all be one line. After you get it in there, just hit the Enter key. Type in your admin password to continue and the Enter again. (You won’t visibly see your password typing, but it’s happening—believe me.)
Now just wait. This could be fairly quickly or very long, depending on your system and USB drive.
The Hardest Way: Do Everything Manually
If you don’t want to use DiskMaker X or Terminal commands, this is another option for you. It’s a lot more complicated, but gets the job done.
Step 1: Reformat Your USB Drive
First, make sure you have a USB flash drive that’s at least 8 GBs in size, then mount it. Open up Disk Utility and do the following.
- Select the USB drive (not the partition)
- Go to the Partition tab
- Change the “Partition Layout” to 1 Partition
- Rename it Yosemite (or whatever you want)
- Select Mac OS Extended (Journaled) as the “Format”
- Click the Options… button

- Select GUID Partition Table
- Hit OK

- Select Apply
- Confirm by clicking on Partition

Then just wait for it to finish erasing and repartitioning your USB flash drive. It will mount back up when it’s done.
Step 2: Open the InstallESD Disk Image
Now that your USB thumb drive is ready, you’ll need to open the InstallESD.dmg file from your Yosemite Install app.
- Head to Applications
- Find the Install OS X Yosemite app
- Right-click on it and Show Package Contents

- Navigate to Contents -> SharedSupport and open InstallESD.dmg
- Wait for it to finish Verifying… and mount

- When it mounts, you’ll see a new window with a Packages folder

Now, don’t do anything with this Packages folder just yet. First, we need to unhide the files located in this newly mounted OS X Install ESD image.
Step 3: Unhide All Files in Finder
To see the hidden files in the OS X Install ESD image, open up a Terminal and input the following two commands (hit Enter after each one). And don’t worry, we’ll be undoing this at the end of this guide.
- defaults write com.apple.finder AppleShowAllFiles TRUE
- killall Finder

If successful, you will see three other files slightly grayed out in the mounted OS X Install ESD window. The one we need here is BaseSystem.dmg.

Step 4: Restore Your USB Drive to BaseSystem
Now, go back into Disk Utility and select the Yosemite partition of your mounted USB flash drive.
- Open the Restore tab
- Drag and drop Yosemite down to the Destination path
- Drag and drop BaseSystem.dmg to the Source path
- Hit the Restore button

Then, on the following prompts, click on Erase to initiate the restore process, then enter in your admin password and hit OK to proceed. Afterward, you’ll have to wait a few minutes until it remounts. Once it does, you should see the OS X Base System window open.

System is the folder we’re looking for, so proceed to the next step.
Step 5: Move the Packages Folder Over to Your Drive
Go ahead and open the System folder. A new window should pop up, and once it does, open the Installation folder. Then, head back to your OS X Install ESD window and drag and drop the Packages folder inside of the Installation folder.

Go ahead and hit Replace to confirm that you want to write over the Packages alias, then wait for it to finish copying over. This will take a few minutes, as it’s over 4 GBs large.

And we’re almost done now. Only a couple things left to copy over…
Step 6: Copy Over the BaseSystem Files
Now, you need to go back to the root of your OS X Base System partition and copy the BaseSystem.chunklist and BaseSystem.dmg files from the OS X Install ESD window where you grabbed the Packages folder from. It should take less than a minute to copy over.

Step 7: Hide All Files in Finder
Unless you want to see a bunch of grayed out hidden files on your Mac, I’d suggest you rehide them all. To do so, open up Terminal again and do the following two commands.
- defaults write com.apple.finder AppleShowAllFiles FALSE
- killall Finder

After your Finder reloads, the hidden files you once saw before should now be gone. Go ahead and close all of your windows, exit Terminal and Disk Utility, and eject your mounted disks to clean up your mess.
Installing Yosemite on Your Computer
Now, it’s time to test out your new drive. Restart your computer while holding the Option (Alt) key on your keyboard. Wait until the Startup Manager pops up, then select your new OS X Base System volume (or whatever your bootable drive is called). Alternatively, you can just hold down the C button while starting up to boot directly into the USB drive.

Then just follow the install instructions and wait for your new Yosemite experience. When you come to the Install OS X screen, make sure to select the right disk. I created a new partition on my hard drive called “Yosemite,” so I used that.

Once it’s done installing, you’ll get to the Welcome screen, and you should be able to figure it out from there.

Troubleshooting Tips
If the installation of Yosemite freezes, it’s probably because your USB drive is corrupted in some way. This happened to me on the first couple tries, where it would freeze at 5 minutes left. The third USB stick I used was successful, and it took less than 15 minutes for Yosemite to boot up.
If you’re getting an Undefined error: 0 warning when trying to install, this more than likely means that you forgot to perform Step 6 above, so make sure to copy over those two BaseSystem files.
If you got the “AppleEvent timed out” error using DiskMaker X, more than likely it’ll still work. Just eject the new drive and use it. If it doesn’t work, try one of the other methods out to start over.
If you’re not sure if you’re going to like Yosemite over Mavericks, I would suggest adding another partition to your Mac and installing Yosemite there, that way if anything goes wrong, your Mavericks installation will still be untouched.
Just updated your iPhone? You’ll find new emoji, enhanced security, podcast transcripts, Apple Cash virtual numbers, and other useful features. There are even new additions hidden within Safari. Find out what’s new and changed on your iPhone with the iOS 17.4 update.
“Hey there, just a heads-up: We’re part of the Amazon affiliate program, so when you buy through links on our site, we may earn a small commission. But don’t worry, it doesn’t cost you anything extra and helps us keep the lights on. Thanks for your support!”

