Many users use the external keyboard when their laptop is broken or not working. If you also use an external keyboard on your laptop, you may want to disable your laptop’s built-in keyboard to preserve battery life.
Hence, if you are looking for ways to turn off your laptop’s built-in keyboard on Windows 11, here’s what you need to do.
Important: Several third-party programs are available for Windows that claim to disable the keyboard. We recommend you refrain from installing such programs on your laptop, which are usually filled with adware and malware.
1. Disable Laptop Internet Keyboard via Device Manager
You can use the Device Manager to turn off your Laptop’s internal keyboard. However, if you restart your computer, the keyboard will be enabled again.
1. Click on the Windows 11 Search and type in Device Manager. Then, click on the Device Manager from the list of options.

2. On the Device Manager, expand the Keyboards section.

3. Right-click on the internal keyboard and select the Disable option.
4. If the Disable option is missing, click the Uninstall Device option.

2. Disable Laptop Internet Keyboard using Group Policy
This method will use the Local Group policy to turn off the Laptop’s internal keyboard. This will permanently disable your keyboard on Windows 11.
1. Open Device Manager on Windows 11 and expand the Keyboard section. Now right-click on the internal keyboard and select Properties.

2. Switch to the Details tab and select Hardware IDs on the Property drop-down menu. Now, right-click on the first entry on the Value and select the Copy option.

3. Press the Windows Key + R button to open the RUN dialog box. On the RUN dialog box, type in gpedit.msc and hit the Enter button.

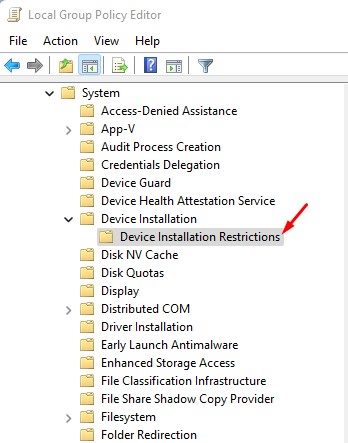
4. On the Local Group Policy, navigate to the path:
Computer Configuration > Administrative Templates > System > Device Installation > Device Installation Restrictions
5. On the right, find and double click on the Prevent installation of devices that match any of these device IDs.
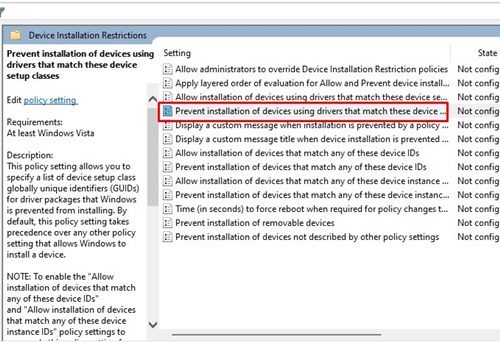
6. On the next Window, select Enabled and click on the Show button as shown below.

7. In the Show Contents dialog box, double-click on the blank space and paste the hardware ID you have copied in Step 2.

8. Once done, click on the OK button and then on Apply.
9. Now open the Device Manager and expand the Keyboards. Right-click on your internal keyboard and select the Uninstall device option.
3. Disable Laptop Keyboard using Apps
Several third-party apps for Windows 11 allow you to disable the laptop keyboard. You can use any apps to turn off the laptop keyboard without modifying any group policy or changing the Device Manager.
The problem with these apps is that they often try to install adware and bundled apps during the installation. So, download these tools from trusted sources and uncheck all bundled apps during the installation process.
KeyFreeze

KeyFreeze is a freeware software that locks the keyboard & mouse on your computer while keeping your screen unlocked.
The program’s legitimacy is yet to be verified, but you can still download it from trusted sources.
LiteLockr

LiteLockr is very similar to the KeyFreeze app listed above. This little program allows you to lock either your keyboard or mouse.
To get started, you must set up a keyboard shortcut key on LiteLockr to lock your keyboard. Then, you need to use the same key combination to unlock the keyboard.
These are the two best apps for disabling the laptop keyboard on a Windows 11 computer. Make sure to download these tools from trusted sources.
The methods we have shared might look complicated, but they work. I hope this article helped you! Please share it with your friends also. If you have any doubts, let us know in the comment box below.
“Hey there! Just so you know, we’re an Amazon affiliate. This means if you buy something through our links, we may earn a small commission. It doesn’t cost you extra and helps keep our lights on. Thanks for supporting us!”