How to Change the Default Fonts in the Microsoft 365 Apps on Windows
Microsoft Office
Quick Links
-
Changing Word’s Default Font
-
Changing Excel’s Default Font
-
Changing PowerPoint’s Default Font
-
Changing OneNote’s Default Font
-
Changing New Outlook’s Default Font
Most Microsoft apps use the same font by default. However, if you want to always use a different font in one or all of your desktop 365 apps, you can change the default manually. Although you can’t change the default font for all apps at the same time, here’s how to do it separately in each program.
Changing the default font does not affect the fonts used in Word, Excel’s, and PowerPoint’s templates, as their designs are pre-formatted with selected typefaces.
Changing Word’s Default Font
To change the default font in Microsoft Word, click the dialog box launcher icon in the bottom-right corner of the Font group of the Home tab on the ribbon.
Here, select the font you want to set as the default, and review the other font settings, such as the style, size, and color. See the bottom of the dialog box for a preview of how your new settings will look.
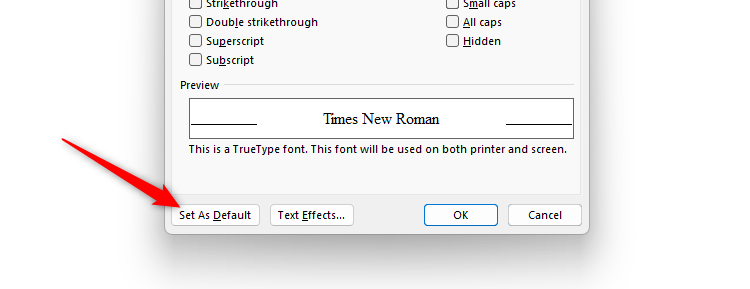
When you’re happy with the changes, click “Set As Default.”
Finally, to ensure the changes apply to all future Word documents, check “All Documents Based On The Normal Template,” and click “OK.”
If you already have text in the current document, you will see it change to the new default, and all future documents will also adopt the changes. The changes you made will not affect any other documents you already have open or any documents you have already saved and closed.
Changing Excel’s Default Font
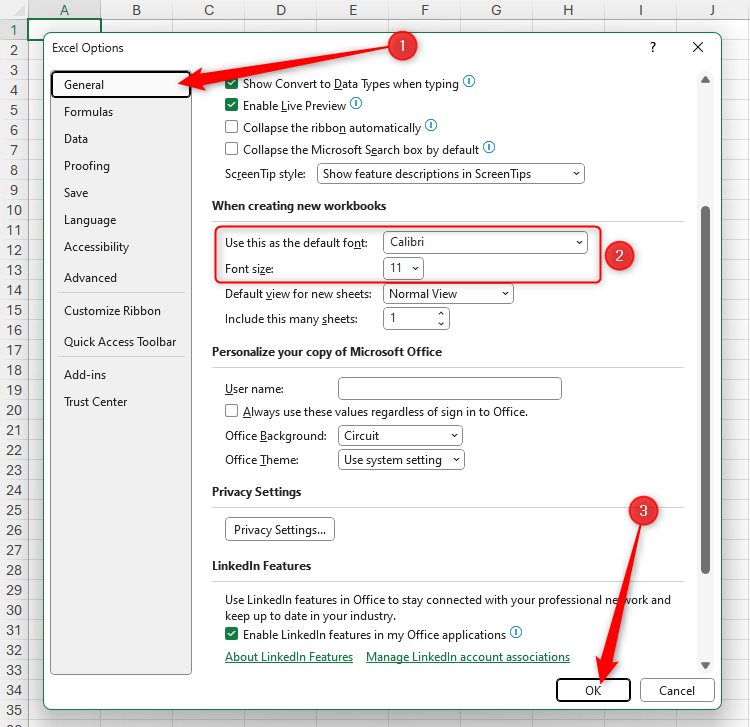
Changing the default font in Excel requires you to open the Excel Options window, which you can do either by clicking File > Options or using the Microsoft Excel keyboard shortcut Alt > F > T.
Make sure the “General” tab is selected in the Excel Options window, and scroll to the section titled When Creating New Workbooks. There, choose the font and font size you want to set as your default, and click “OK.”
The changes you made will apply only to new workbooks you create, and not the current workbook or any you have already created and saved.
Also, as well as affecting the data you add to cells, this default font change will apply to the column and row headings. I definitely wouldn’t recommend using Comic Sans MS in any formal file like an Excel spreadsheet, but I’ve used this font for demonstration purposes in the screenshot below.
Changing PowerPoint’s Default Font
Unfortunately, you can’t permanently change the default in Microsoft PowerPoint. Instead, create a template that is ready-made with your font choice, and then use this every time you start a new PowerPoint presentation. Here’s how.
First, open a new, blank PowerPoint presentation, click “View” on the ribbon, and select “Slide Master.”
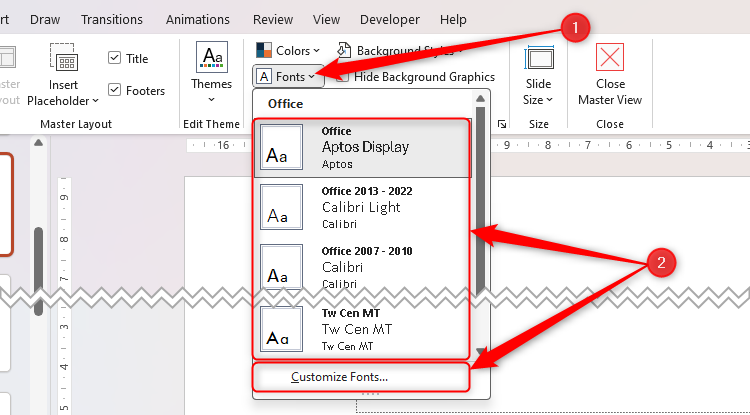
Next, click the “Fonts” drop-down menu in the Background group, and select either a font style listed or click “Customize Fonts” to choose an alternative.
You will then see the fonts in the master slides change to your new selection. Click “Close Master View” to return to the Normal view.
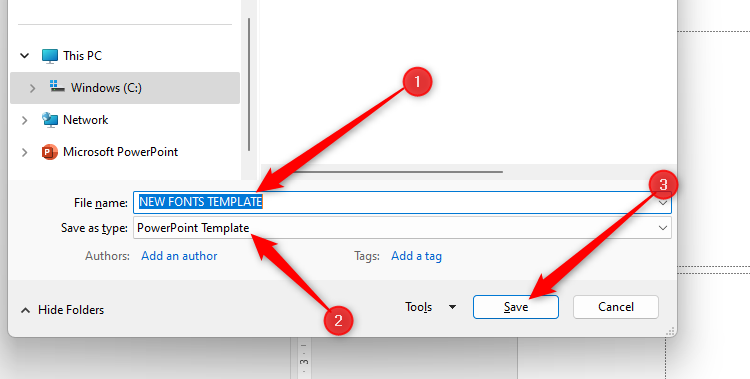
Now, click File > Save As > Browse—or press the Microsoft PowerPoint keyboard shortcut F12—to launch the Save As dialog box. Give your template a memorable name in the “File Name” field, change the “Save As Type” option to “PowerPoint Template,” and click “Save.”
Next time you open a new PowerPoint file, the template you created will appear in the New menu on the welcome page. You may have to open the “Personal” tab to see your template, depending on which version of Microsoft PowerPoint you’re using.
Whenever you select this option, your template containing your font of choice will reopen as a new presentation that you can amend and save as needed.
Changing OneNote’s Default Font
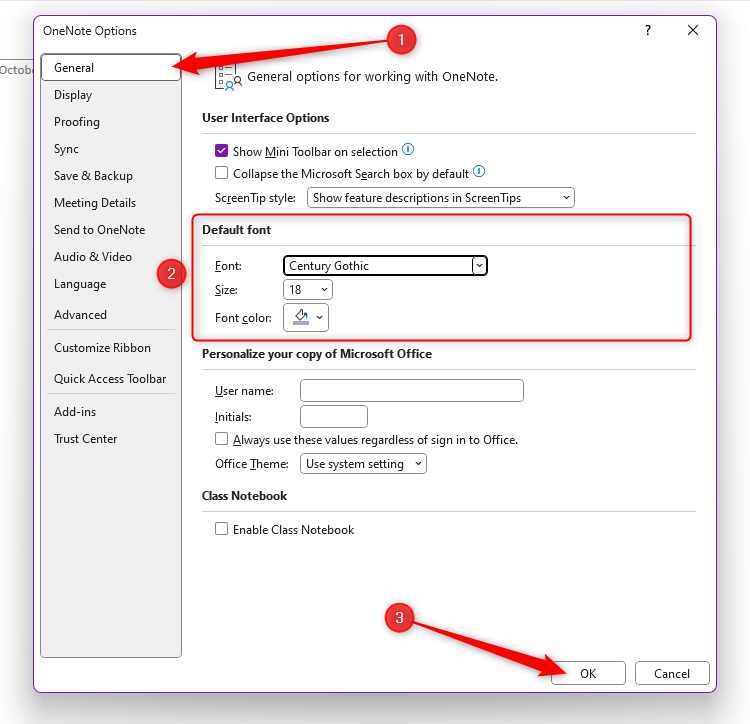
If you want to change OneNote’s default font, click File > Options—or use the keyboard shortcut Alt > F > T—to launch the OneNote Options window. There, double-check the “General” tab is opened, and change the font typeface, size, and color in the Default Font section of this menu.
After you click “OK,” the new settings will apply to any new OneNote Files or Pages you open, though it won’t affect anything you’ve already typed in the current or other existing files.
Changing New Outlook’s Default Font
If you want to change the default font in new Outlook, first, click the “Settings” cog in the top-right corner of your window.
Then, click “Email” in the left-hand menu, and select “Compose And Reply” in the second menu that appears.
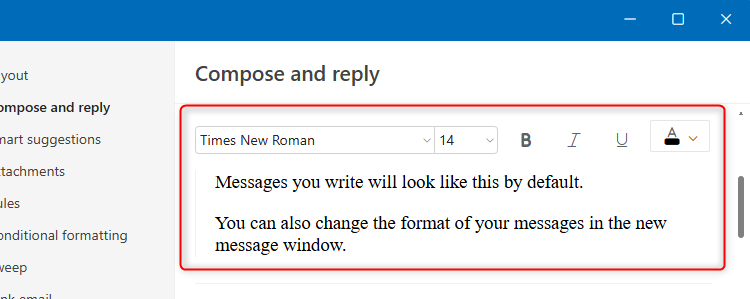
Now, change the font settings using the drop-down menus and buttons shown in the screenshot below. As you make the changes, the preview will show you how future messages will appear.
When you’re happy with the changes, click “Save,” and close the Settings window via the “X” in the top-right corner.
The changes you made won’t affect any emails you have already started to draft, but they will affect any future new emails or replies you draft.
It’s important to think carefully about which fonts you use in each program. For example, the best fonts to use in Excel are those that are easy to read and make clear distinctions between letters and numbers. In Word, you should choose a font that suits the tone you’re trying to convey, while in PowerPoint, you can be more creative, as long as your audience can understand your text easily.


