Macs are generally highly power efficient due to, in part, the optimized sleeping schedule with OS X. Yet in certain scenarios, you might not want your Mac to go to sleep: downloading a huge file, reading a book, reviewing a spreadsheet, analyzing some content on the screen… the list goes on. To resolve this, you can go to System Preferences and mess with the settings, but this can be an annoying process if you need to do it often.
Naturally, there are various solutions available for this dilemma. A classic option is to use the free program Caffeine. More recent versions of OS X introduced some changes to the way the system handles going to sleep alongside a handy built-in utility to induce insomnia. The aptly named Caffeinate is a command line utility that is accessed via Terminal. As the name suggests, running the command will “caffeinate” your Mac and prevent it from going to sleep.
The command can be run by itself along with some modification options that will customize its behavior. Some of the more common options are adding a sleep timer, targeting a specific program/process, and modifying the sleep options.
Step 1: Launch Terminal
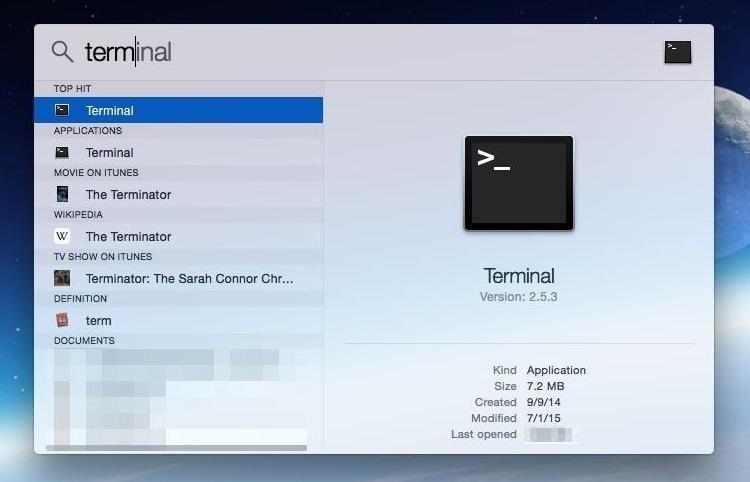
Like other operations, Caffeinate is run via Terminal. Just search for and open Terminal from Spotlight Search, from your Launchpad, or via the Utilities folder in Applications.
Step 2: Run the Caffeinate Command
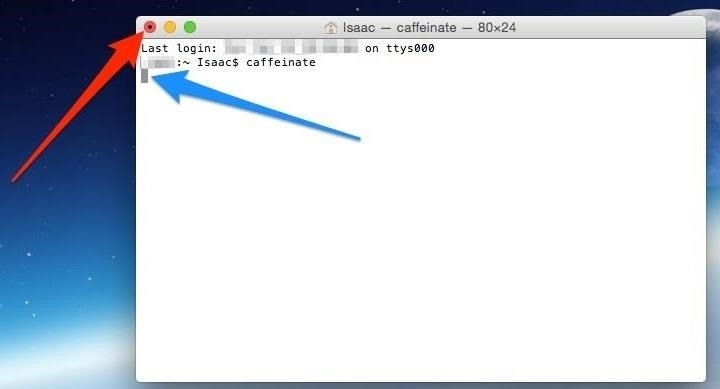
You can simply run the Caffeinate command inside Terminal and it will prevent your Mac from going to sleep for as long as it’s active. To do so, just type in caffeinate inside the Terminal prompt and press the Enter/Return key.
You’ll notice two small changes inside Terminal that tells you the command is currently active. The first is that the Red stoplight has a dot inside it (red arrow) indicating that Terminal is currently running a command. The second is that the prompt cursor is unavailable (blue arrow) indicating that a command is currently being carried out.
Step 3: No More Caffeine!
To stop the Caffeinate command, press the Control + C keys while inside Terminal. This classic keyboard combination stops the currently running Terminal command and your Mac should now resume its regular sleep cycle.
As stated, the Caffeinate command can be run by itself or with some modifier flags—here are a couple useful modifiers:
Adding a Sleep Timer
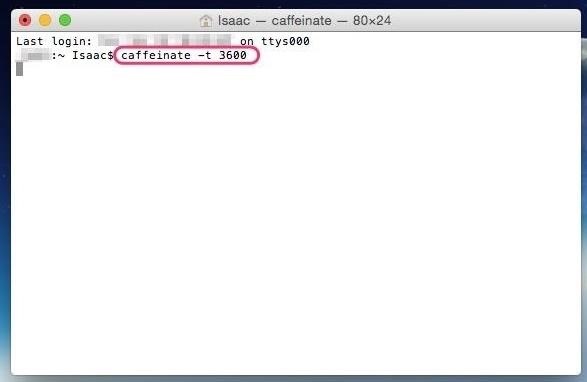
Say that you want your Mac to “stay up” for an hour, then resume its proper sleep cycle. Just modify the caffeinate command like so, caffeinate -t 3600, where the -t adds a timer followed by the time in seconds. So for this example of 1 hour, it would be 3600 seconds.
Targeting a Specific Application/Process
Another modifier flag is to attach Caffeinate to a certain application or system process. The benefit of this is that the system will not go to sleep as long as the specified program/process is running. So for example, if you’re running Final Cut Pro and don’t want your Mac dozing off, just modify the command like so:
- caffeinate /Applications/Final Cut Pro.app/Contents/MacOS/Final Cut Pro
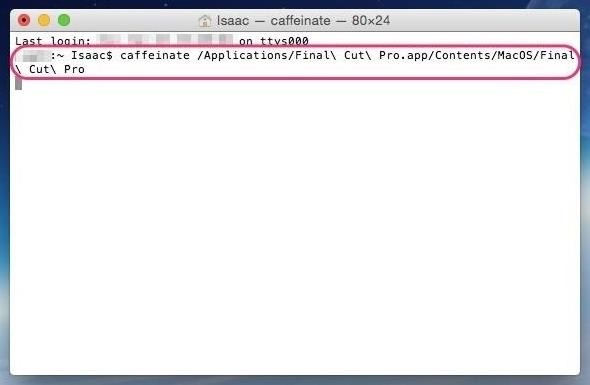
This is simpler than it looks. The first part is just the caffeinate command and the second part, for this specific scenario, is just the location of the core Final Cut Pro program.
Some More Specific Modifier Flags
Per the manual pages for the Caffeinate command, there’s a couple other more specific options that you can attach.
- -d will prevent the display from going to sleep
- -i will prevent the system from idle sleeping
- -m will prevent the disk from going to sleep
- -s will prevent the machine from going to sleep when plugged in
- -u replicates a currently active user
Naturally, all these choices can be piled on for interesting scenarios. For example, if you’re planning on some Netflix and chill, you can combine the pieces into the following to ensure that your Mac stays up…
- caffeinate -d /Applications/Firefox.app/Contents/MacOS/firefox-bin https://netflix.com
Benefits & Limitations of the Caffeinate Command
If you have used the command line before, then you know that you can link up the different flags and arguments in various ways to create something custom and possibly powerful. A few common usage scenarios were outlined above, but these can be wielded in many different and interesting ways depending on your needs.
On the flip side, there are a lot of options and a lot of use scenarios which can potentially conflict and overwhelm you, especially if you’ve never used Terminal before. If that’s the case, then the free and easy-to-use Caffeine app is the way to go.
Personally, I use both Caffeine and the Caffeinate command. Caffeine is awesome for a quick and simple solution but when you want to get all fancy, then Caffeinate is a good native option to use.
More Terminal Hacks
- Purge RAM for Improved System Performance
- Install the Command Line Developer Tools Without Xcode
- Access Recently Used Apps & Documents from Your Dock
- 13 Terminal Commands Every Mac User Should Know
- Organize Your Dock by Adding Blank Spaces as App Icon Dividers
Follow Apple Hacks over on Facebook and Twitter, or Gadget Hacks over on Facebook, Google+, and Twitter, for more Apple fun.
Just updated your iPhone? You’ll find new emoji, enhanced security, podcast transcripts, Apple Cash virtual numbers, and other useful features. There are even new additions hidden within Safari. Find out what’s new and changed on your iPhone with the iOS 17.4 update.
“Hey there, just a heads-up: We’re part of the Amazon affiliate program, so when you buy through links on our site, we may earn a small commission. But don’t worry, it doesn’t cost you anything extra and helps us keep the lights on. Thanks for your support!”


