By wandering in, you agree to our Privacy Policy and Terms of Use; we're Amazon and BestBuy affiliates, so buying through our links might earn us a few coins!
My One Unexpected Gripe After Switching From Windows to Mac
How to Share Files Between Mac and Windows
Why I Switched to macOS After Using Windows for Nearly Two Decades
Sign in to your How-To Geek account
Dusan Petkovic/Shutterstock.com
Quick Links
Adjust the Display Scaling
Buy a Bigger Monitor
Adjust Your Brightness to Suit
Illuminate the Space Behind Your Mac
Toggle Light and Dark Modes
Stop Hunting for Your Cursor
Some Accessibility Settings Can Help
Use True Tone and Night Shift (or f.lux)
Are you having trouble finding Finder? Do you spend all day squinting at Safari? Take five minutes out of your day to make your Mac easier to see.
1
Adjust the Display Scaling
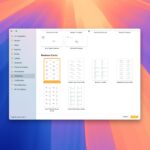
Apple displays lack the traditional resolution and scaling controls you’d find in Windows or Linux in favor of a unified setting. Under System Settings > Display you can choose between “More Space” and “Larger Text.” The default setting lies somewhere in between.
If you’re having trouble seeing things clearly, there’s a good chance you need to move closer to the “Larger Text” side of things. UI elements like buttons and app icons will get bigger, and things will be a little easier to read. Everything should still look crisp as per Apple’s Retina branding, they’ll just be bigger.
The downside is that you’ll be able to fit less on the screen. If you love to work in two side-by-side windows, this could be a dealbreaker for you. I prefer the “More Space” setting because I can use two web pages, side-by-side, without triggering the mobile compact view.
If you’re connected to an external display, like a monitor or TV, you’ll see the standard array of resolution and refresh rate options.
2
Buy a Bigger Monitor
If you can afford to throw money at the problem, a bigger monitor will give you the best of both worlds: the ability to scale the display according to your preferences, and enough extra room to offset the bigger UI elements.
Before you buy any old display, be aware that there’s a “sweet spot” when it comes to pixel density on the Mac.
Due to the way the operating system scales, macOS works best with displays that have a pixel density of 218 pixels per inch (PPI) or better. As a simple rule of thumb, you should look for a 27-inch monitor at 5K resolution like Apple’s own Studio Display or Pro Display XDR.
Apple Studio Display (Standard Glass, No Stand)
$1300 $1599 Save
$299
The Apple Studio Display is a premium 5K display that doesn’t even come with a stand, but offers a bright and color-accurate viewing experience out of the box. It works over Thunderbolt with your MacBook too.
$1300 at Amazon
$1599.99 at Best Buy
Fortunately, there are other monitors available that hit this fabled pixel density like the Samsung ViewFinity S9 and the admittedly more expensive Dell UltraSharp 6K. Apple desperately needs to make a new “budget” monitor to pair with its Mac Mini and notebook range.
A post on the Bjango blog summarizes the “issue” you’ll face if you opt for a monitor that falls short of the Retina standard, so you can decide for yourself if it’s a big deal or not. Just be aware you’ll likely have to put up with inferior display quality compared to a MacBook or iMac.
3
Adjust Your Brightness to Suit
The F1 and F2 keys on your Mac’s keyboard turn your display brightness up and down on internal and Apple-branded displays. Ultimately, you want your screen bright enough to be able to see what you’re doing without being considerably lighter or darker than your environment.
Sydney Louw Butler / How-To Geek
Making sure “Automatically adjust brightness” is enabled under System Settings > Display can help avoid having to adjust this yourself, but macOS doesn’t always get things right. In addition to excessive brightness, a display that’s too dim can also cause you to strain your vision.
If you find yourself using your Mac outside in direct sunlight, and you want to unlock the full potential brightness on offer, apps like BetterDisplay and Vivid can let a MacBook Pro display hit its full 1000 nit potential.
4
Illuminate the Space Behind Your Mac
Bias lighting is a valuable tool for reducing eye strain associated with staring at a bright screen for hours on end. By offsetting the bright light cast by your Mac display, you can better illuminate your environment and reduce the impact of staring at a very bright rectangle in a dark environment.
Ben Lovejoy / How-To Geek
How you go about achieving this depends on your setup. If you face a wall while sitting at your computer, placing LED strip lighting or angling a desk lamp so that the wall is now illuminated can help. If you’re feeling particularly fancy, you can even automate the lighting with a routine that triggers when you sit down for work.
Otherwise, placing ample soft lighting around the room so that the room is well-lit while you’re working works too. You only need a small amount of light to make things a lot more comfortable, especially when working at night.
5
Toggle Light and Dark Modes
Once you’ve matched your display brightness with your lighting environment, the finishing touch is to use an appropriately light or dark interface. It took Apple long enough to add a proper dark mode to macOS, so you might as well get some use out of it.
I prefer letting my Mac decide when to switch between light and dark mode based on the time of day, which you can set under System Settings > Appearance using the “Auto” toggle in the “Appearance” box. Alternatively, you can force one or the other if your Mac is always used under the same lighting conditions.
It can be tempting to always use dark mode because it looks so good, but it’s rarely the best choice for eye strain, especially in a brightly lit room at midday.
6
Stop Hunting for Your Cursor
Your Mac’s cursor can sometimes get a bit lost, especially if you have multiple displays and aren’t sure where you left it. Under System Settings > Accessibility > Display make sure that “Shake mouse pointer to locate” is enabled and give your mouse a good shake.
This setting will briefly make your cursor appear much larger, so you can easily find it. If it doesn’t work, you aren’t shaking fast enough. Alternatively, you can permanently increase the size of your cursor using the scaling tool within the same menu. You can also change the pointer outline and fill colors.
7
Some Accessibility Settings Can Help
macOS is full of accessibility options that you can find under the System Settings > Accessibility menu. Hover Text is especially useful, as is Hover Typing which you can find under the same menu.
With Hover Text enabled, holding the Command button on your keyboard will display a larger view of any text directly underneath your cursor. This is great for small and hard-to-read text, like fiddly spreadsheets or poorly optimized websites. Hover Typing goes one further and adds a magnified view of any text you are typing whenever the cursor is active.
Zoom is another feature but one that works for the whole screen, with trackpad gestures, modifier keys, and keyboard shortcut options in case you need it. You can also use a feature like VoiceOver to read aloud UI elements, or select text then right-click (Control+click) and choose Speech > Start Speaking to listen instead of reading.
Though some of these may feel like they’re going a bit far, they can be used sparingly to great effect. Another feature that qualifies in this regard is your Mac’s dictation feature, which is better than ever. Hit the F5 key and your Mac will turn your speech into typed text (you can even type at the same time if you want).
8
Use True Tone and Night Shift (or f.lux)
Lastly, True Tone should be enabled by default on all Apple displays but you can check for sure under System Settings > Display > True Tone. The feature balances the whites in your display with the white balance in your room. It’s a nice feature to have, especially if you do a lot of typing against a white background.
You can also enable Night Shift under the same menu (using the button at the bottom). Night Shift will shift the colors of your Mac’s display to the warmer side according to your schedule. You can also use an app like f.lux to do the same.
Though there’s some evidence to suggest that blue light potentially affects alertness, tiredness, and sleep quality, most claims about blue light are greatly exaggerated.
Got a PC and want to do the same? Learn how to make Windows easier on the eyes too.
Mac
macOS
Health
Follow
Followed
Share
FacebookXLinkedInRedditFlipboardCopy linkEmail
Readers like you help support How-To Geek. When you make a purchase using links on our site, we may earn an affiliate commission. Read More.
“Hey there, just a heads-up: We’re part of the Amazon affiliate program, so when you buy through links on our site, we may earn a small commission. But don’t worry, it doesn’t cost you anything extra and helps us keep the lights on. Thanks for your support!”