5 Best Power Automate Flows for Windows 11
Quick Links
-
Automatically Move Downloaded Files
-
Automatically Rename Files with Date & Time
-
Close Select Apps
-
Automatically Empty the Recycle Bin
-
Automatically Archive Old Files
-
How to Manage and Schedule Flows in Power Automate
Power Automate is a free app that allows you to automate many tasks on your Windows 11 PC. From automatically emptying Recycle Bin to archiving old files, you can do many things with this app. I’ll show you some useful flows to use with the app.
Automatically Move Downloaded Files
If you save all downloaded files in the default Downloads folder, the folder is bound to get cluttered. You can get around that by automating the task of moving your downloaded files. You can choose which folder to move your files to, so your Downloads folder is always neat and clean.
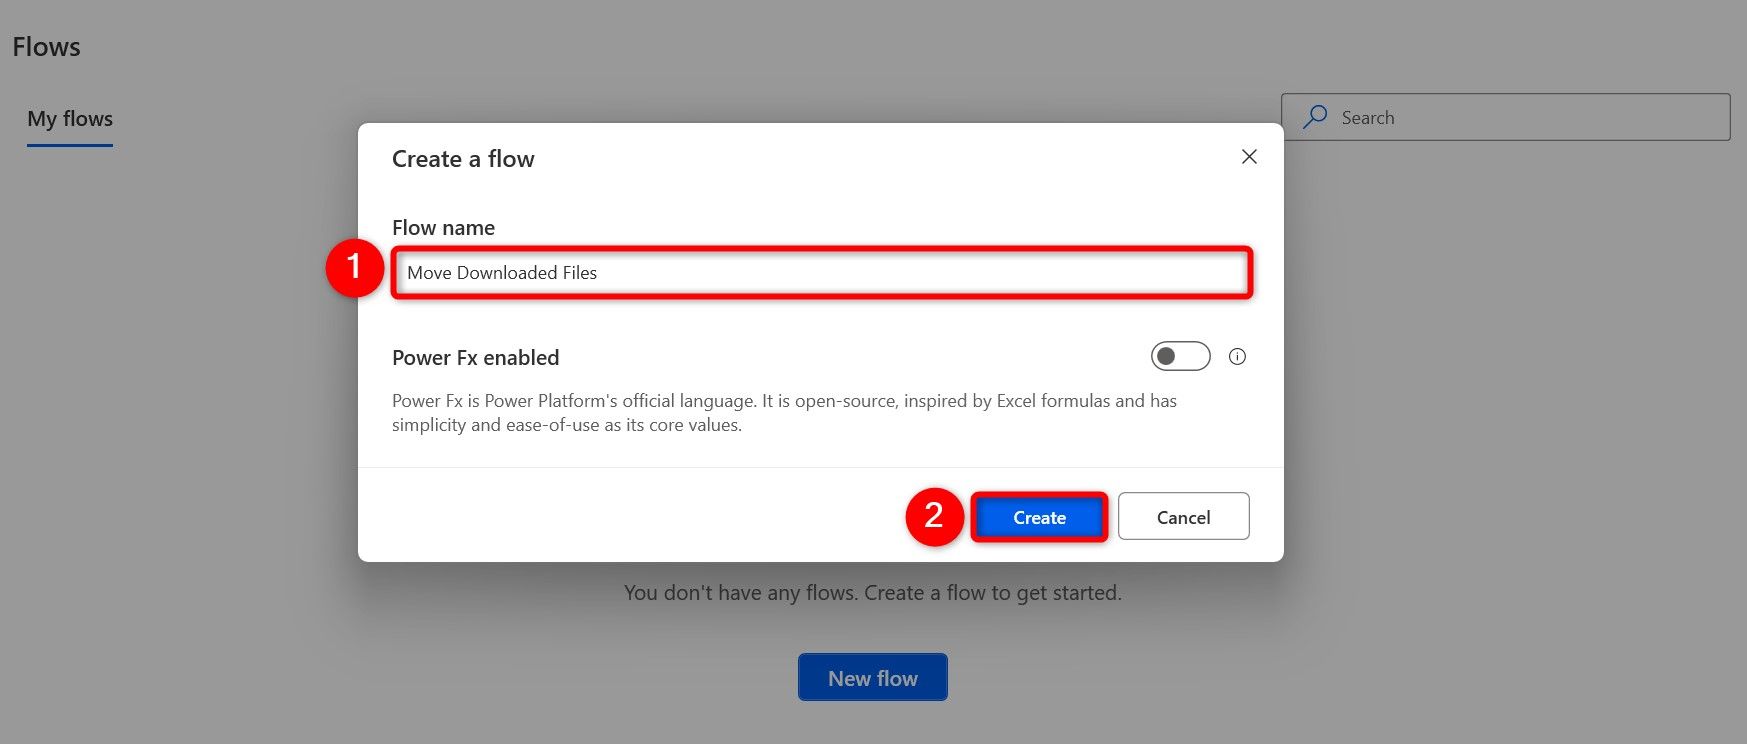
To make that flow, launch Power Automate and select New > Flow in the top-left corner. On the Create a Flow screen, select the “Flow Name” field and type a descriptive name. This could be something like Move Downloaded Files. Then, click “Create.”
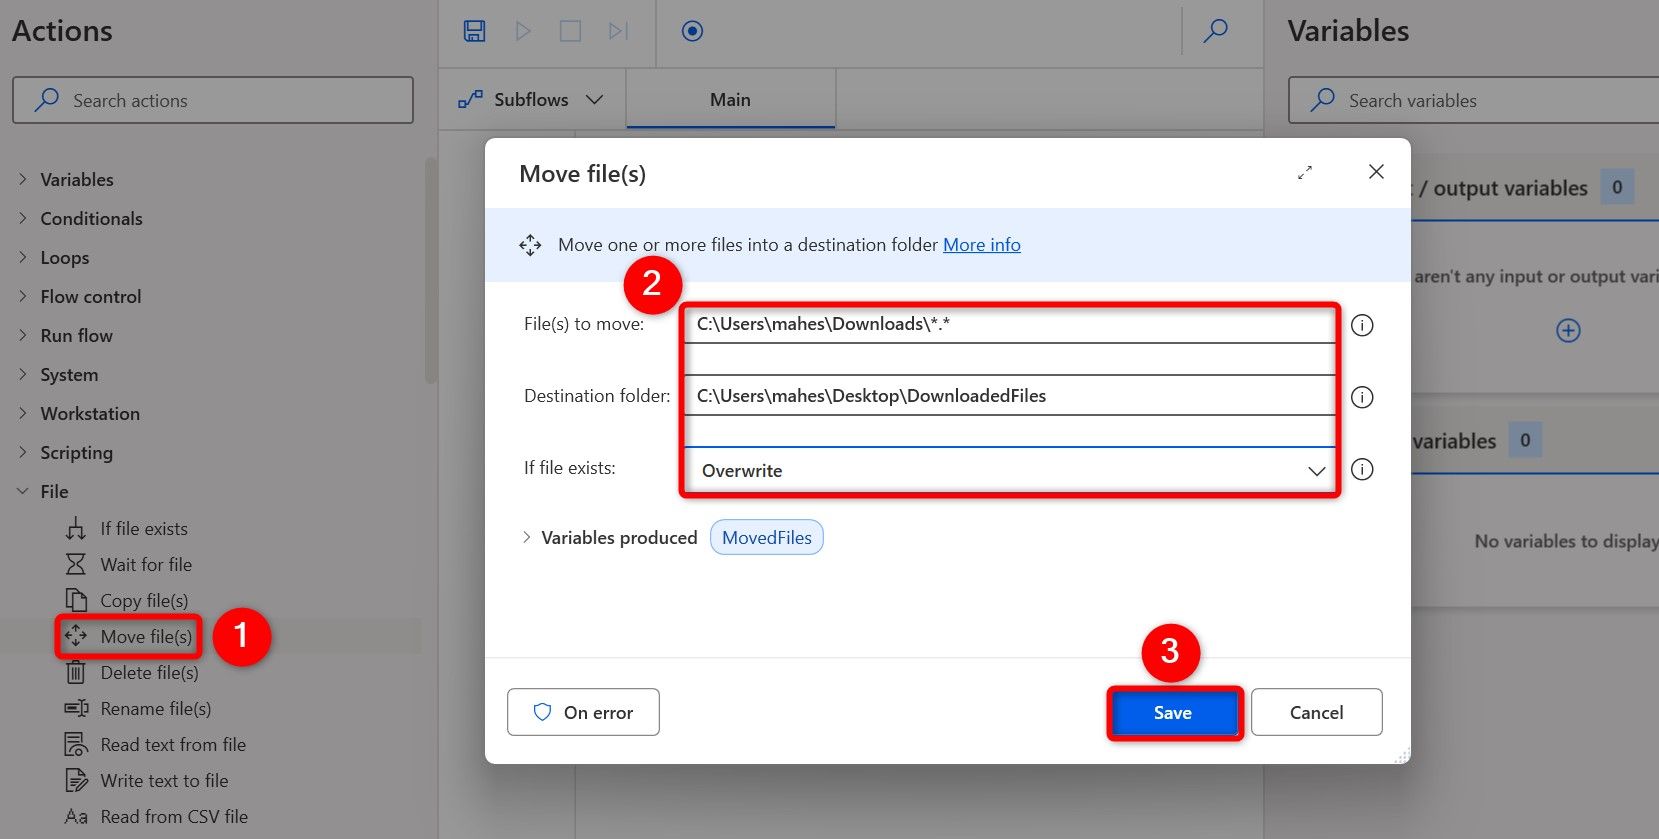
On the open window, in the left sidebar, expand “File” and double-click “Move File(s).” On the Move File(s) window, select the “File(s) to Move” field and type the following. Replace “Username” with your username.
I have added *.* at the end to ensure all files in the folder are selected. If you only want to move certain file types, say EXE, type *.exe, and so on.
C:UsersUsernameDownloads*.*
Click the “Destination Folder” field and choose the folder you want to move files to. Select the “If File Exists” drop-down menu and choose what happens if the file to move already exists in the destination folder. Your options are “Do Nothing” and “Overwrite.” Then, choose “Save.”
To test your flow (which will actually move your files from the Downloads folder), click “Run” at the top. Then, save the flow by clicking “Save” (the floppy disk icon) at the top.
Automatically Rename Files with Date & Time
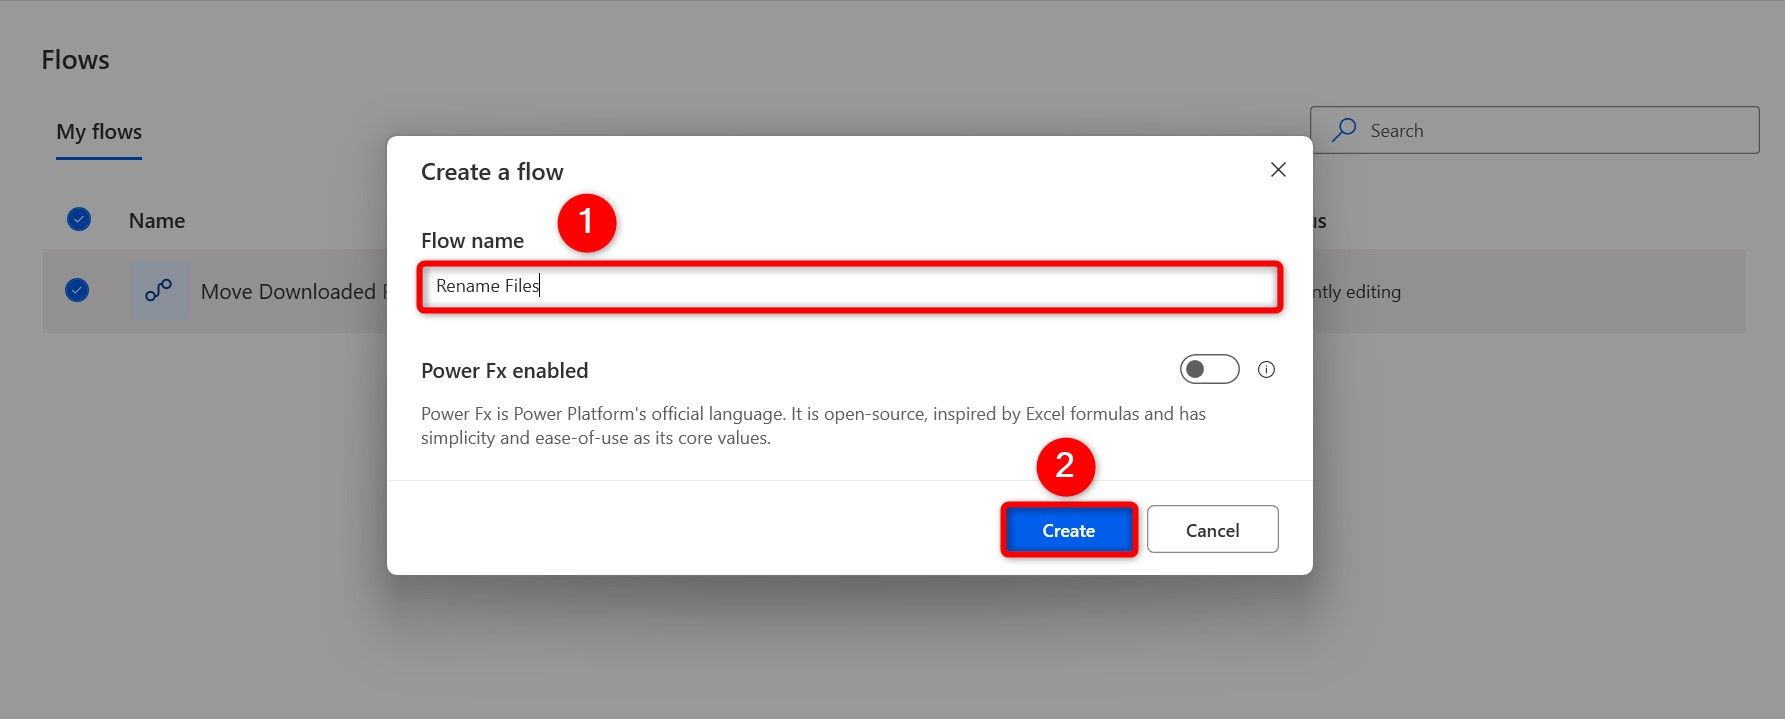
You can rename multiple files and add the current date and time to them using Power Automate. This makes file organization easier and helps with version control. To do that, open Power Automate and select New > Flow. Click the “Flow Name” field and type something like Rename Files. Then, choose “Create.”
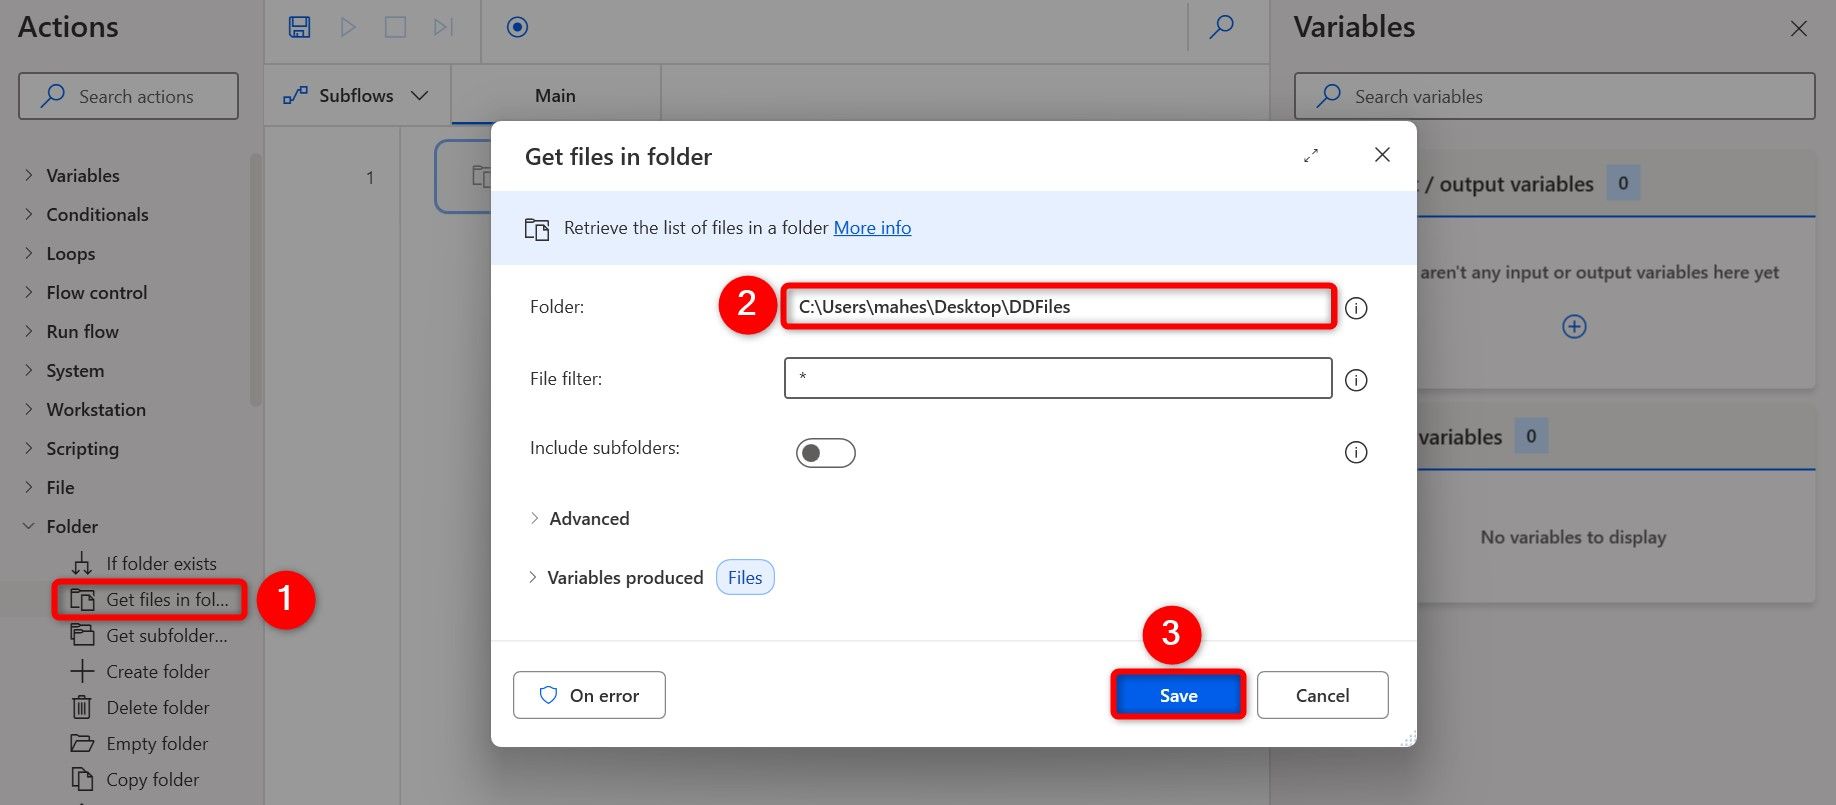
In the left sidebar, expand “Folder” and double-click “Get Files in Folder.” Choose the “Folder” field and select the folder in which the files to rename are located. Leave the “File Filter” field as is if you want to include all files. Then, click “Save.”
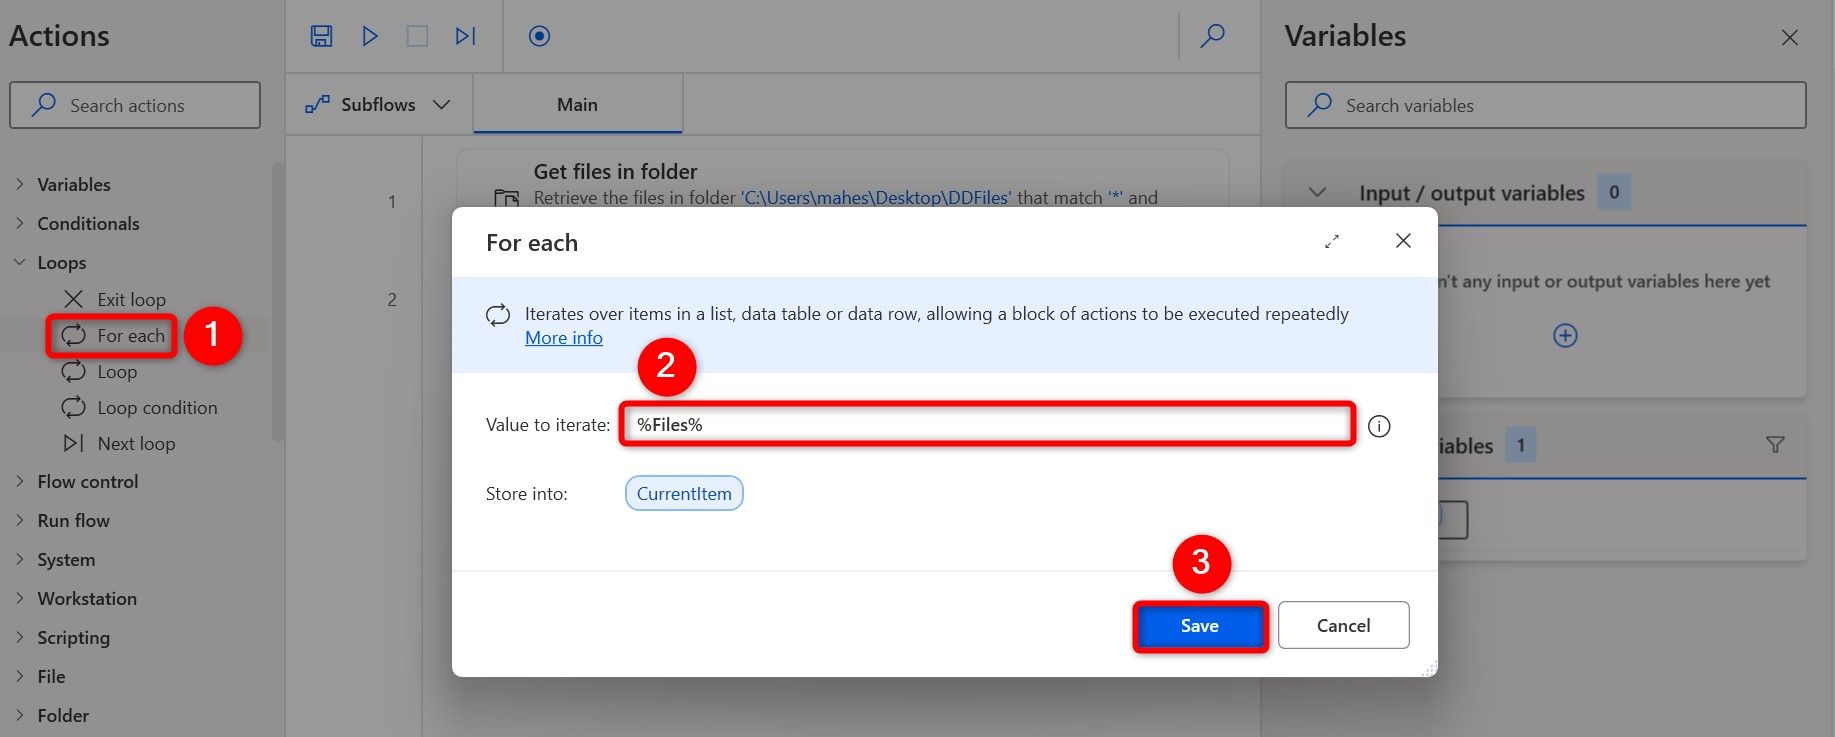
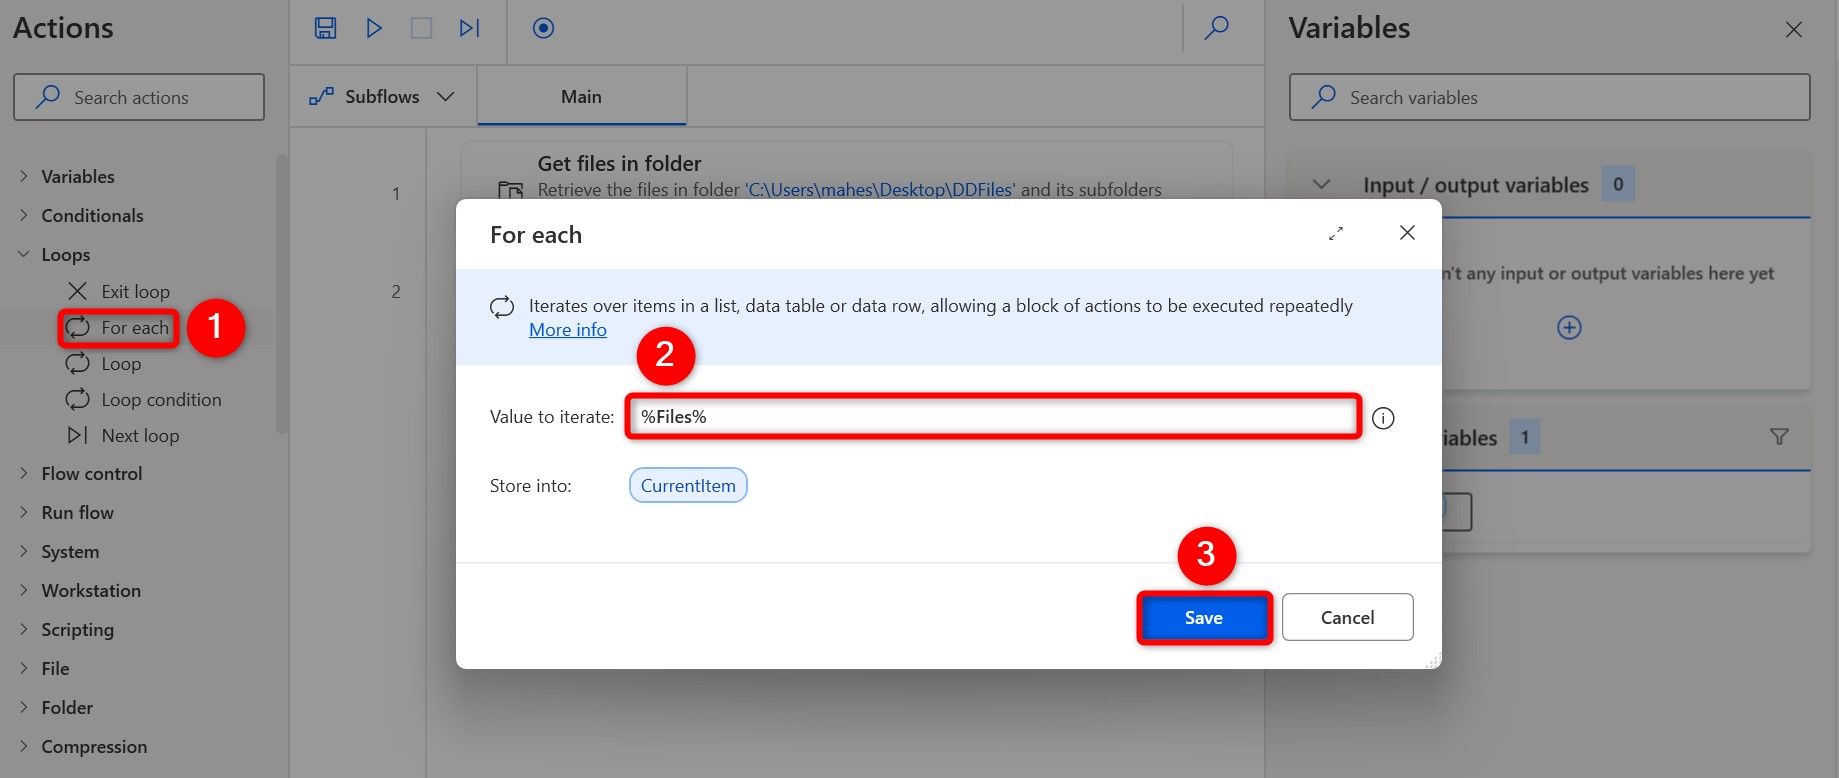
From the left sidebar, expand “Loops” and double-click “For Each.” Select the “Value to Iterate” field and add the “Files” variable. Then, click “Save.”
In the left sidebar, expand “File” and double-click “Rename File(s).” Select the “File to Rename” field and choose the “CurrentItem” variable. Choose the “Rename Scheme” field and select “Add Datetime.” To add a custom date and time, turn on “Use Custom Datetime.” The rest of the fields are self-explanatory. Then, click “Save.”
You can now run the flow using the “Run” button at the top.
Close Select Apps
You can make a flow that automatically closes your chosen apps, eliminating the need for you to close each app manually. You can select as many apps as you want to be closed at once.
This method force-closes your apps. Make sure to save your unsaved work in your apps before running this flow.
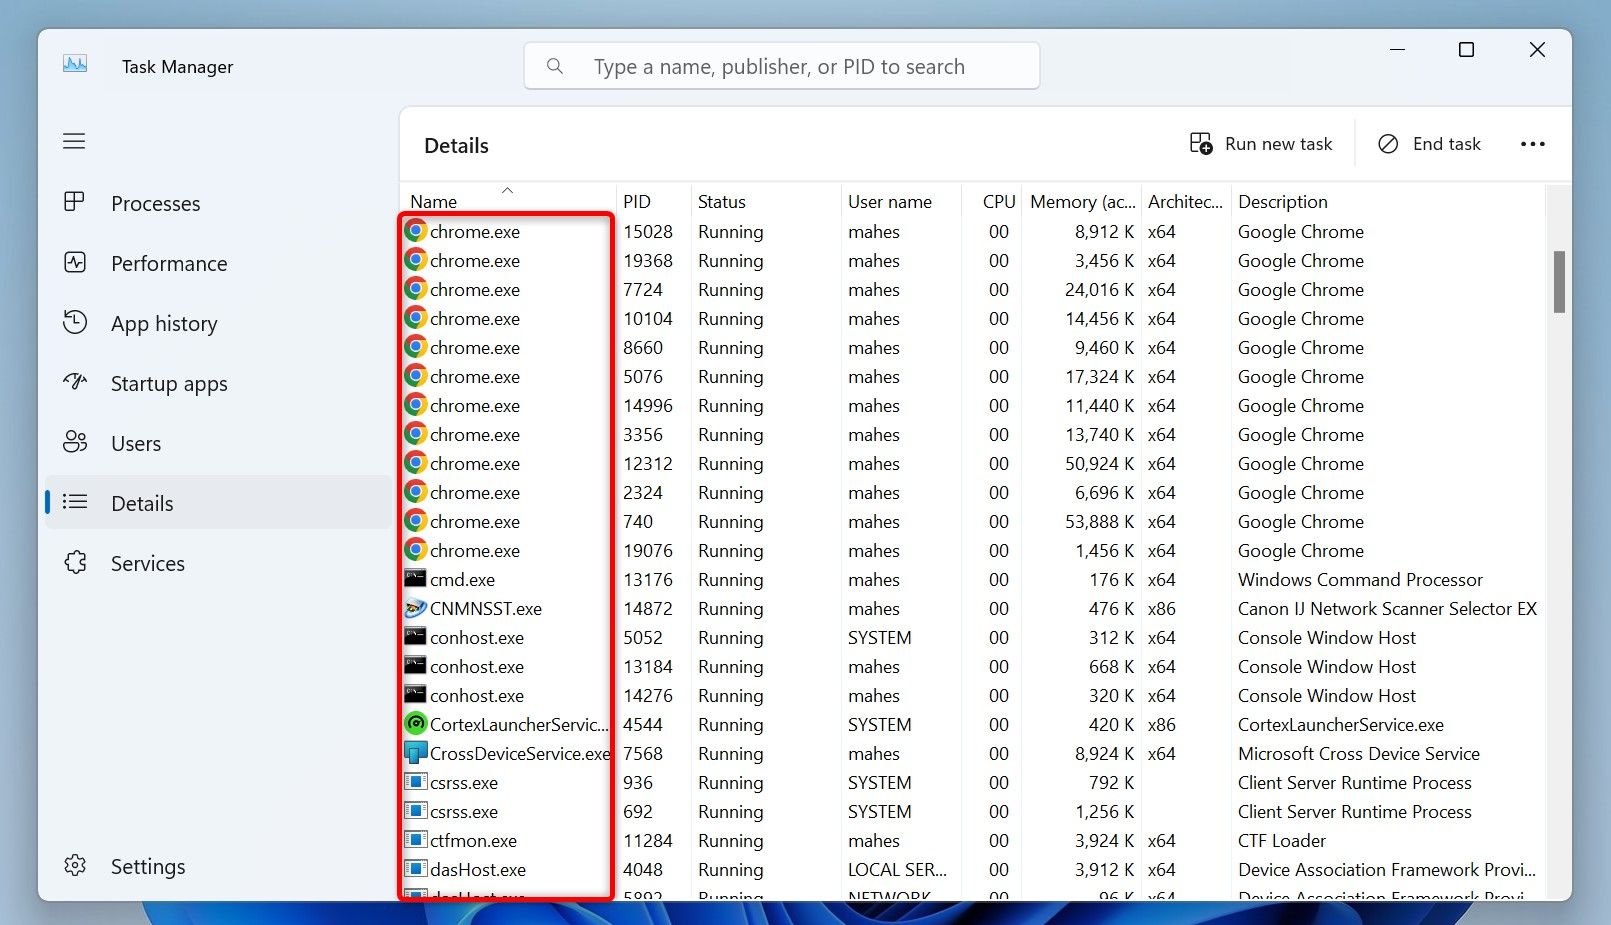
First, find the process names of the apps you want to close. To do that, open Task Manager by right-clicking the Windows taskbar and choosing “Task Manager.” Open the “Details” tab and note the process name for each app you want to close. The process names look like chrome.exe, slack.exe, and so on.
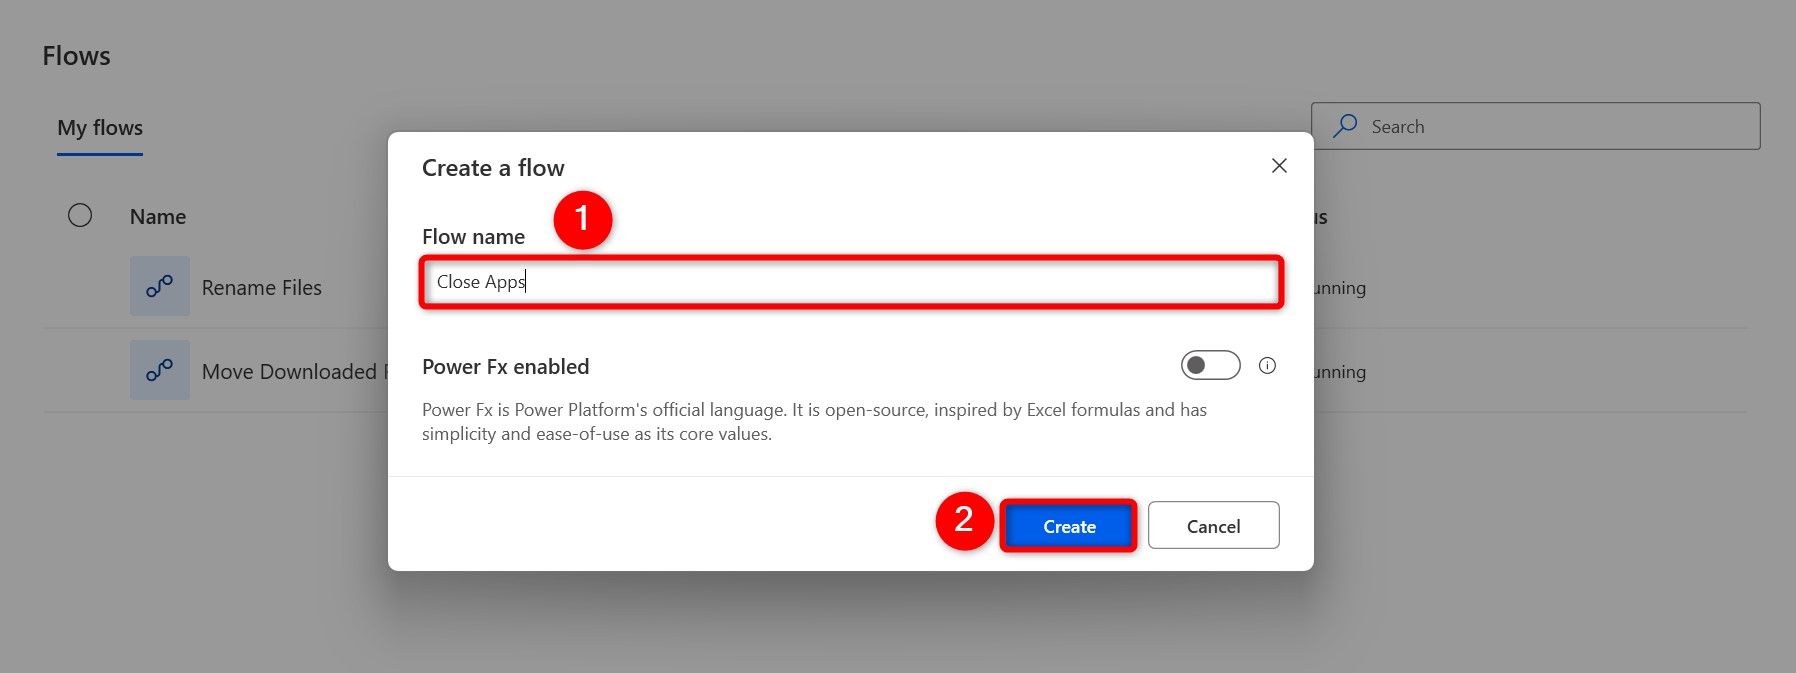
Launch Power Automate and choose New > Flow. Click the “Flow Name” field and type something like Close Apps. Choose “Create” to begin making the flow.
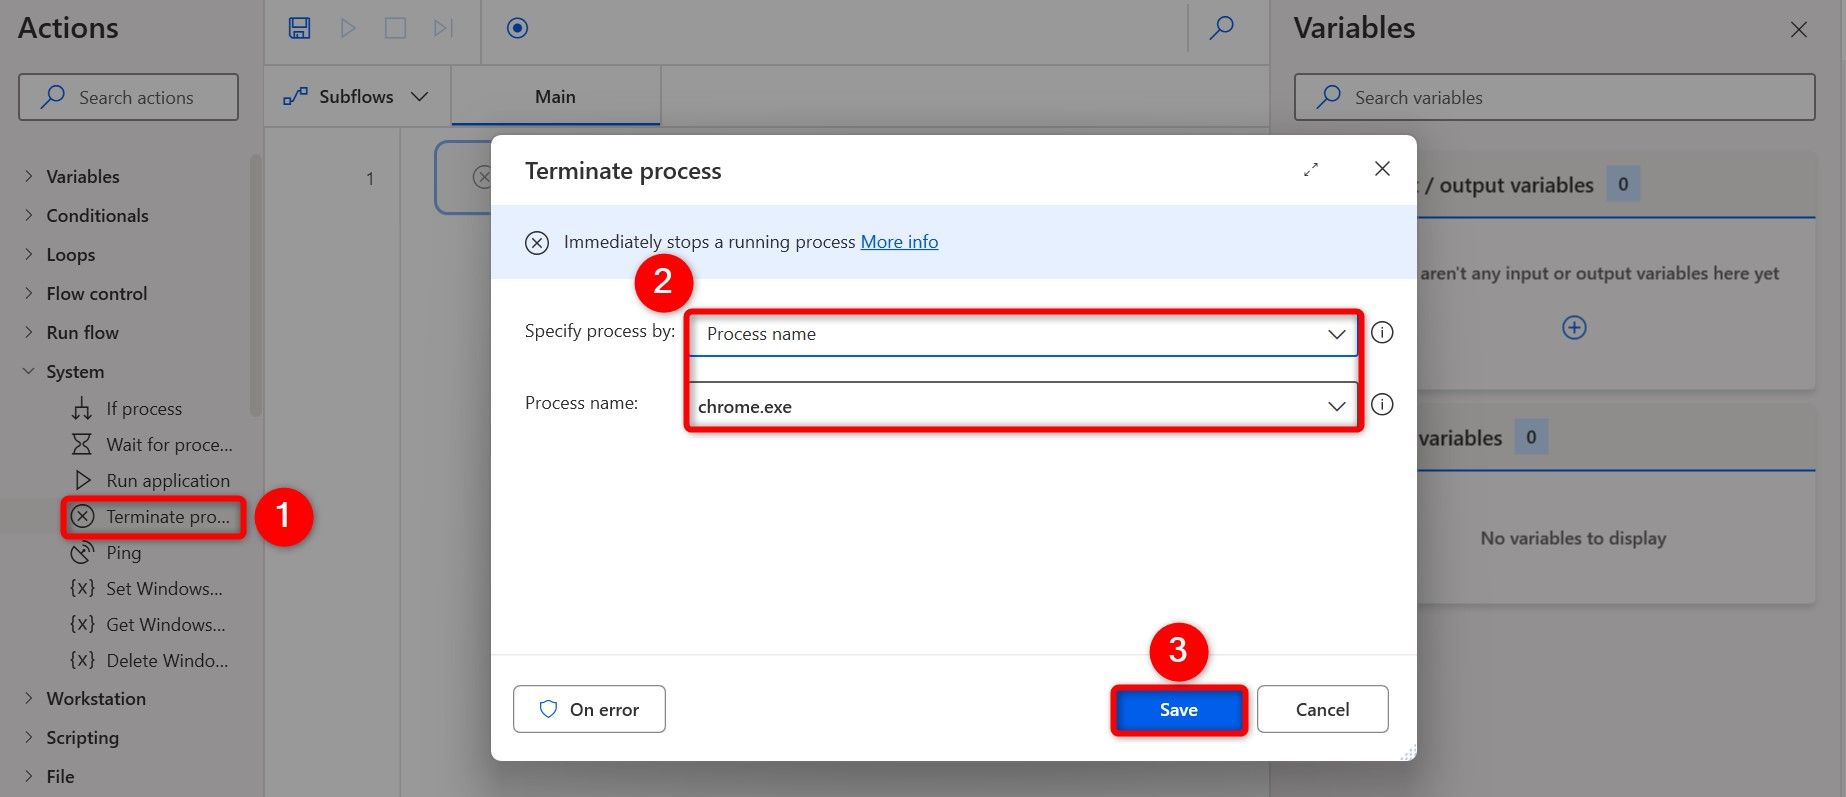
From the left sidebar, expand “System” and double-click “Terminate Process.” Click the “Specify Process By” drop-down menu and choose “Process Name.” Click the “Process Name” field and type the process name you noted earlier. Then, choose “Save.”
Repeat the above process to add the Terminate Process action for each app you want to close. After you’ve added all your apps, click “Run” at the top to test the flow.
Automatically Empty the Recycle Bin
The default file removal behavior in Windows 11 is to send the file to Recycle Bin. This causes Recycle Bin to get cluttered. You can fix that by emptying it on a regular basis, and you can create a Power Automate flow to automate that task.
Make sure you don’t want to recover any deleted files from Recycle Bin. If you do, recover the files now, as running the following flow will delete all the files in Recycle Bin for good.
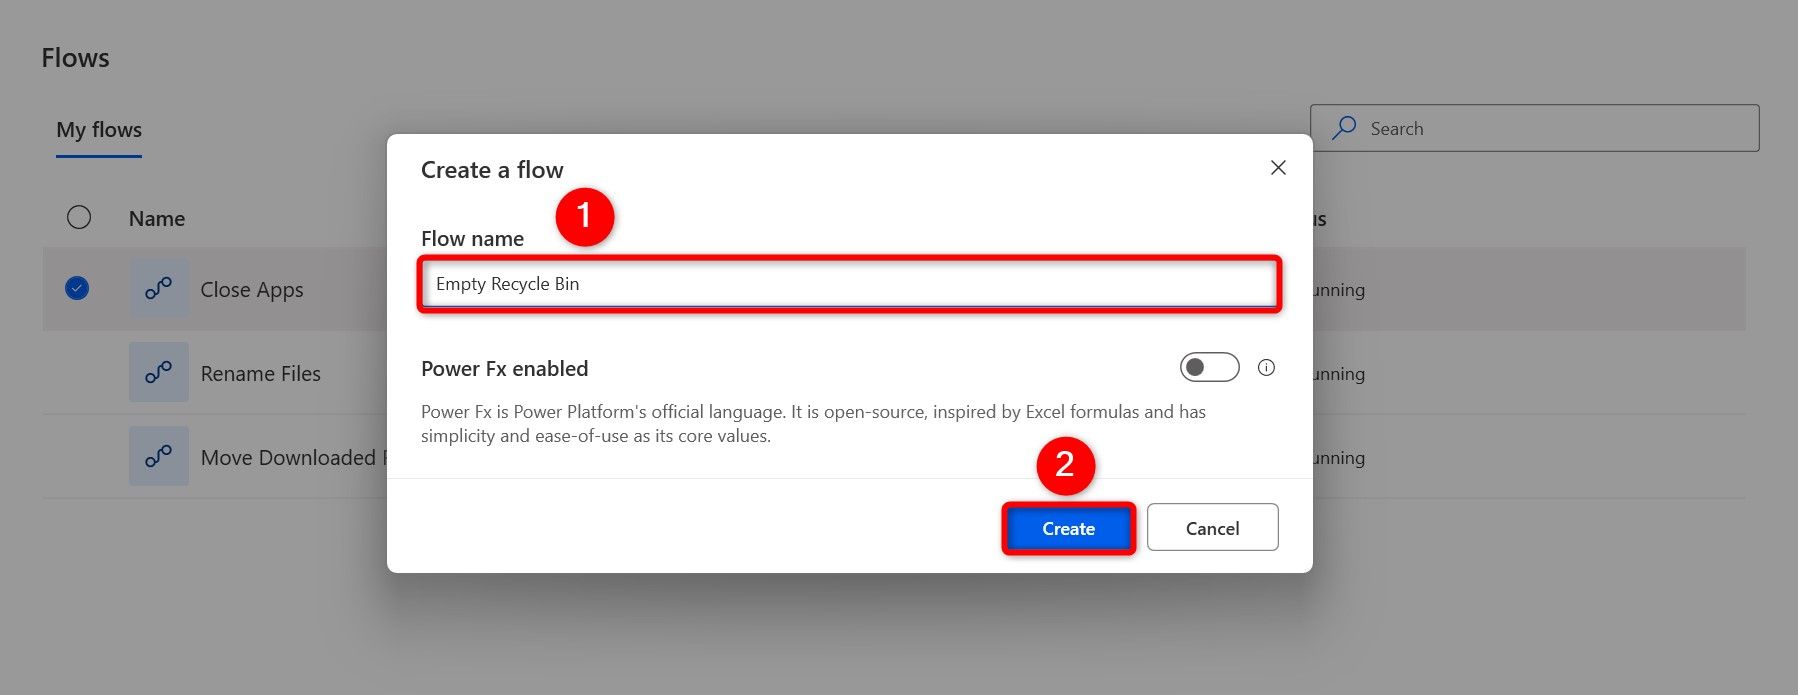
Open Power Automate and click New > Flow. Select the “Flow Name” field and type something like Empty Recycle Bin. Then, choose “Create.”
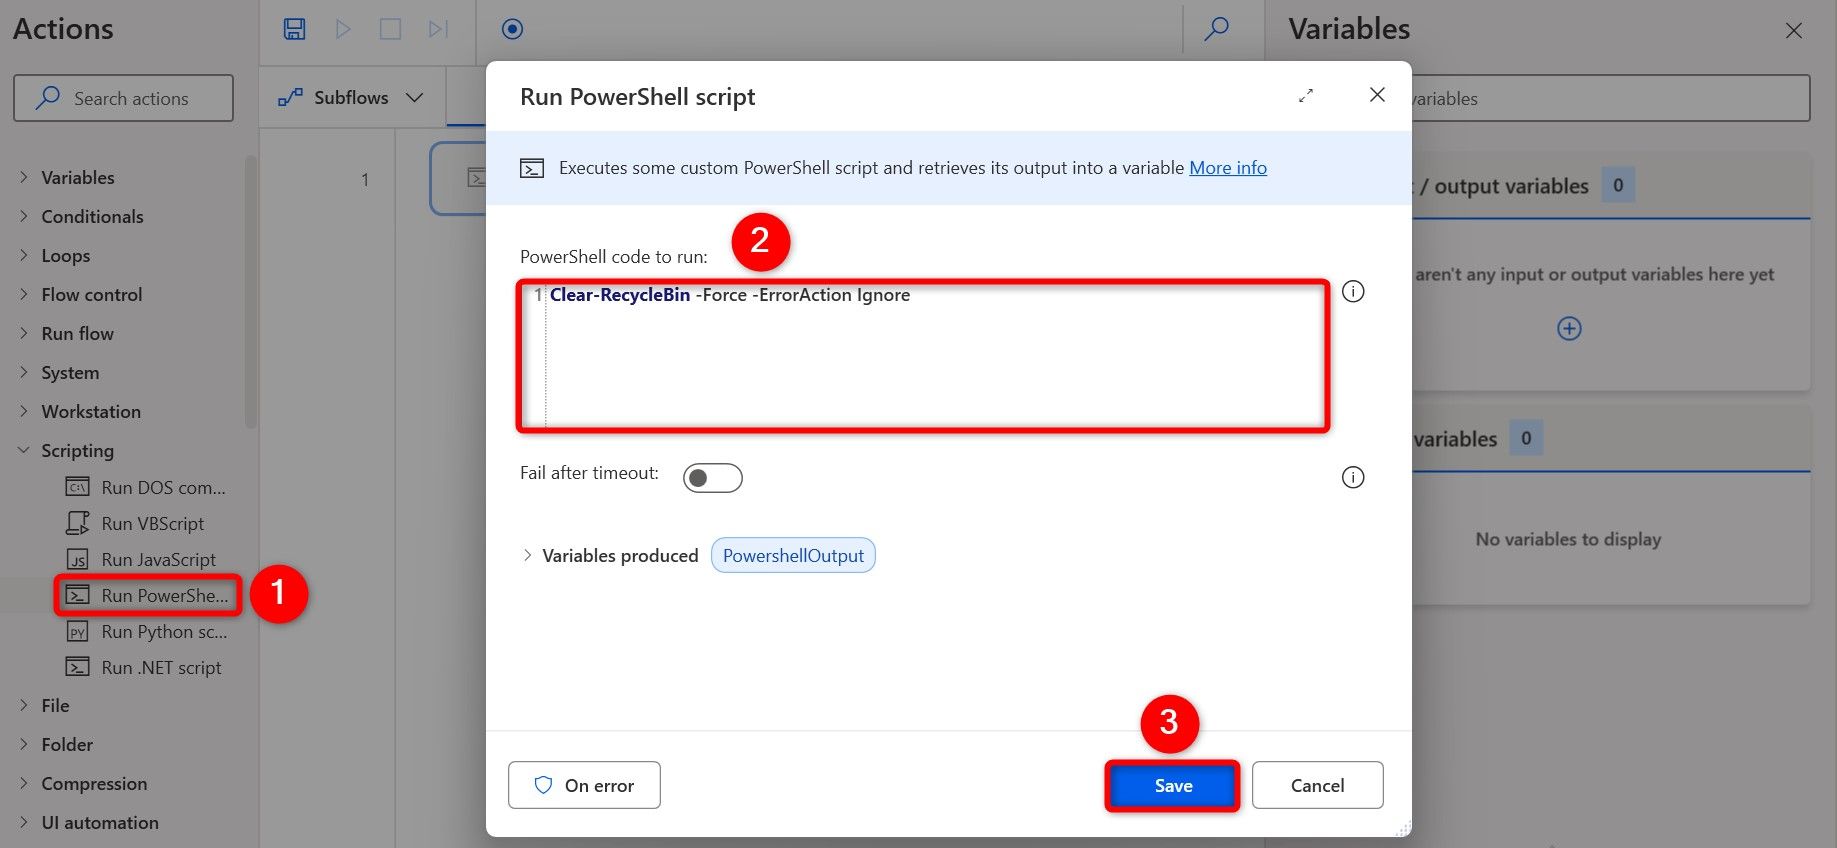
In the left sidebar, expand “Scripting” and double-click “Run PowerShell Script.” Click the “PowerShell Code to Run” box and type the following code. This code empties the contents of Recycle Bin. Then, at the bottom, choose “Save.”
Clear-RecycleBin -Force -ErrorAction Ignore
To run the flow, click “Run” at the top. It will immediately clear Recycle Bin.
Automatically Archive Old Files
You can automatically archive files older than the specified number of days, making it easier to find fresh files. You can archive your files by moving them to a different folder or adding them to a ZIP archive. I’ll show you how to do the former.
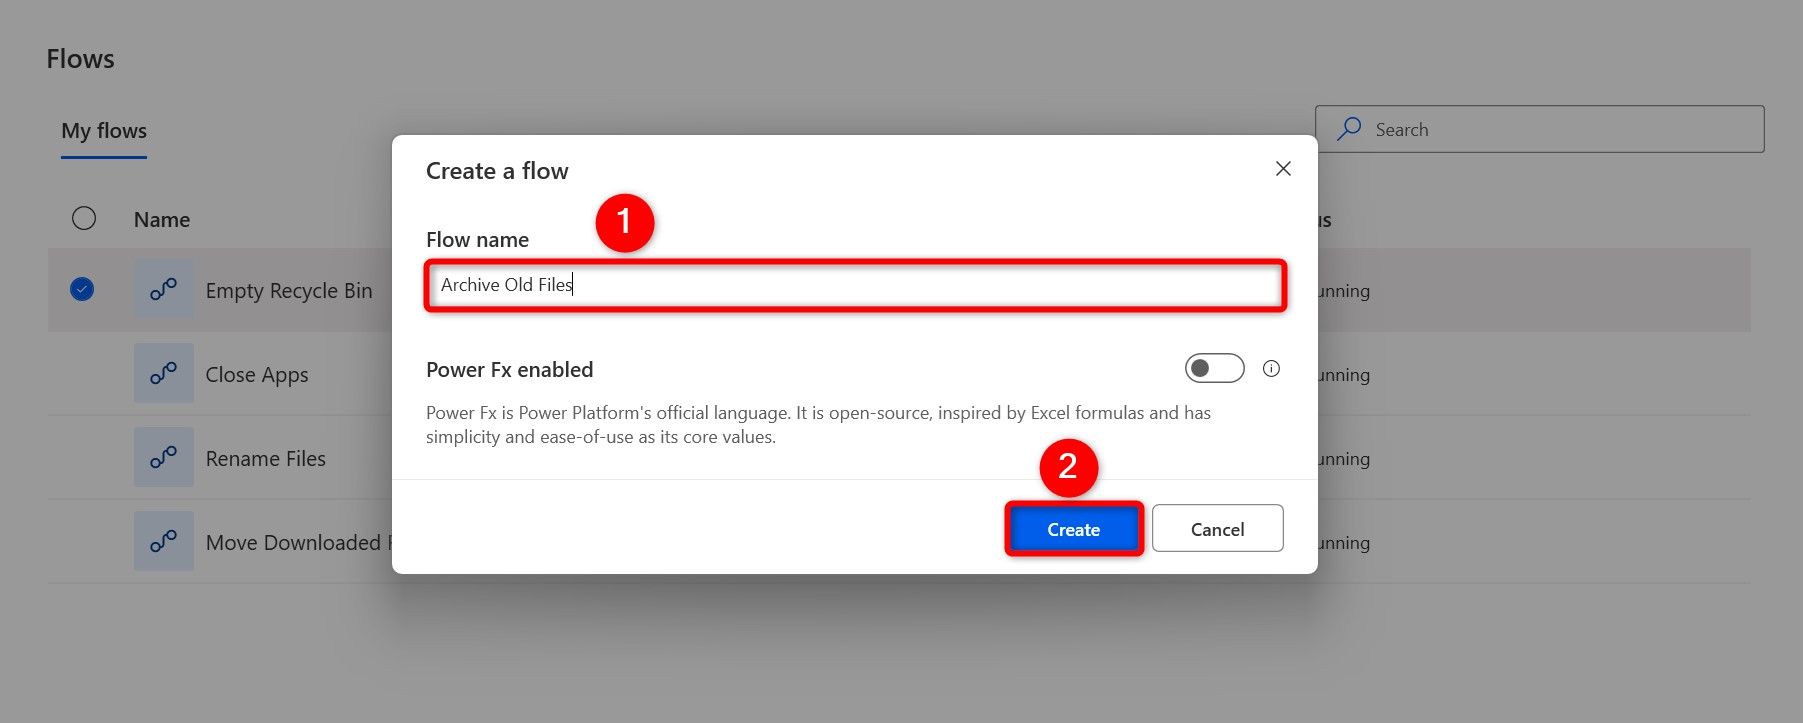
To start, launch Power Automate and select New > Flow. Click the “Flow Name” field and type Archive Old Files. Then, choose “Create.”
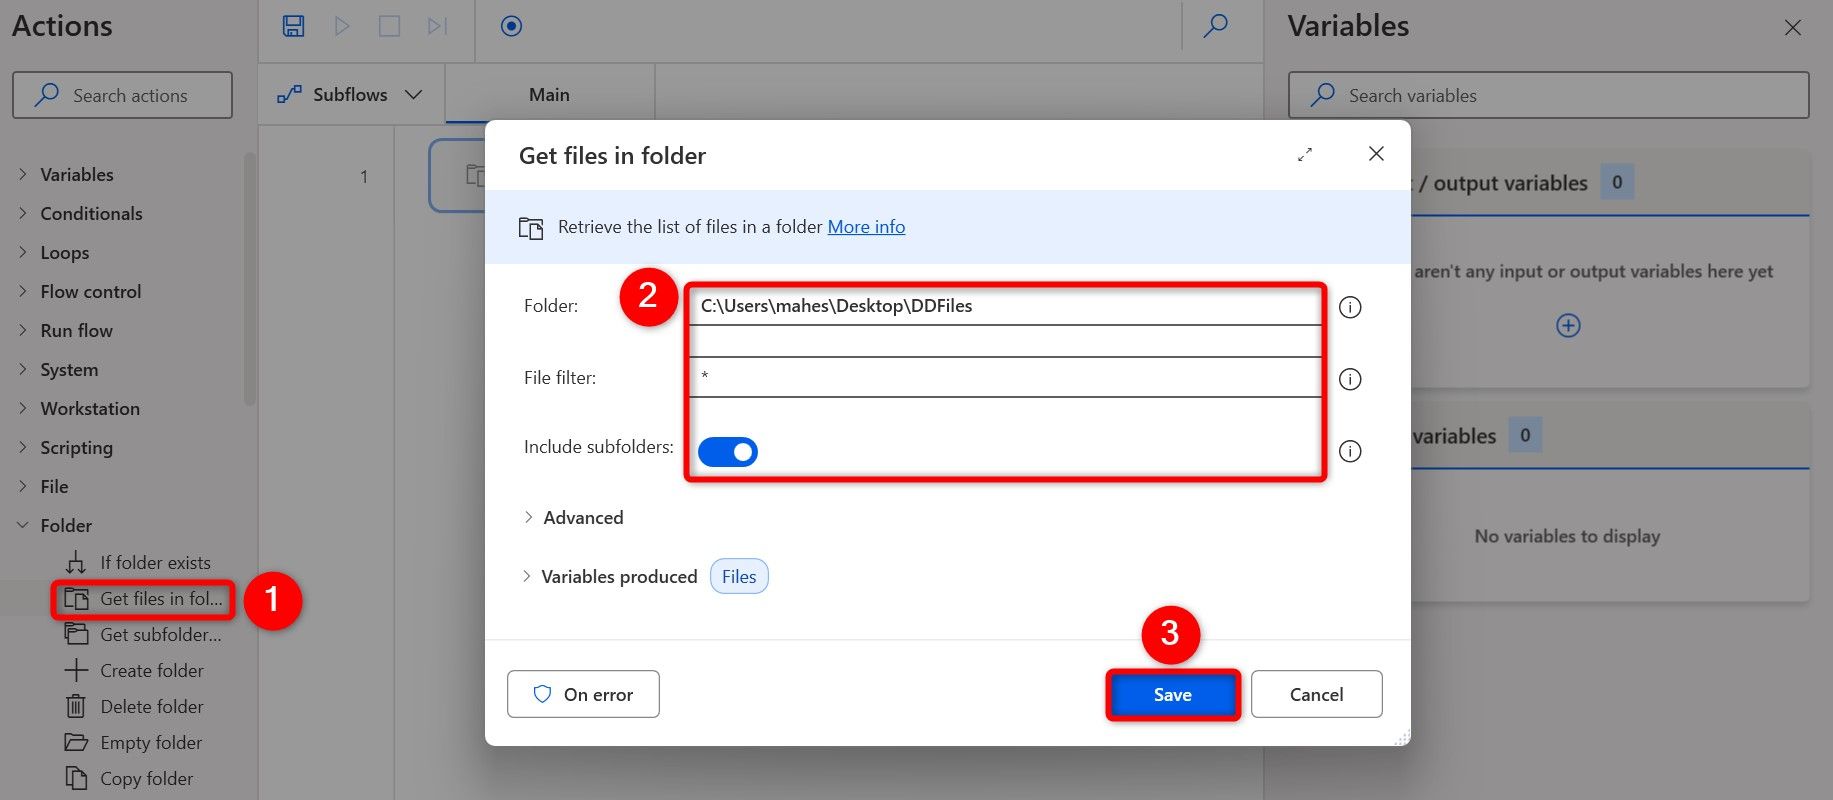
In the left sidebar, expand “Folder” and double-click “Get Files in Folder.” Choose the “Folder” field and select the folder from which you want to archive files. Keep the “File Filter” field as is to include all files. Turn on “Include Subfolders” to include subfolders from your selected folder. Then, click “Save.”
From the left sidebar, expand “Loops” and double-click “For Each.” Select the “Value to Iterate” field and choose the “Files” variable. Then, click “Save.”
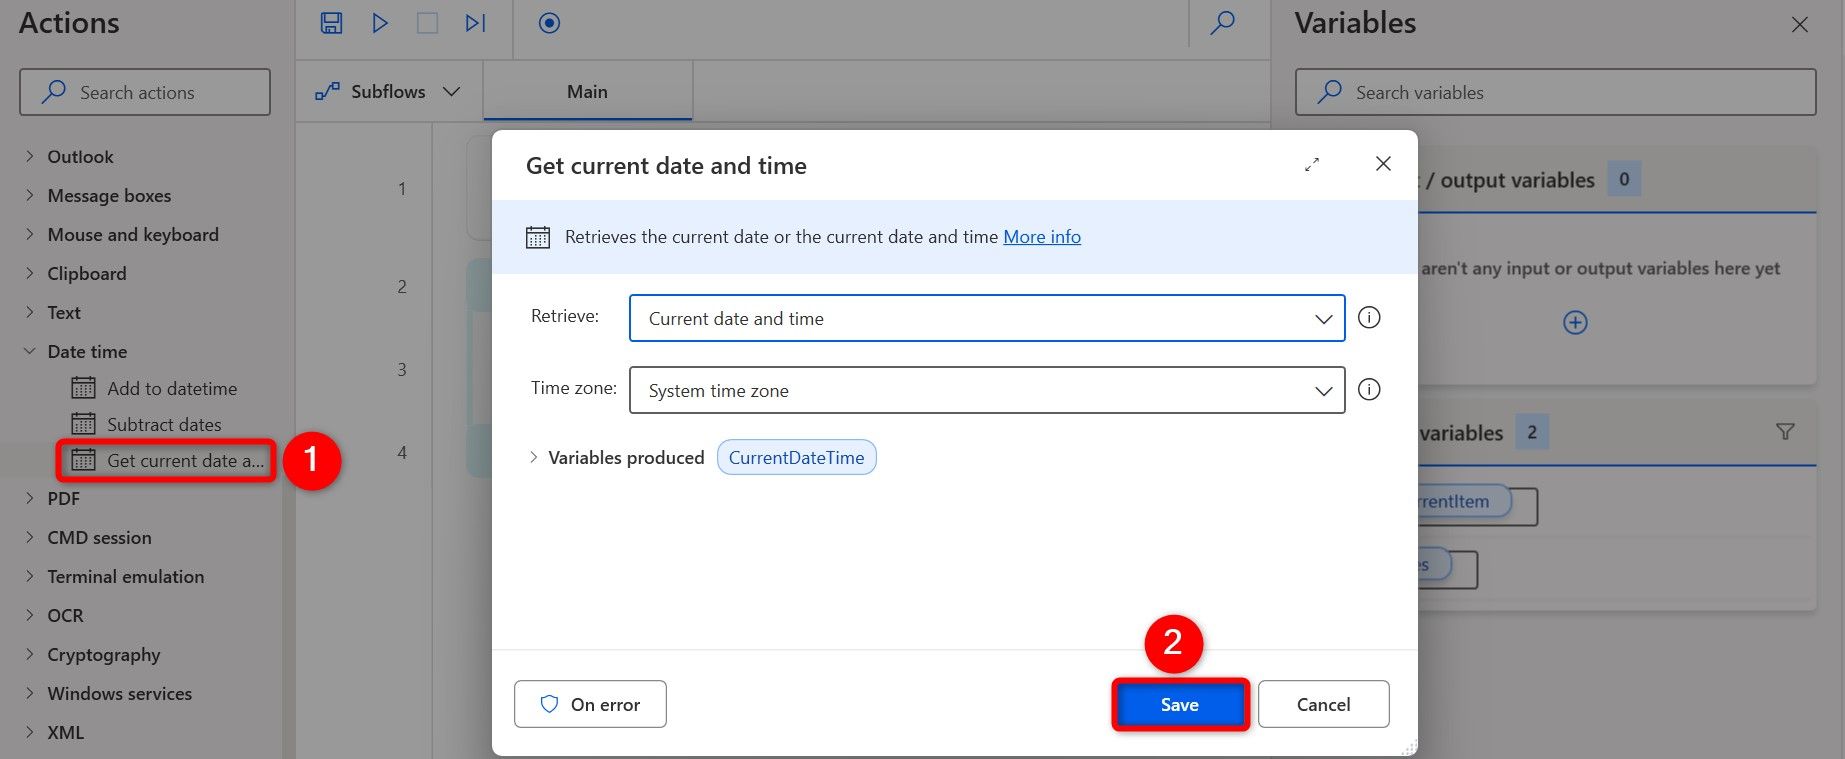
In the left sidebar, expand “Date Time” and double-click “Get Current Date and Time.” Then, choose “Save.”
On the left, in the Date Time section, double-click “Subtract Dates.” Click the “From Date” field and select “CurrentDateTime.” Choose the “Subtract Date” field and select CurrentItem > CreationTime. In the “Get Difference In” field, choose “Days.” Then, select “Save.”
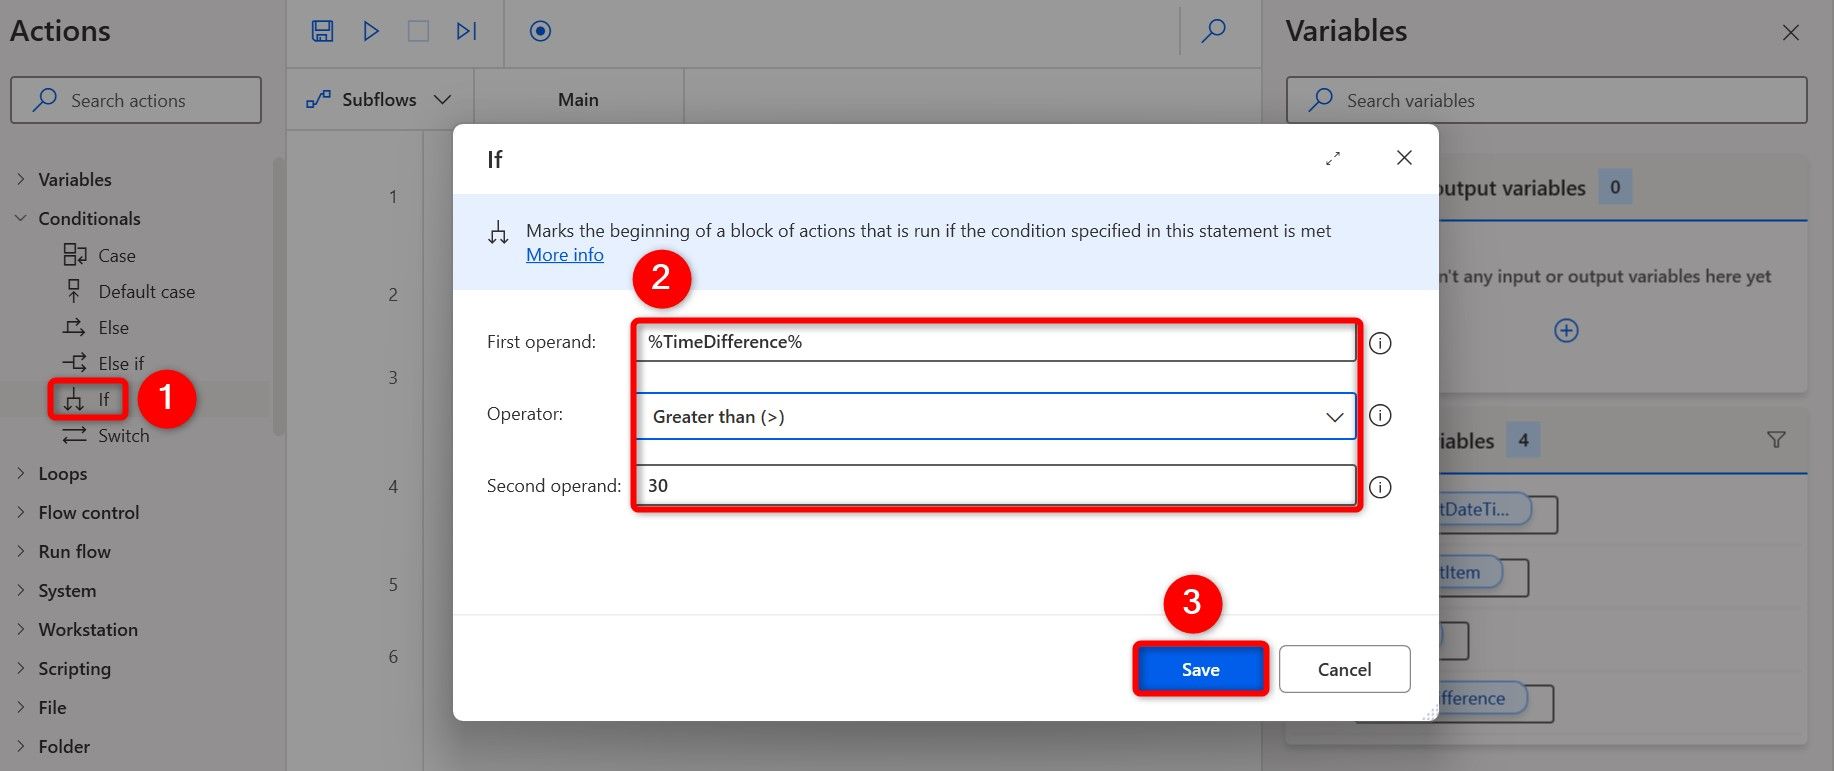
In the left sidebar, expand “Conditionals” and double-click “If.” Click the “First Operand” field and select the “TimeDifference” variable. Click the “Operator” drop-down menu and choose “Greater Than.” Select the “Second Operand” field and type the number of days after which a file is ready to be archived. Then, click “Save.”
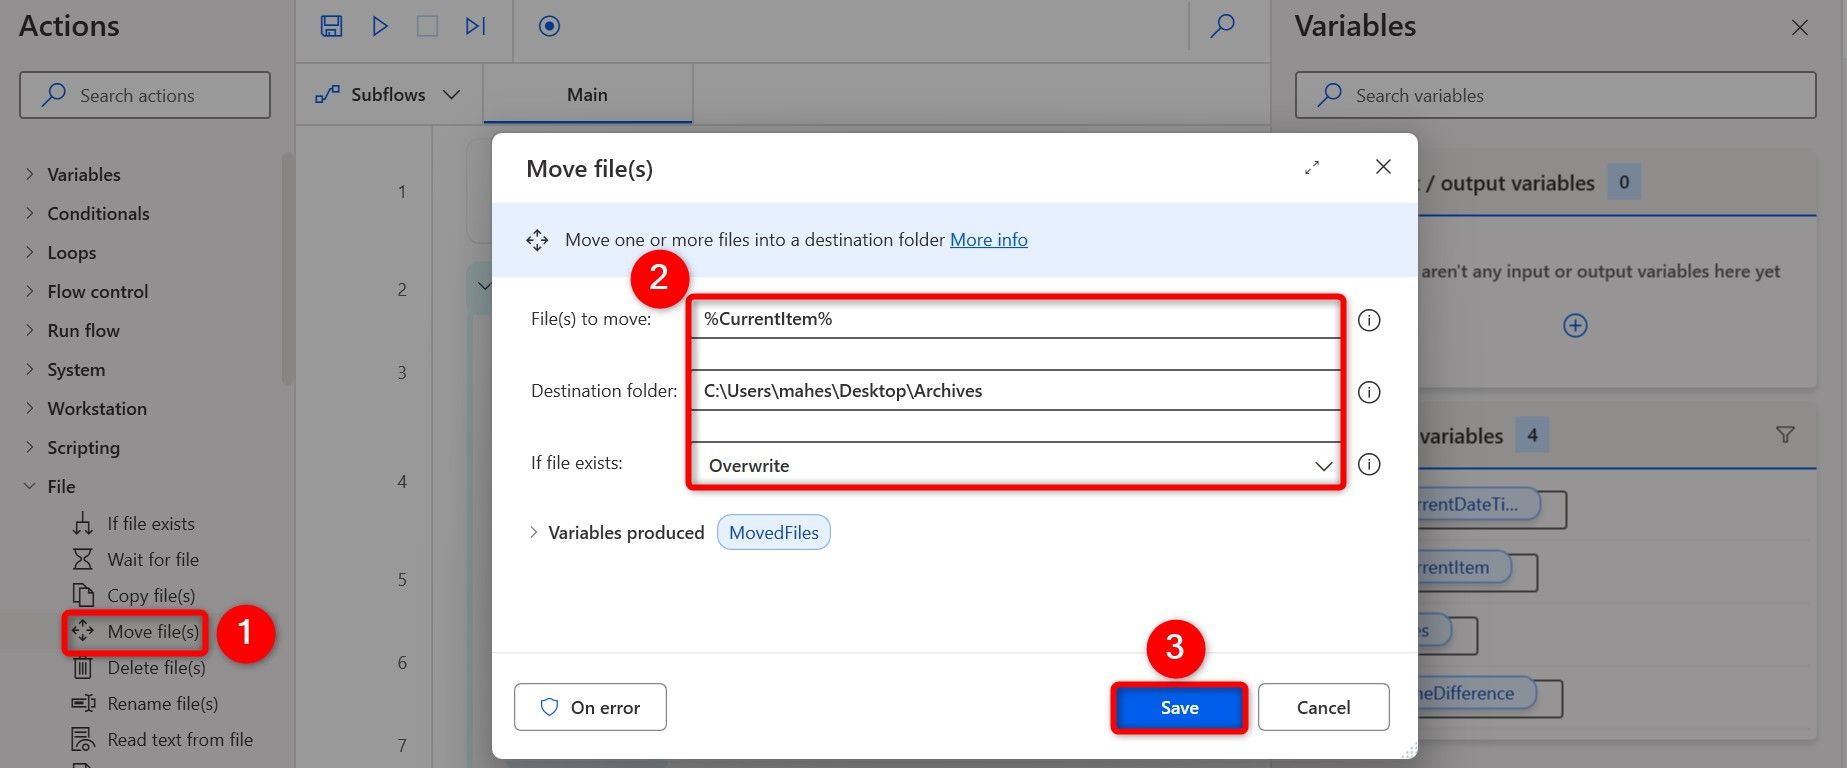
Expand “File” in the left sidebar and double-click “Move File(s).” Select the “File(s) to Move” field and choose the “CurrentItem” variable. Select the “Destination Folder” field and choose the folder where you want to save the archived files. Select the “If File Exists” drop-down menu and choose what to do if the file to archive already exists in the destination folder. Then, select “Save.”
Click “Run” at the top to run the flow.
How to Manage and Schedule Flows in Power Automate
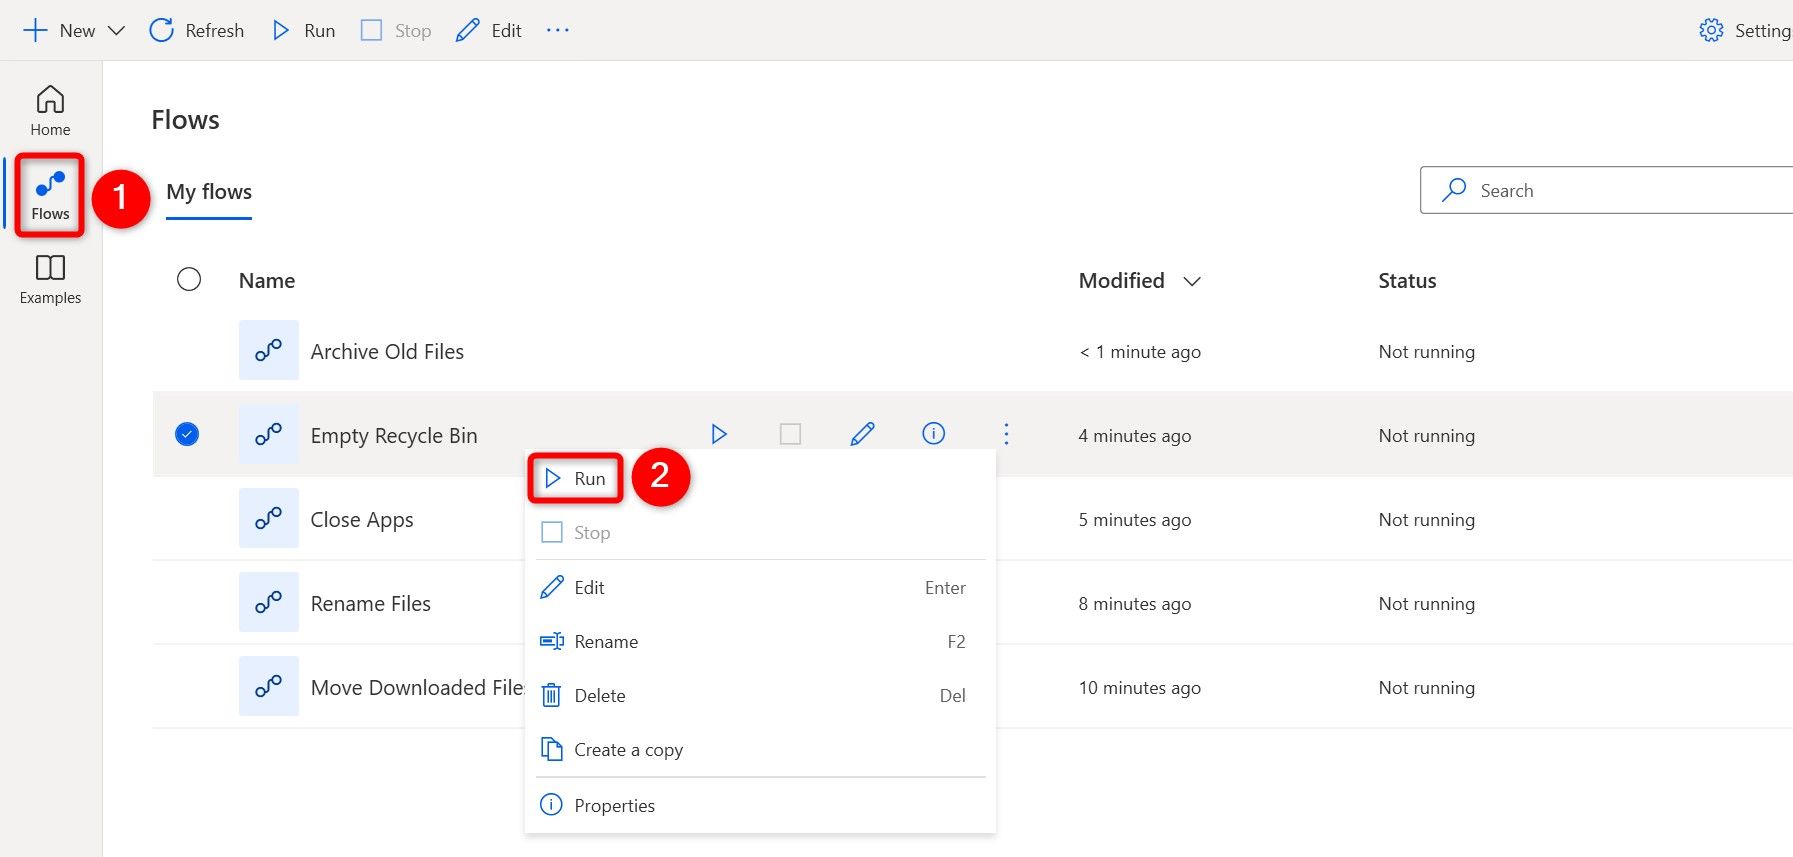
After creating your flows, you’ll find them all on the main interface of Power Automate. It’s from here that you can edit your flows, delete your flows, and run your flows.
To run a flow, in Power Automate’s left sidebar, click “Flows.” Find the flow to run, right-click it, and choose “Run.” Feel free to select any other action you want to perform on your flow.
Power Automate doesn’t offer the feature to schedule flows, but you can use this app in conjunction with Task Scheduler to schedule your flows. This allows you to run your created flows at the specified date and time automatically.
And that’s how you use Power Automate to automate various tasks on your Windows 11 PC. You can play around with many other flow variations to create just the kind of flow you want. And like that, you can also use batch files to automate many tasks on your PC.


