10 Google Wallet Features You Should Be Using
Android
Quick Links
-
A Digital ID for TSA Checkpoints
-
Pay While Offline
-
Save Passes From an Image
-
Pay for Public Transit on Your Vacation
-
Save Your Student ID, Corporate Badge, or Hotel Key
-
Store Your Health Insurance Card
-
Turn Off Notifications for Passes You No Longer Want to Receive
-
Use Wallet on Your NFC-Enabled Fitbit
-
Quickly Save Passes to Wallet From Messages
-
Transfer a Card or Pass to Another Device
After years of jumping between Google Pay and Google Wallet, the company finally settled on Google Wallet as its one-stop destination for everything from contactless payments to digital IDs. Here are some of its helpful features to make your life easier.
10
A Digital ID for TSA Checkpoints
If you often fly domestically, Google Wallet’s digital ID feature can be pretty helpful. It works at select TSA checkpoints in the US right now, but the number is gradually increasing. It eliminates the need to fumble for your physical ID, providing a seamless and secure travel experience. However, it’s crucial to carry your physical ID as a backup.
You can create a digital ID in Google Wallet using select state-issued IDs, driver’s licenses, and US passports.
Creating your digital ID pass is relatively painless. All you need is a phone with Android 9 or a newer version, a screen lock set up, and “Bluetooth and Nearby devices” turned on. You can start by opening the Wallet app and tapping the “Add to Wallet” option. Then, navigate to “ID” and follow the on-screen instructions.
The process includes taking photos of your ID and recording a short video of yourself. If you’re using your passport for the digital ID pass, you will also need to scan the chip on the back of it, and for this, your phone must have NFC support.
Google will then send the ID issuer your information for verification, and once it is verified, your digital ID will be added to the app.
It’s important to remember that digital IDs won’t work everywhere and aren’t a replacement for physical IDs. The TSA website has the latest list of airports that support digital IDs.
9
Pay While Offline
You may not know it, but you can pay using Google Wallet even when your phone does not have data access. This is pretty handy as there is no guarantee that you’ll get a good data connection everywhere you go. The only time you need data access is while adding a new card. Otherwise, when you are paying for something, you can pay without worrying about connectivity.
You will still need to connect Google Wallet to the internet occasionally. This is because the Wallet app securely keeps select one-time-use codes that are utilized while you are making a payment. However, depending on how often you use Tap to Pay, these codes will get exhausted if your phone is offline for a long duration, like days or weeks.
If the app is having trouble loading your cards in a poor network area, it’s best to disable data access entirely so that the app works seamlessly. You can re-enable it after your transaction has gone through.
8
Save Passes From an Image
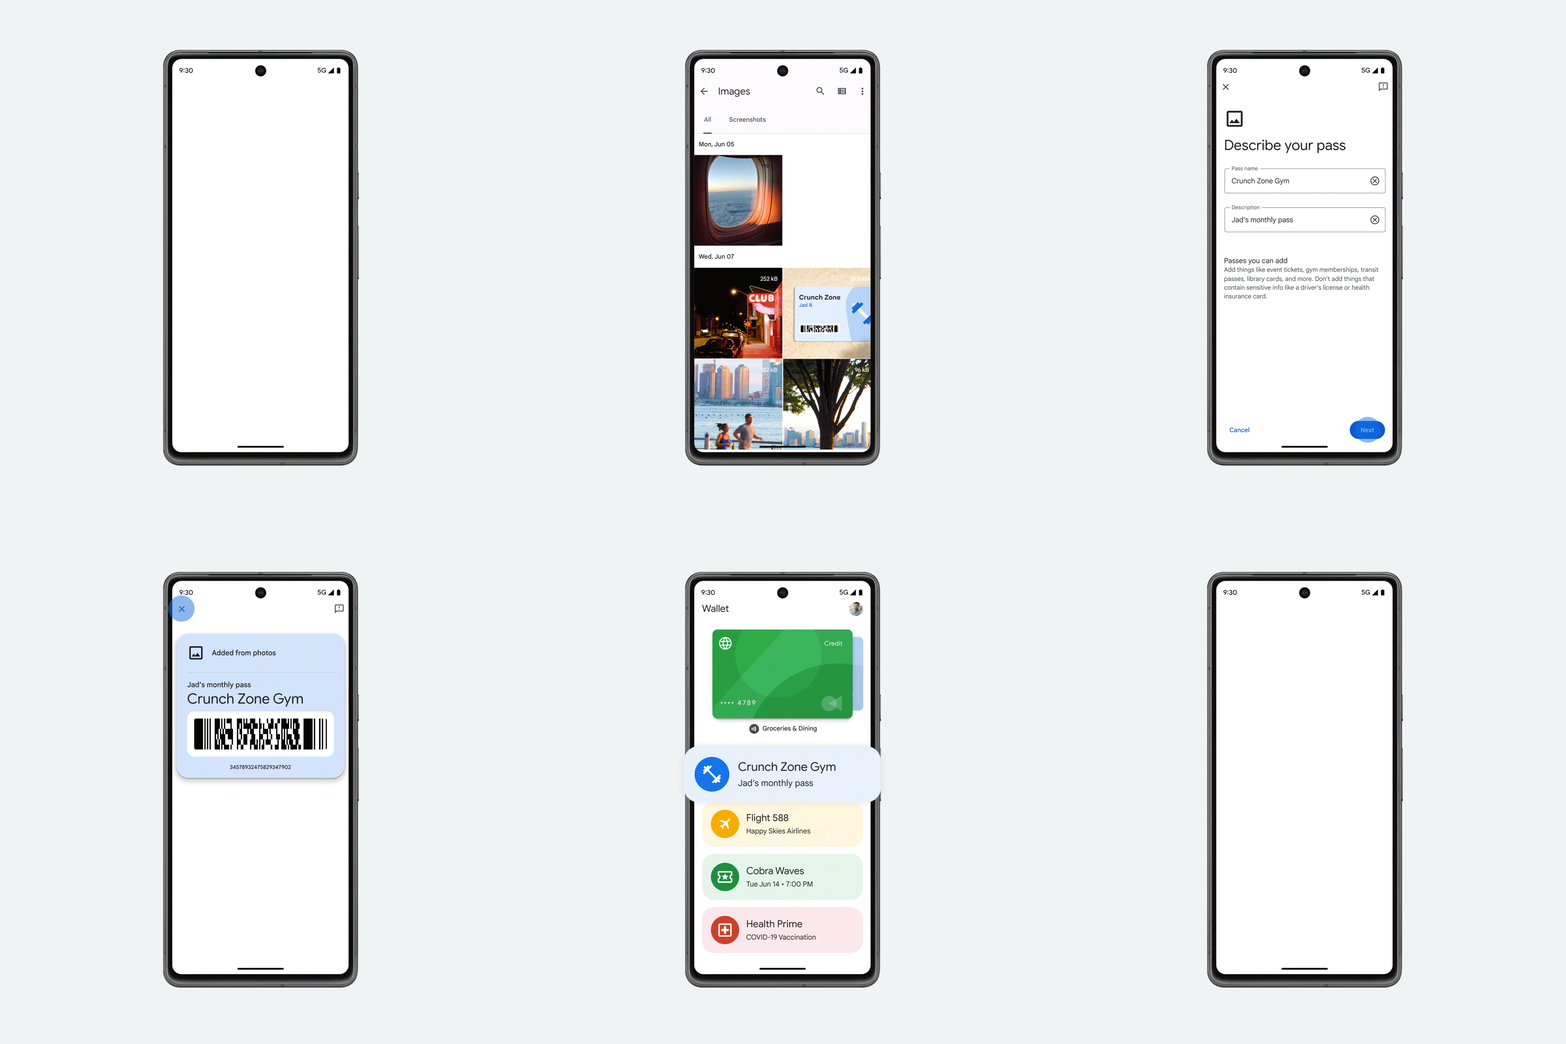
Google Wallet can store a variety of passes and cards. But still, many of us have cards and passes that don’t fit in any of the app’s predefined categories. Worry not! If any of such passes have a barcode or QR code, you can digitize them in Google Wallet, use those digital copies whenever you need, and stop worrying about losing the physical copy.
To save a pass from a photo, tap “Add to Wallet,” choose the Photo option, and follow the on-screen instructions.
7
Pay for Public Transit on Your Vacation
Contactless payments are growing worldwide, and if you’re planning a vacation, you may be able to pay using Google Wallet while using public transit. This takes some hassle out of using public transit. More importantly, with select transit agencies, such as Brighton and Hove Buses in the UK, Google Wallet will even show your ride history, any savings you made, and more. However, not all public transit systems support contactless payments just yet.
Besides, you can use Google Wallet to store your public transit ticket with select systems around the world. For example, you can save ORCA transit cards in Seattle, iPASS Card in Taiwan, Octopus Card in Hong Kong, and Deutschlandticket in Germany.
6
Save Your Student ID, Corporate Badge, or Hotel Key
Google Wallet is pretty versatile, and apart from your digital IDs, it allows you to save select access cards, such as student IDs, corporate badges, and hotel keys. With this, you can seamlessly access your school, office, or office with just your phone. It’s important to note that you’ll only be able to do this if the ID issuer supports the functionality.
Access cards are typically added through the apps or websites of the respective institutions. To add an access card, open the app or website and sign in. Then, navigate to your access card section, and you will see the “Add to Google Wallet” option. Tap on it and follow the on-screen instructions. Sometimes, you may get the option to add the access card through an email. Like the app or website, you simply have to tap on the “Add to Google Wallet” and continue.
Contact your school, office, or hotel to find out whether or not they support digital access. Some places offering digital access include select Hilton locations and the University of Notre Dame.
5
Store Your Health Insurance Card
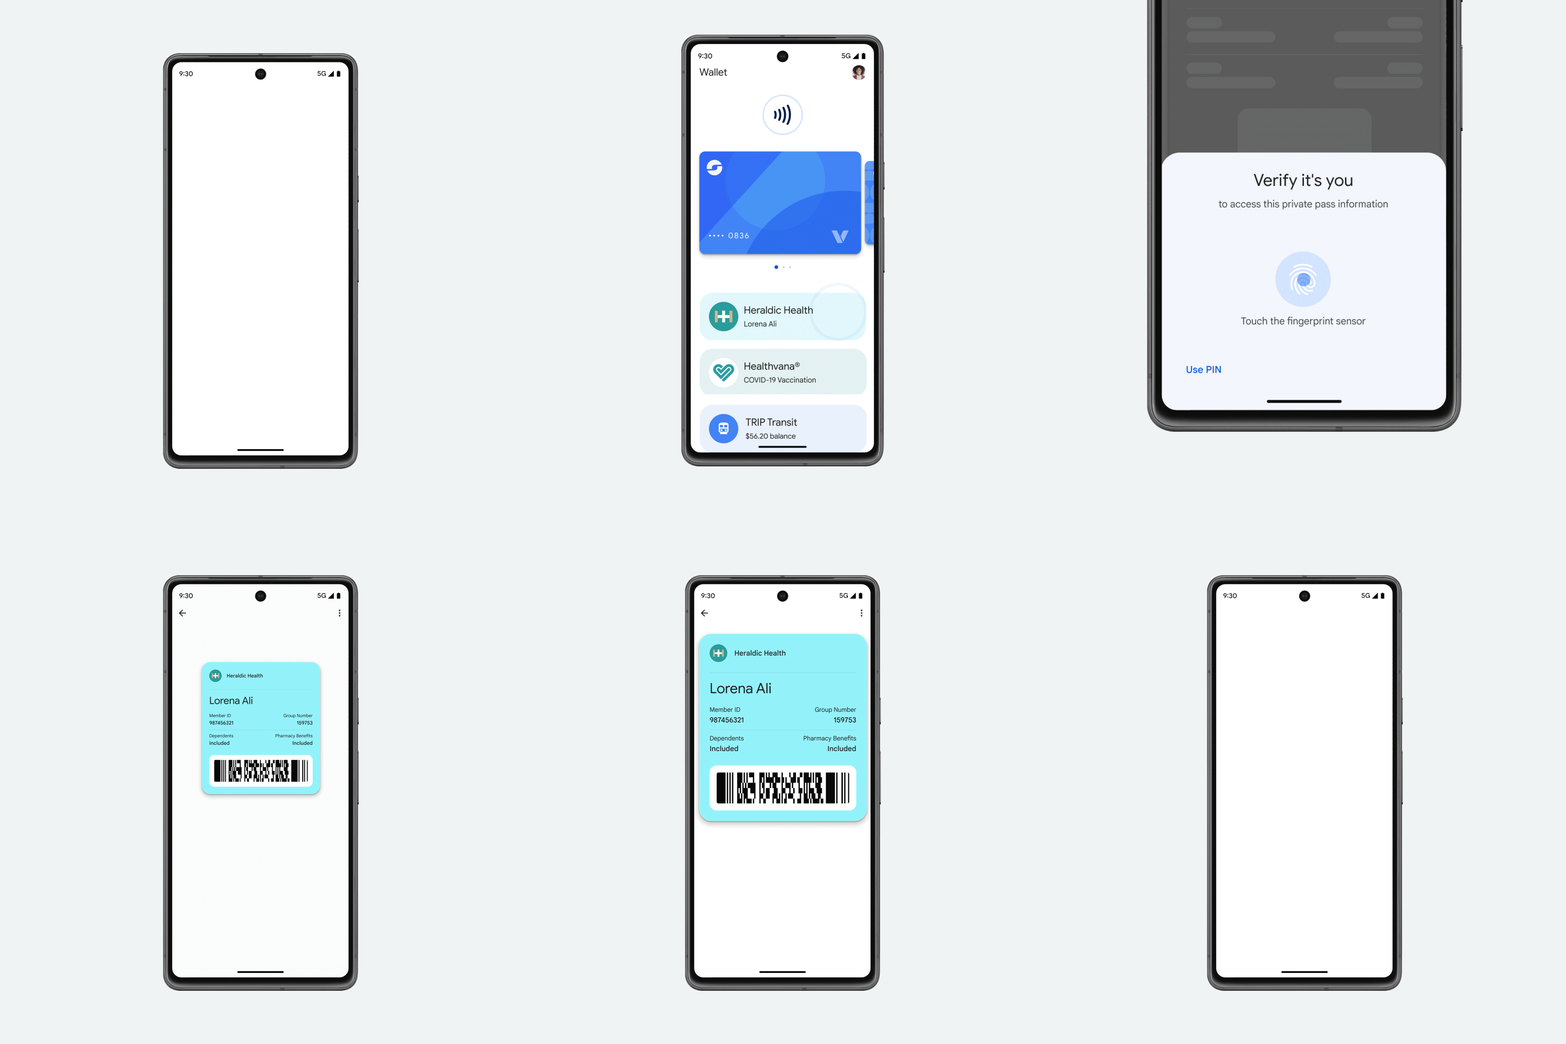
Select insurers, such as Humana, allow you to add your health insurance card to Google Wallet for easy access. Adding your health insurance card is similar to adding your student ID or corporate badge. You will need to use your health insurer’s official app and go to the member ID card section in the app. You will then see the “Add to Google Wallet” option. If you don’t see the option, your insurer likely doesn’t support Google Wallet right now.
Remember that you can’t add a health insurance card directly from the Wallet app. You’ll have to add it through the insurer’s app. Moreover, as these cards have private and sensitive data, they require verification to access or add to your Google Wallet.
4
Turn Off Notifications for Passes You No Longer Want to Receive
There is no shortage of notifications on our phones, and many of them are unnecessary. So, if you are tired of getting notifications from specific passes or cards in your Google Wallet, you can disable them for a little peace of mind.
To turn off notifications for a pass, open the Google Wallet app on your phone. Then, open the pass whose notifications you want to turn off and tap on the options icon in the top right corner of the pass. You will now see the notifications option. Turn the toggle off to stop getting notifications for that card or pass.
3
Use Wallet on Your NFC-Enabled Fitbit
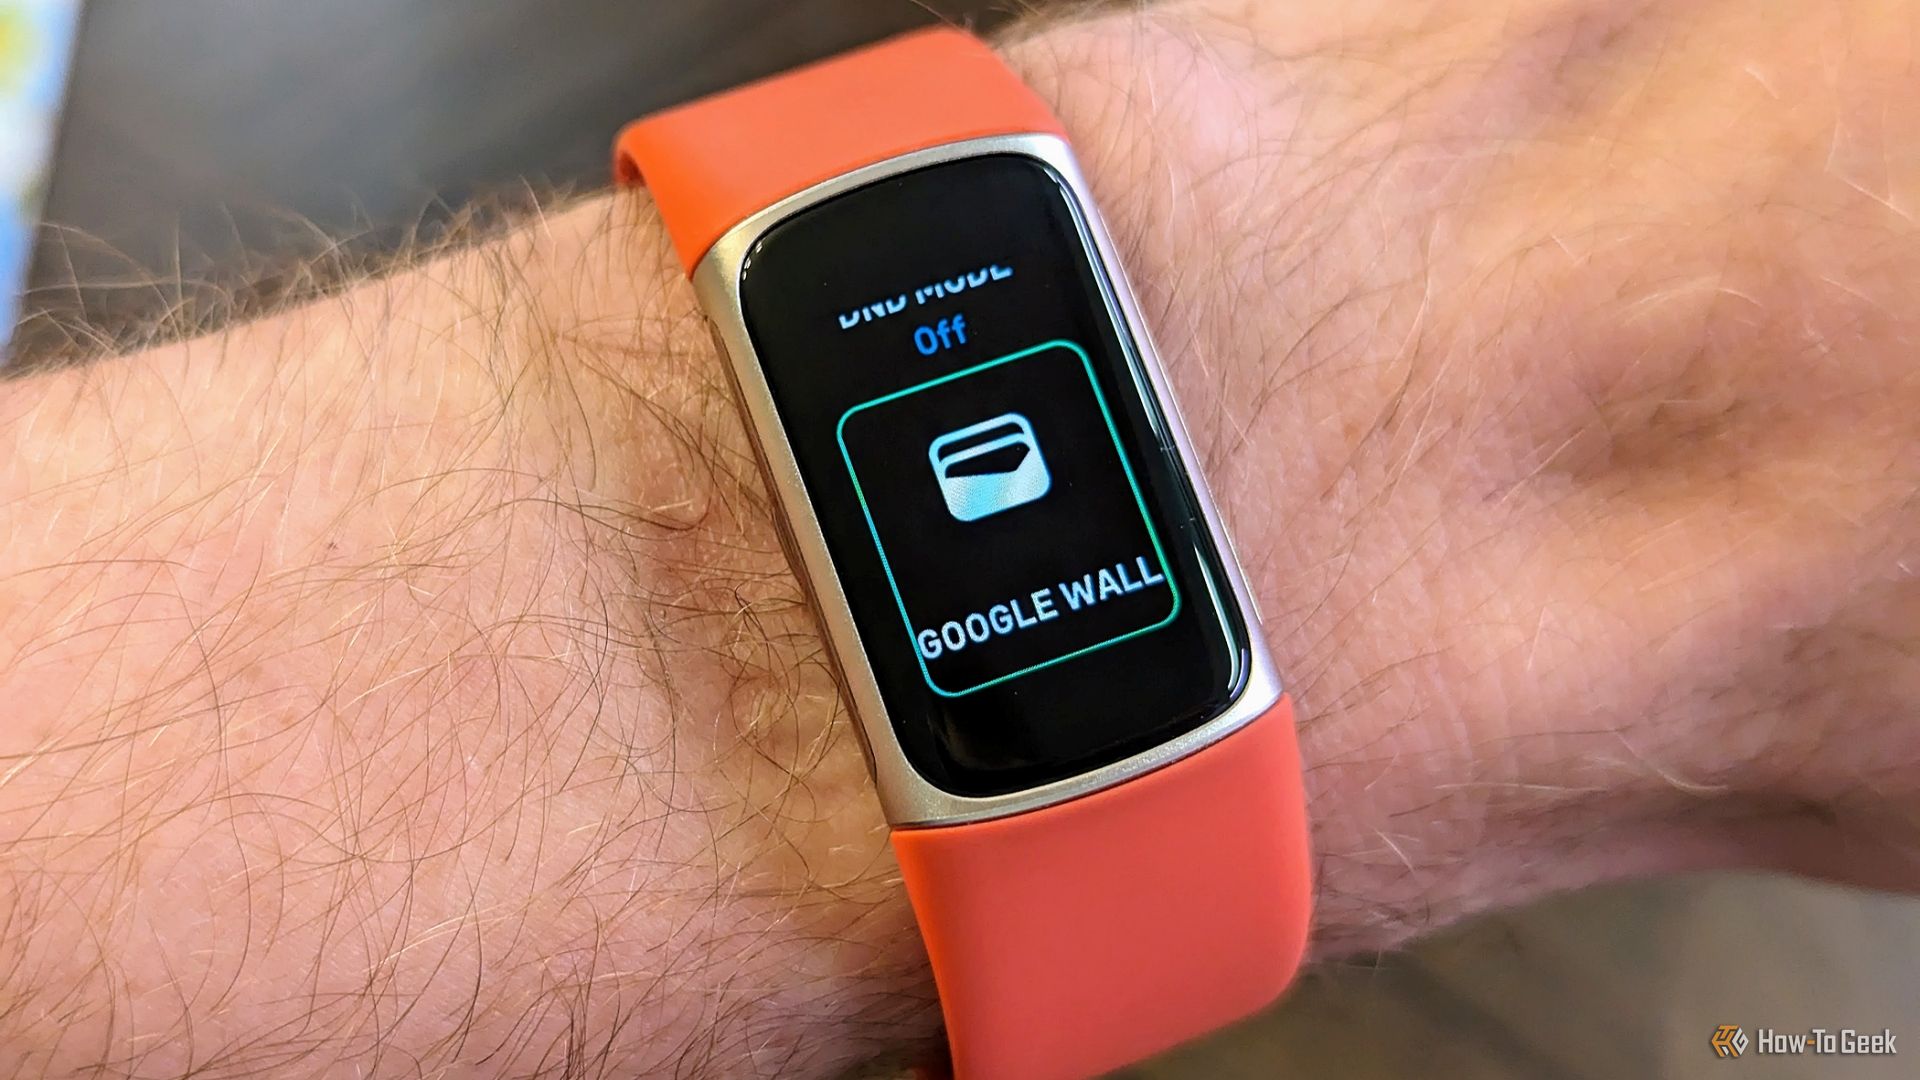
Apart from your Wear OS smartwatch, you can use the Google Wallet on any NFC-enabled Fitbit smartwatch or tracker. For example, the Fitbit Versa 4, Fitbit Sense 2, and Fitbit Charge 6 support the app. Google Wallet support for the various Fitbits is vital because the company shut down Fitbit Pay on January 13, 2025. So, if you need to make a contactless payment using your Fitbit, you’ll need to use Google Wallet.
2
Quickly Save Passes to Wallet From Messages
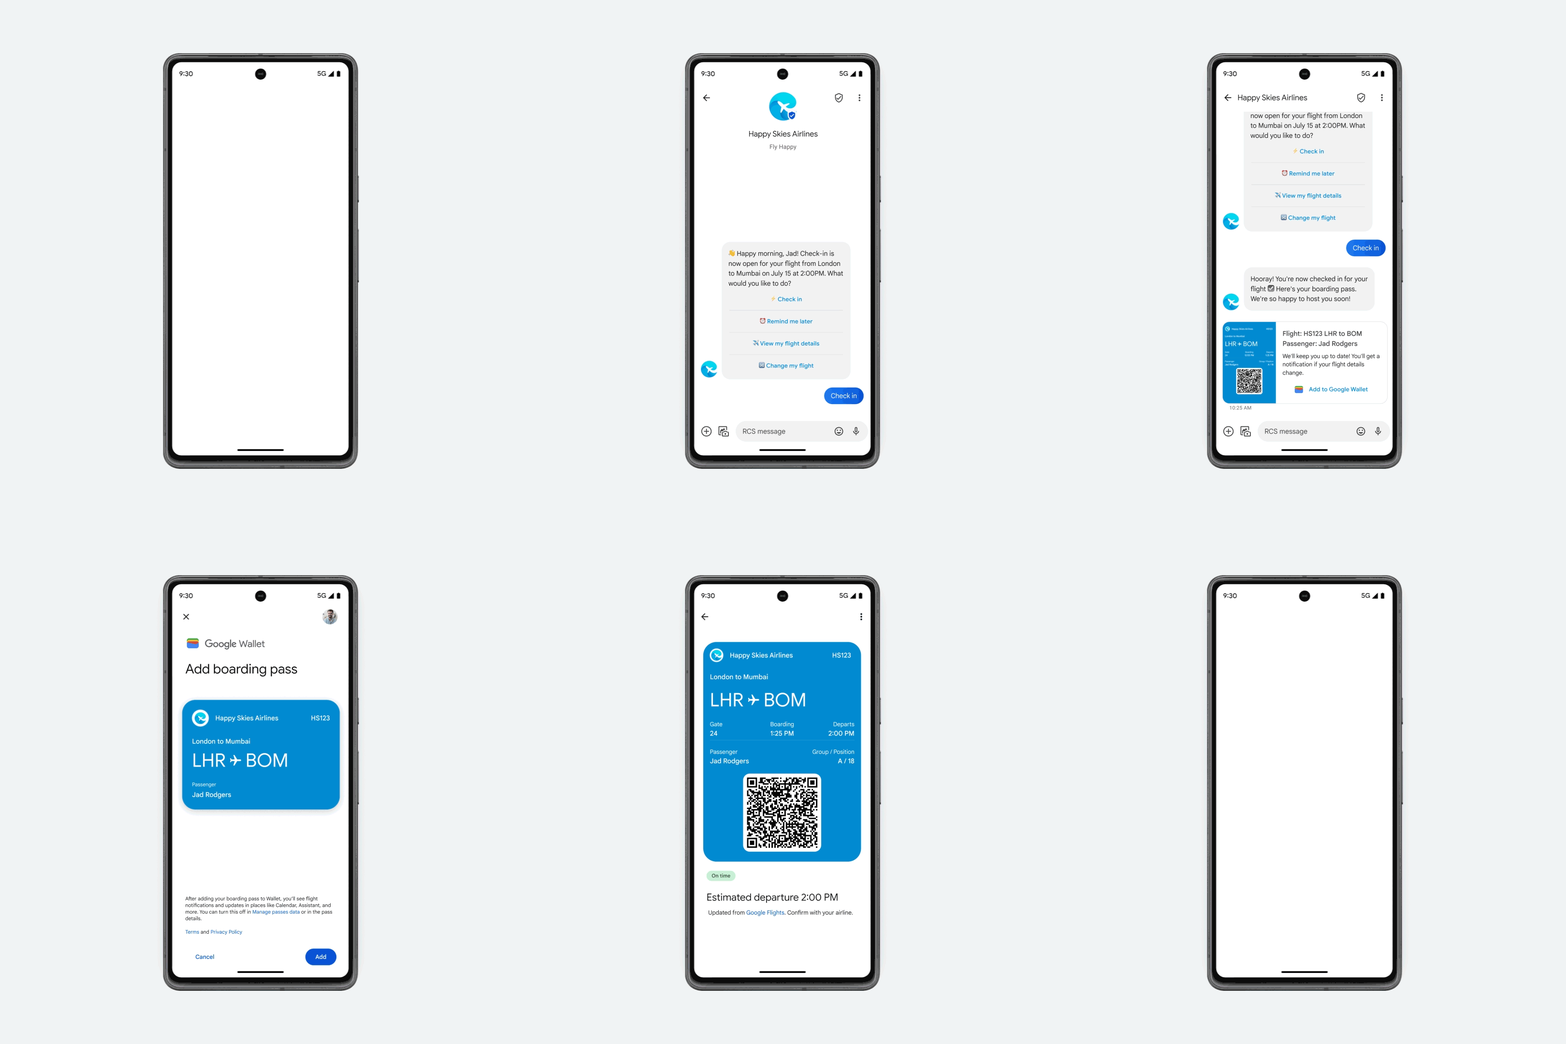
There are various ways to save a boarding pass, train ticket, or restaurant reservation received from a business. You can add it using the business’s app, website, or email. Some of these require more effort than others. But there is an even simpler way: using the Messages app if you have RCS enabled.
If your airline, train service provider, or restaurant sends a pass using an RCS message, you can directly add it to Google Wallet. All you have to do is tap the “Add to Google Wallet” option next to the message in the Messages app.
1
Transfer a Card or Pass to Another Device
While some cards and passes, such as loyalty cards, gift cards, event tickets, and boarding passes, will automatically appear in Google Wallet on any device you sign in with the same Google account, others are restricted to one device. Such passes and cards include your bank cards, transit passes, digital and access IDs, car keys, private passes, and more. If you have any such cards or passes and are migrating devices, you can transfer them at the time of setting up the new device.
The easiest way to transfer your cards and passes from one device to another is using device-to-device transfer or restoring a cloud backup while setting up the new device. When you are setting up the new device, and you get the option to transfer or restore the backed-up data from your older phone, make sure to select the Google Wallet app to transfer its data. This method will work for specific cards and passes but not necessarily all.
For others, you’ll first have to delete the cards and passes from the older phone and then manually add them to the new phone.
The Google Wallet app has a lot to offer, and Google has consistently enhanced its feature set. So, if you have been staying away from it for some reason, it’s a good time to check it out. Apart from all the valuable features mentioned here, you can use it to store your loyalty cards, gift cards, event tickets, boarding passes, digital car keys, and much more.


